Sharp 4W-B55FT5U Setup guide - Page 10
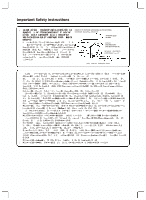
Mounting Precautions, For SHARP ²eaLers an² service engineers
 |
View all Sharp 4W-B55FT5U manuals
Add to My Manuals
Save this manual to your list of manuals |
Page 10 highlights
Mounting Precautions ( For SHARP dealers and service engineers) • When installing, removing or moving the monitor, ensure that this is carried out by at least 4 people. Be sure to use a wall-mount bracket designed or designated for mounting the monitor. This monitor is designed to be installed on a concrete wall or pillar. Reinforced work m ight be necessary for some materials such as plaster / thin plastic board / wood before starting installation. • This monitor and bracket must be installed on a wall which can endure at least 4 times or more the weight of the monitor. • I nstall by the most suitable method for the material and the structure. To attach a VESA-compliant mounting bracket, use M6 screws which are set-top-box for 55 inch and 65 inch models. Use M8 screws for 75 inch and 86 inch models. For the screws, refer to the table shown below. 4W-B55FTSU and 4W-B65FTSU Standard screws Length( Depth of mounting holes) Qua ntity M6 (1.0 pitch) I Upper side 33 mm I Lower side 10 mm 4 pcs. (set in the box) 4W-B75 FTS U MS (1.25 pitch) 24 m m 4 pcs. 4W-BS6FTS U MS (1.25pitch) 30 mm 4 pcs. For 4W-B55FT5U / 4W-B65FT5U *Longer screws (for Upper side) For 4W-B75FT5U /4W- B 8 6 F T 5 U 1 5/1 6 inch (24 m m ) / 1 - 1 1 /64(30 m m ) 1,i I� *Shorter screws (for Lower side) Screws (M8) Mounting bracket � Monitor mounting □ Do not use an impact driver. • When moving the monitor, be sure to hold the a rea marked by below. Do not grasp the screen . This may cause product damage, failure, or injury. [4W-B55FT5U, 4W-B65FT5U, 4W-B75FT5U and 4W-B86FT5U] If you need to temporarily place the monitor on a table or other surface during installation, spread a thick so cloth on the table to prevent damage to the screen and table. After mounting, please carefully ensure the monitor is secure, and not able to come loose from the wall or mount. Do not use any screw holes other than those for mounting b rackets, localed on the rear of the monitor, for installation. 9
-
 1
1 -
2
-
3
-
4
-
 5
5 -
 6
6 -
 7
7 -
 8
8 -
 9
9 -
 10
10 -
 11
11 -
 12
12 -
 13
13 -
 14
14 -
 15
15 -
16
-
17
-
18
-
19
-
20
-
21
-
22
-
23
-
24
-
25
-
26
-
27
-
28
-
29
-
30
-
31
-
32
-
33
-
34
-
35
-
36
-
37
-
38
-
39
-
40
-
41
-
42
-
43
-
44
-
45
-
46
-
47
-
48
-
49
-
50
-
51
-
52
-
53
-
54
-
55
-
56
-
57
-
58
-
59
 |
 |
