Sharp AJ-6010 AJ6010 Operation Manual - Page 77
Aligning the Print Head
 |
View all Sharp AJ-6010 manuals
Add to My Manuals
Save this manual to your list of manuals |
Page 77 highlights
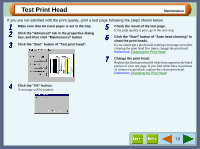
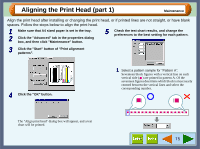
Aligning the Print Head (part 1) Maintenance Align the print head after installing or changing the print head, or if printed lines are not straight, or have blank spaces. Follow the steps below to align the print head. 1 Make sure that A4 sized paper is set in the tray. 2 Click the "Advanced" tab in the properties dialog box, and then click "Maintenance" button. 5 Check the test chart results, and change the preferences to the best setting for each pattern. 3 Click the "Start" button of "Print alignment patterns". 4 Click the "OK" button. The "Align print head" dialog box will appear, and a test chart will be printed. 1 Select a pattern sample for "Pattern A". Seventeen block figures with a vertical line on each vertical side ( ) are printed in pattern A. Of the seventeen figures determine which block is most nearly centred between the vertical lines and select the corresponding number. Example: -8 +8 A -8 -7 -6 -5 -4 -3 -2 -1 0 +1 +2 +3 +4 +5 +6 +7 +8 75
-
 1
1 -
2
-
3
-
4
-
5
-
6
-
7
-
8
-
9
-
10
-
11
-
12
-
13
-
14
-
15
-
16
-
17
-
18
-
19
-
20
-
21
-
22
-
23
-
24
-
25
-
26
-
27
-
28
-
29
-
30
-
31
-
32
-
33
-
34
-
35
-
36
-
37
-
38
-
39
-
40
-
41
-
42
-
43
-
44
-
45
-
46
-
47
-
48
-
49
-
50
-
51
-
52
-
53
-
54
-
55
-
56
-
57
-
58
-
59
-
60
-
61
-
62
-
63
-
64
-
65
-
66
-
67
-
68
-
69
-
70
-
71
-
 72
72 -
 73
73 -
 74
74 -
 75
75 -
 76
76 -
 77
77 -
 78
78 -
 79
79 -
 80
80 -
 81
81 -
 82
82 -
83
-
84
-
85
-
86
-
87
-
88
-
89
-
90
-
91
-
92
-
93
 |
 |
