Sharp AL 1655CS AL-1655CS Operation Manual - Page 51
the Next button., Enter the IP address - windows 7
 |
UPC - 074000074712
View all Sharp AL 1655CS manuals
Add to My Manuals
Save this manual to your list of manuals |
Page 51 highlights
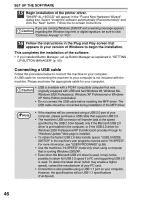
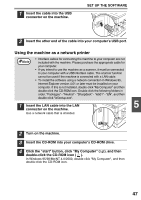
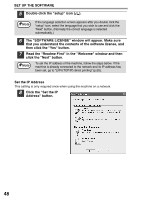
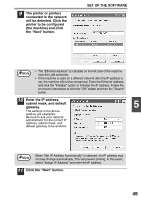
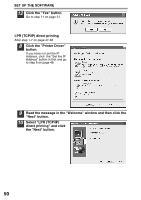
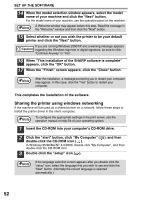
9 The printer or printers connected to the network will be detected. Click the printer to be configured (the machine) and click the "Next" button. SET UP THE SOFTWARE Note • The "Ethernet Address" is indicated on the left side of the machine near the LAN connector. • If the machine is used on a different network after the IP address is set, the machine will not be recognized. Enter the Ethernet Address and click the "Initialize" button to initialize the IP address. Follow the on-screen instructions to click the "OK" button and then the "Search" button. 10 Enter the IP address, subnet mask, and default gateway. 5 The settings in the above window are examples. Be sure to ask your network administrator for the correct IP address, subnet mask, and default gateway to be entered. Note When "Get IP Address Automatically" is selected, the IP address may at times change automatically. This will prevent printing. In this event, select "Assign IP Address" and enter the IP address. 11 Click the "Next" button. 49
-
 1
1 -
2
-
3
-
4
-
5
-
6
-
7
-
8
-
9
-
10
-
11
-
12
-
13
-
14
-
15
-
16
-
17
-
18
-
19
-
20
-
21
-
22
-
23
-
24
-
25
-
26
-
27
-
28
-
29
-
30
-
31
-
32
-
33
-
34
-
35
-
36
-
37
-
38
-
39
-
40
-
41
-
42
-
43
-
44
-
45
-
 46
46 -
 47
47 -
 48
48 -
 49
49 -
 50
50 -
 51
51 -
 52
52 -
 53
53 -
 54
54 -
 55
55 -
 56
56 -
57
-
58
-
59
-
60
-
61
-
62
-
63
-
64
-
65
-
66
-
67
-
68
-
69
-
70
-
71
-
72
-
73
-
74
-
75
-
76
-
77
-
78
-
79
-
80
-
81
-
82
-
83
-
84
-
85
-
86
-
87
-
88
-
89
-
90
-
91
-
92
-
93
-
94
-
95
-
96
-
97
-
98
-
99
-
100
-
101
-
102
-
103
-
104
-
105
-
106
-
107
-
108
-
109
-
110
-
111
-
112
-
113
-
114
-
115
-
116
-
117
-
118
-
119
-
120
-
121
-
122
-
123
-
124
 |
 |
