Sharp AR-M455N Printer Software - Page 12
Installation method 2
 |
View all Sharp AR-M455N manuals
Add to My Manuals
Save this manual to your list of manuals |
Page 12 highlights
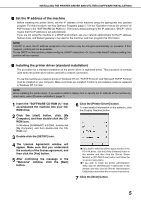
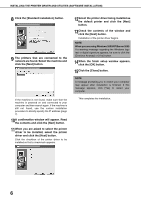
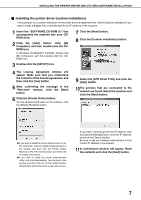
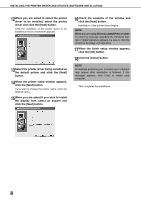
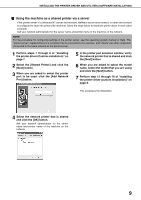
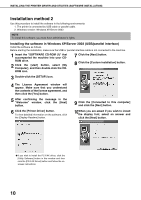
INSTALLING THE PRINTER DRIVER AND UTILITIES (SOFTWARE INSTALLATION) Installation method 2 Use this procedure to install the software in the following environments: 1. The printer is connected by USB cable or parallel cable. 2. Windows version: Windows XP/Server 2003 NOTE To install this software, you must have administrator's rights. Installing the software in Windows XP/Server 2003 (USB/parallel interface) Install the software as follows. Before starting the installation, make sure the USB or parallel interface cable is not connected to the machine. 1 Insert the "SOFTWARE CD-ROM (1)" that accompanied the machine into your CDROM drive. 2 Click the [start] button, select [My Computer], and then double-click the CDROM icon. 7 Click the [Next] button. 8 Click the [Custom installation] button. 3 Double-click the [SETUP] icon. 4 The License Agreement window will appear. Make sure that you understand the contents of the license agreement, and then click the [Yes] button. 5 After confirming the message in the "Welcome" window, click the [Next] button. 6 Click the [Printer Driver] button. To view detailed information on the software, click the [Display Readme] button. 9 Click the [Connected to this computer] and click the [Next] button. 10When you are asked if you wish to install the display font, select an answer and click the [Next] button. G If you wish to install the PC-FAX driver, click the [Utility Software] button in this window and then click the [PC-FAX Driver] button and follow the onscreen instructions. 10
-
 1
1 -
2
-
3
-
4
-
5
-
6
-
 7
7 -
 8
8 -
 9
9 -
 10
10 -
 11
11 -
 12
12 -
 13
13 -
 14
14 -
 15
15 -
 16
16 -
 17
17 -
18
-
19
-
20
 |
 |
