Sharp BD-HP17U BD-HP17U Operation Manual - Page 13
Major Components, Main Unit (Front), HDMI cable holder on the rear of the main unit - remote
 |
UPC - 074000354913
View all Sharp BD-HP17U manuals
Add to My Manuals
Save this manual to your list of manuals |
Page 13 highlights
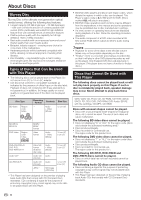
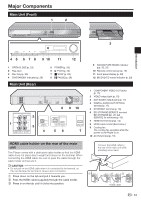
Major Components Main Unit (Front) 1 2 Introduction 3 4 5 6 7 8 9 10 11 12 1 OPEN/CLOSE (p. 23) 2 Flap door 3 Disc tray (p. 23) 4 ON/STANDBY indicator (p. 20) Main Unit (Rear) 5 POWER (p. 20) 6 d PLAY (p. 23) 7 H STOP (p. 23) 8 F PAUSE (p. 29) 8 9 10 2 1 3 4 56 7 HDMI cable holder on the rear of the main unit This Player comes with a dedicated cable holder so that the HDMI cable does not place direct weight and stress on the terminal. When connecting the HDMI cable, be sure to pass the cable through the cable holder and secure it. CAUTION • Do not pull on the HDMI cable when it is connected to the terminal, as this can damage the terminal or cause a poor connection. 1 Press down on the tab and pull it towards you. 2 Pass the HDMI cable (supplied) through the cable holder. 3 Press in on the tab until it clicks into position. 9 AQUOS PURE MODE indicator (pp. 20, 22) 10 Remote control sensor (p. 19) 11 Front panel display (p. 20) 12 BD/DVD/CD mode indicator (p. 20) 1 COMPONENT VIDEO OUT jacks (p. 15) 2 VIDEO output jack (p. 16) 3 2CH AUDIO output jacks (p. 17) 4 DIGITAL AUDIO OUT OPTICAL terminal (p. 17) 5 ETHERNET terminal (p. 18) 6 BD STORAGE/SERVICE terminal BD STORAGE (pp. 25, 42) SERVICE for software (p. 43) 7 HDMI OUT terminal (p. 14) 8 HDMI cable holder (See below.) 9 Cooling fan The cooling fan operates while the power to the Player is on. 10 AC IN terminal (p. 19) Connect the HDMI cable to the rear of the main unit while providing some slack. HDMI cable 11
-
 1
1 -
2
-
3
-
4
-
5
-
6
-
7
-
 8
8 -
 9
9 -
 10
10 -
 11
11 -
 12
12 -
 13
13 -
 14
14 -
 15
15 -
 16
16 -
 17
17 -
 18
18 -
19
-
20
-
21
-
22
-
23
-
24
-
25
-
26
-
27
-
28
-
29
-
30
-
31
-
32
-
33
-
34
-
35
-
36
-
37
-
38
-
39
-
40
-
41
-
42
-
43
-
44
-
45
-
46
-
47
-
48
-
49
-
50
-
51
-
52
-
53
-
54
-
55
 |
 |
