| Section |
Page |
| DK-A1 EN 01-30.fm .pdf |
2 |
| ��Important Instruction |
2 |
| SPECIAL NOTES |
2 |
| <GRAPHIC> |
2 |
| <GRAPHIC> |
2 |
| <GRAPHIC> |
2 |
| <GRAPHIC> |
2 |
| <GRAPHIC> |
3 |
| IMPORTANT SAFETY INSTRUCTIONS |
3 |
| <GRAPHIC> |
3 |
| <GRAPHIC> |
4 |
| IMPORTANT SAFETY INSTRUCTIONS (continued) |
4 |
| IMPORTANT SAFETY INSTRUCTIONS (continued) |
4 |
| <GRAPHIC> |
4 |
| <GRAPHIC> |
5 |
| <GRAPHIC> |
5 |
| <GRAPHIC> |
5 |
| Supply of this product does not convey a license nor imply any right to distribute content create... |
5 |
| MPEG Layer-3 audio coding technology licensed from Fraunhofer IIS and Thomson. |
5 |
| General Information |
6 |
| Precautions |
6 |
| n General |
6 |
| <TABLE> |
6 |
| <TABLE> |
6 |
| <TABLE BODY> |
6 |
| <TABLE ROW> |
6 |
| l Use the unit on a firm, level surface free from vibration. |
6 |
| l Use the unit on a firm, level surface free from vibration. |
6 |
| <GRAPHIC> |
6 |
| <TABLE> |
6 |
| <TABLE BODY> |
6 |
| <TABLE ROW> |
6 |
| l Keep the unit away from direct sunlight, strong magnetic fields, excessive dust, humidity and e... |
6 |
| l Keep the unit away from direct sunlight, strong magnetic fields, excessive dust, humidity and e... |
6 |
| <GRAPHIC> |
6 |
| l Do not place anything on top of the unit. |
6 |
| l Do not place anything on top of the unit. |
6 |
| l Do not place anything on top of the unit. |
6 |
| l Do not expose the unit to moisture, to temperatures higher than 140�F (60�C) or to extremely lo... |
6 |
| l Do not expose the unit to moisture, to temperatures higher than 140�F (60�C) or to extremely lo... |
6 |
| l Do not expose the unit to moisture, to temperatures higher than 140�F (60�C) or to extremely lo... |
6 |
| l Do not expose the unit to moisture, to temperatures higher than 140�F (60�C) or to extremely lo... |
6 |
| l If your system does not work properly, disconnect the AC power cord from the AC outlet. Plug th... |
6 |
| l If your system does not work properly, disconnect the AC power cord from the AC outlet. Plug th... |
6 |
| l If your system does not work properly, disconnect the AC power cord from the AC outlet. Plug th... |
6 |
| l If your system does not work properly, disconnect the AC power cord from the AC outlet. Plug th... |
6 |
| <TABLE> |
6 |
| <TABLE> |
6 |
| <TABLE BODY> |
6 |
| <TABLE ROW> |
6 |
| l In case of an electrical storm, unplug the unit for safety. |
6 |
| l In case of an electrical storm, unplug the unit for safety. |
6 |
| <GRAPHIC> |
6 |
| l Do not lift the unit by holding left or right side panel, it may cause the unit damage or broken. |
6 |
| l Do not lift the unit by holding left or right side panel, it may cause the unit damage or broken. |
6 |
| <GRAPHIC> |
6 |
| <TABLE> |
6 |
| <TABLE BODY> |
6 |
| <TABLE ROW> |
6 |
| l Hold the AC power plug by the head when removing it from the AC outlet, as pulling the cord can... |
6 |
| l Hold the AC power plug by the head when removing it from the AC outlet, as pulling the cord can... |
6 |
| l The AC power plug is used as disconnect device and shall always remain readily operable. |
6 |
| <GRAPHIC> |
6 |
| <TABLE> |
6 |
| <TABLE BODY> |
6 |
| <TABLE ROW> |
6 |
| l Do not remove the outer cover, as this may result in electric shock. Refer internal service to ... |
6 |
| l Do not remove the outer cover, as this may result in electric shock. Refer internal service to ... |
6 |
| l Do not remove the outer cover, as this may result in electric shock. Refer internal service to ... |
6 |
| <GRAPHIC> |
6 |
| l This unit should only be used within the range of 41�F - 95�F (5�C - 35�C). |
6 |
| l This unit should only be used within the range of 41�F - 95�F (5�C - 35�C). |
6 |
| l This unit should only be used within the range of 41�F - 95�F (5�C - 35�C). |
6 |
| The voltage used must be the same as that specified on this unit. Using this product with a highe... |
6 |
| n Volume control |
6 |
| The sound level at a given volume setting depends on speaker efficiency, location and various oth... |
6 |
| General Information |
7 |
| Controls and indicators |
7 |
| <GRAPHIC> |
7 |
| <GRAPHIC> |
7 |
| Reference page |
7 |
| Reference page |
7 |
| Reference page |
7 |
| 1. iPod Dock 15 |
7 |
| 1. iPod Dock 15 |
7 |
| 1. iPod Dock 15 |
7 |
| 2. POWER ON/STAND-BY Button 12, 17, 23 |
7 |
| 2. POWER ON/STAND-BY Button 12, 17, 23 |
7 |
| 2. POWER ON/STAND-BY Button 12, 17, 23 |
7 |
| 3. Clock Button 13 |
7 |
| 3. Clock Button 13 |
7 |
| 3. Clock Button 13 |
7 |
| 4. iPod Button 14, 15 |
7 |
| 4. iPod Button 14, 15 |
7 |
| 4. iPod Button 14, 15 |
7 |
| 5. Alarm Indicator 19 |
7 |
| 5. Alarm Indicator 19 |
7 |
| 5. Alarm Indicator 19 |
7 |
| 6. Auxiliary Button 21 |
7 |
| 6. Auxiliary Button 21 |
7 |
| 6. Auxiliary Button 21 |
7 |
| 7. Snooze/Dimmer Button 12, 19, 23 |
7 |
| 7. Snooze/Dimmer Button 12, 19, 23 |
7 |
| 7. Snooze/Dimmer Button 12, 19, 23 |
7 |
| 8. Tuner Button 17 |
7 |
| 8. Tuner Button 17 |
7 |
| 8. Tuner Button 17 |
7 |
| 9. Remote Sensor 11 |
7 |
| 9. Remote Sensor 11 |
7 |
| 9. Remote Sensor 11 |
7 |
| 10. Alarm Button 19 |
7 |
| 10. Alarm Button 19 |
7 |
| 10. Alarm Button 19 |
7 |
| 11. Alarm ON/OFF Button 19 |
7 |
| 11. Alarm ON/OFF Button 19 |
7 |
| 11. Alarm ON/OFF Button 19 |
7 |
| 12. |
7 |
| 12. |
7 |
| 12. |
7 |
| 13. Play/Pause Button 14, 16 |
7 |
| 13. Play/Pause Button 14, 16 |
7 |
| 13. Play/Pause Button 14, 16 |
7 |
| 14. Skip Down, Tuner Preset Down Button 13, 16, 18 |
7 |
| 14. Skip Down, Tuner Preset Down Button 13, 16, 18 |
7 |
| 14. Skip Down, Tuner Preset Down Button 13, 16, 18 |
7 |
| 15. Skip Up, Tuner Preset Up Button 13, 16, 18 |
7 |
| 15. Skip Up, Tuner Preset Up Button 13, 16, 18 |
7 |
| 15. Skip Up, Tuner Preset Up Button 13, 16, 18 |
7 |
| 16. EQ Button 12 |
7 |
| 16. EQ Button 12 |
7 |
| 16. EQ Button 12 |
7 |
| 17. Volume Down Button 12 |
7 |
| 17. Volume Down Button 12 |
7 |
| 17. Volume Down Button 12 |
7 |
| 18. Volume Up Button 12 |
7 |
| 18. Volume Up Button 12 |
7 |
| ����General Information |
8 |
| Controls and indicators (continued) |
8 |
| Controls and indicators (continued) |
8 |
| <GRAPHIC> |
8 |
| n Display |
8 |
| Reference page |
8 |
| Reference page |
8 |
| Reference page |
8 |
| 1. Alarm Indicator 19 |
8 |
| 1. Alarm Indicator 19 |
8 |
| 1. Alarm Indicator 19 |
8 |
| 2. Sleep Indicator 20 |
8 |
| 2. Sleep Indicator 20 |
8 |
| 2. Sleep Indicator 20 |
8 |
| 3. iPod Indicator 14 |
8 |
| 3. iPod Indicator 14 |
8 |
| 3. iPod Indicator 14 |
8 |
| 4. Aux Indicator 21 |
8 |
| 4. Aux Indicator 21 |
8 |
| 4. Aux Indicator 21 |
8 |
| 5. FM Stereo Mode Indicator 17 |
8 |
| 5. FM Stereo Mode Indicator 17 |
8 |
| 5. FM Stereo Mode Indicator 17 |
8 |
| 6. FM Stereo Receiving Indicator 17 |
8 |
| 6. FM Stereo Receiving Indicator 17 |
8 |
| 6. FM Stereo Receiving Indicator 17 |
8 |
| 7. Summer Time Indicator 13 |
8 |
| 7. Summer Time Indicator 13 |
8 |
| 7. Summer Time Indicator 13 |
8 |
| n Rear panel |
8 |
| Reference page |
8 |
| Reference page |
8 |
| Reference page |
8 |
| 1. AM Loop Antenna Terminal 10 |
8 |
| 1. AM Loop Antenna Terminal 10 |
8 |
| 1. AM Loop Antenna Terminal 10 |
8 |
| 2. AM Antenna Ground Terminal 10 |
8 |
| 2. AM Antenna Ground Terminal 10 |
8 |
| 3. FM 75 Ohms Antenna Jack 10 |
8 |
| 3. FM 75 Ohms Antenna Jack 10 |
8 |
| 4. Auxiliary Input Jacks 21 |
8 |
| 4. Auxiliary Input Jacks 21 |
8 |
| 5. Headphone Jack 21 |
8 |
| 5. Headphone Jack 21 |
8 |
| 6. Video Out Jack 10 |
8 |
| 6. Video Out Jack 10 |
8 |
| 7. Summer Time Switch 13 |
8 |
| 7. Summer Time Switch 13 |
8 |
| 8. AC Input 10 |
8 |
| 8. AC Input 10 |
8 |
| General Information |
9 |
| <GRAPHIC> |
9 |
| <GRAPHIC> |
9 |
| Reference page |
9 |
| Reference page |
9 |
| Reference page |
9 |
| 1. Remote Control Transmitter 11 |
9 |
| 1. Remote Control Transmitter 11 |
9 |
| 2. Function Button 12 |
9 |
| 2. Function Button 12 |
9 |
| 2. Function Button 12 |
9 |
| 2. Function Button 12 |
9 |
| 2. Function Button 12 |
9 |
| 4. Volume Up and Down Buttons 12 |
9 |
| 4. Volume Up and Down Buttons 12 |
9 |
| 4. Volume Up and Down Buttons 12 |
9 |
| 4. Volume Up and Down Buttons 12 |
9 |
| 5. Skip Down, Tuner Preset Down Button 13, 16, 18 |
9 |
| 5. Skip Down, Tuner Preset Down Button 13, 16, 18 |
9 |
| 5. Skip Down, Tuner Preset Down Button 13, 16, 18 |
9 |
| 5. Skip Down, Tuner Preset Down Button 13, 16, 18 |
9 |
| 6. Play Mode Button 16 |
9 |
| 6. Play Mode Button 16 |
9 |
| 6. Play Mode Button 16 |
9 |
| 7. Tuning Up and Down Buttons 17 |
9 |
| 7. Tuning Up and Down Buttons 17 |
9 |
| 8. Memory Button 18, 20 |
9 |
| 8. Memory Button 18, 20 |
9 |
| 9. Clock Button 13 |
9 |
| 9. Clock Button 13 |
9 |
| 10. Snooze/Dimmer Button 12, 19 |
9 |
| 10. Snooze/Dimmer Button 12, 19 |
9 |
| 11. Sleep Button 20 |
9 |
| 11. Sleep Button 20 |
9 |
| 12. Alarm Button 19 |
9 |
| 12. Alarm Button 19 |
9 |
| 13. Skip Up, Tuner Preset Up Button 13, 16, 18 |
9 |
| 13. Skip Up, Tuner Preset Up Button 13, 16, 18 |
9 |
| 14. Display Button 13, 16 |
9 |
| 14. Display Button 13, 16 |
9 |
| 15. Play/Pause Button 14, 16 |
9 |
| 15. Play/Pause Button 14, 16 |
9 |
| 16. E Sound/Demo Button 10, 12 |
9 |
| 16. E Sound/Demo Button 10, 12 |
9 |
| 17. Clear Button 18 |
9 |
| 17. Clear Button 18 |
9 |
| 18. EQ Button 12 |
9 |
| 18. EQ Button 12 |
9 |
| Before using remote control, please remove plastic shield at battery holder. |
9 |
| <TABLE> |
9 |
| <TABLE BODY> |
9 |
| <TABLE ROW> |
9 |
| <GRAPHIC> |
10 |
| System connections |
10 |
| <TABLE> |
10 |
| <TABLE> |
10 |
| <TABLE> |
10 |
| <TABLE BODY> |
10 |
| <TABLE ROW> |
10 |
| Make sure to unplug the AC power cord before any connections. |
10 |
| <TABLE ROW> |
10 |
| <TABLE> |
10 |
| <TABLE> |
10 |
| <TABLE BODY> |
10 |
| <TABLE ROW> |
10 |
| Supplied FM antenna: |
10 |
| Supplied FM antenna: |
10 |
| Connect the FM antenna wire to the FM 75 OHMS jack and position the FM antenna wire in the direct... |
10 |
| <GRAPHIC> |
10 |
| <GRAPHIC> |
10 |
| <TABLE> |
10 |
| <TABLE> |
10 |
| <TABLE BODY> |
10 |
| <TABLE ROW> |
10 |
| < Assembling > |
10 |
| < Assembling > |
10 |
| < Attaching to the wall > |
10 |
| < Attaching to the wall > |
10 |
| <TABLE ROW> |
10 |
| <GRAPHIC> |
10 |
| Wall |
10 |
| Wall |
10 |
| Screws (not supplied) |
10 |
| Screws (not supplied) |
10 |
| n Outdoor FM antenna |
10 |
| Use an outdoor FM antenna if you require better reception. Consult your dealer. |
10 |
| <GRAPHIC> |
10 |
| <GRAPHIC> |
10 |
| n Connecting iPod to TV |
10 |
| iPod photo and 5th Generation iPod with photo and video can be viewed by connecting to TV/monitor... |
10 |
| <GRAPHIC> |
10 |
| <GRAPHIC> |
10 |
| After checking all the connections have been made correctly, plug the AC power cord of this unit ... |
10 |
| <GRAPHIC> |
10 |
| <GRAPHIC> |
10 |
| l Unplug the AC power cord from the AC outlet if the unit will not be in use for a prolonged peri... |
10 |
| l Unplug the AC power cord from the AC outlet if the unit will not be in use for a prolonged peri... |
10 |
| l Unplug the AC power cord from the AC outlet if the unit will not be in use for a prolonged peri... |
10 |
| <TABLE> |
10 |
| <TABLE> |
10 |
| <TABLE> |
10 |
| <TABLE BODY> |
10 |
| <TABLE ROW> |
10 |
| n Demonstration mode |
10 |
| n Demonstration mode |
10 |
| To cancel the demonstration mode: |
10 |
| To cancel the demonstration mode: |
10 |
| When the unit is in the demonstration mode, press the E SOUND/DEMO button. The unit will enter th... |
10 |
| <GRAPHIC> |
10 |
| <TABLE> |
10 |
| <TABLE BODY> |
10 |
| <TABLE ROW> |
10 |
| To return to the demonstration mode: When the unit is in the power stand-by mode, press the E SOU... |
10 |
| To return to the demonstration mode: |
10 |
| To return to the demonstration mode: |
10 |
| <TABLE ROW> |
10 |
| Note: When the power is on, the E SOUND/DEMO button can be used to select the E SOUND mode. |
10 |
| Note: |
10 |
| Note: |
10 |
| Preparation for Use |
11 |
| Remote control |
11 |
| n Battery installation |
11 |
| <TABLE> |
11 |
| <TABLE> |
11 |
| <TABLE BODY> |
11 |
| <TABLE ROW> |
11 |
| 1 |
11 |
| 1 |
11 |
| 1 |
11 |
| While pushing the locking tab toward the center of the remote control, slide out the battery holder. |
11 |
| While pushing the locking tab toward the center of the remote control, slide out the battery holder. |
11 |
| While pushing the locking tab toward the center of the remote control, slide out the battery holder. |
11 |
| <GRAPHIC> |
11 |
| 2 |
11 |
| 2 |
11 |
| 2 |
11 |
| Remove the old battery from the battery holder, insert the new battery and then slide the battery... |
11 |
| Remove the old battery from the battery holder, insert the new battery and then slide the battery... |
11 |
| <TABLE ROW> |
11 |
| <GRAPHIC> |
11 |
| l Remove the battery if the unit will not be used for long periods of time. This will prevent pot... |
11 |
| l Remove the battery if the unit will not be used for long periods of time. This will prevent pot... |
11 |
| l Remove the battery if the unit will not be used for long periods of time. This will prevent pot... |
11 |
| l Do not use rechargeable battery (nickel-cadmium battery, etc.). |
11 |
| l Do not use rechargeable battery (nickel-cadmium battery, etc.). |
11 |
| l Do not use rechargeable battery (nickel-cadmium battery, etc.). |
11 |
| l Do not use rechargeable battery (nickel-cadmium battery, etc.). |
11 |
| l Installing the battery incorrectly may cause the unit to malfunction. |
11 |
| l Installing the battery incorrectly may cause the unit to malfunction. |
11 |
| l Installing the battery incorrectly may cause the unit to malfunction. |
11 |
| l Installing the battery incorrectly may cause the unit to malfunction. |
11 |
| l Replace the battery if the operating distance is reduced or if the operation becomes erratic. P... |
11 |
| l Replace the battery if the operating distance is reduced or if the operation becomes erratic. P... |
11 |
| l Replace the battery if the operating distance is reduced or if the operation becomes erratic. P... |
11 |
| l Replace the battery if the operating distance is reduced or if the operation becomes erratic. P... |
11 |
| l Periodically clean the transmitter on the remote control and the sensor on the unit with a soft... |
11 |
| l Periodically clean the transmitter on the remote control and the sensor on the unit with a soft... |
11 |
| l Periodically clean the transmitter on the remote control and the sensor on the unit with a soft... |
11 |
| l Periodically clean the transmitter on the remote control and the sensor on the unit with a soft... |
11 |
| l Exposing the sensor on the unit to strong light may interfere with operation. Change the lighti... |
11 |
| l Exposing the sensor on the unit to strong light may interfere with operation. Change the lighti... |
11 |
| l Exposing the sensor on the unit to strong light may interfere with operation. Change the lighti... |
11 |
| l Exposing the sensor on the unit to strong light may interfere with operation. Change the lighti... |
11 |
| l Keep the remote control away from moisture, heat, shock, and vibrations. |
11 |
| l Keep the remote control away from moisture, heat, shock, and vibrations. |
11 |
| l Keep the remote control away from moisture, heat, shock, and vibrations. |
11 |
| l Keep the remote control away from moisture, heat, shock, and vibrations. |
11 |
| n Test of the remote control |
11 |
| Check the remote control after checking all the connections (see page 10). |
11 |
| Point the remote control directly at the remote sensor on the unit. |
11 |
| Press the ON/STAND-BY button. Does the power turn on? Now, you can enjoy the music. |
11 |
| <GRAPHIC> |
11 |
| <GRAPHIC> |
12 |
| General control |
12 |
| <GRAPHIC> |
12 |
| <GRAPHIC> |
12 |
| Press the ON/STAND-BY button to turn the power on. |
12 |
| <TABLE> |
12 |
| <TABLE> |
12 |
| <TABLE BODY> |
12 |
| <TABLE ROW> |
12 |
| After use: |
12 |
| After use: |
12 |
| After use: |
12 |
| Press the ON/STAND-BY button to enter the power stand-by mode or demonstration mode. |
12 |
| <TABLE ROW> |
12 |
| Press the SNOOZE/DIMMER button to adjust the brightness of the display and LED. |
12 |
| n Volume auto fade-in |
12 |
| n Volume auto fade-in |
12 |
| If you turn off and on the main unit with the volume set to 27 or higher, the volume starts at 16... |
12 |
| <TABLE> |
12 |
| <TABLE> |
12 |
| <TABLE> |
12 |
| <TABLE BODY> |
12 |
| <TABLE ROW> |
12 |
| n Volume control |
12 |
| n Volume control |
12 |
| Main unit and remote control operation: Press the VOL (+ or –) button to increase or decrease the... |
12 |
| Main unit and remote control operation: Press the VOL (+ or –) button to increase or decrease the... |
12 |
| <GRAPHIC> |
12 |
| The special sound created to enhance iPod sound as sound been produced by CD-Audio quality. When ... |
12 |
| n Equalizer |
12 |
| When the EQ button is pressed, the current mode setting will be displayed. To change to a differe... |
12 |
| n Function |
12 |
| When the FUNCTION button on remote control is pressed, the current function will change to differ... |
12 |
| <GRAPHIC> |
12 |
| <GRAPHIC> |
12 |
| The backup function protect the memorized function mode for a few days should there be a power fa... |
12 |
| Basic Operation |
13 |
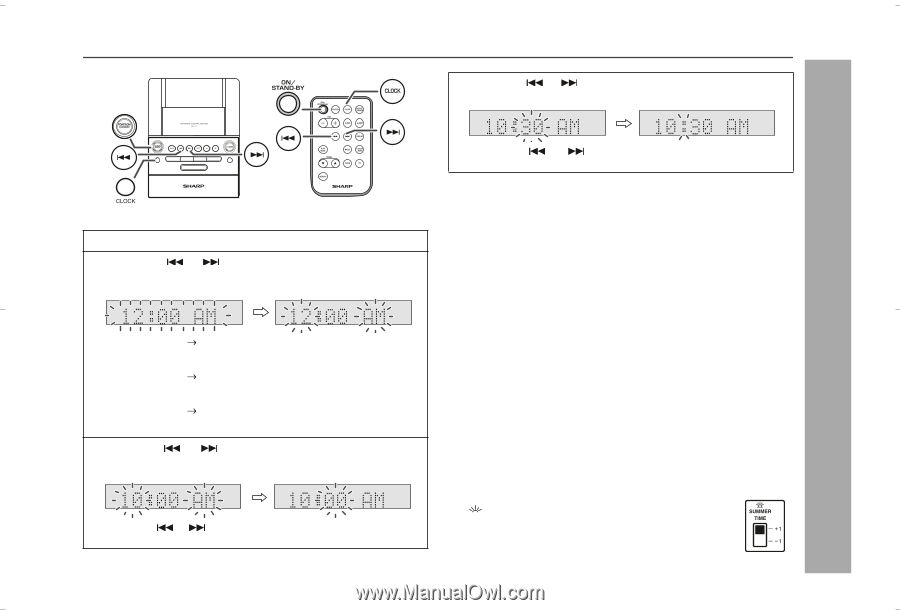
| Setting the clock |
13 |
| <GRAPHIC> |
13 |
| <GRAPHIC> |
13 |
| <TABLE> |
13 |
| <TABLE> |
13 |
| <TABLE BODY> |
13 |
| <TABLE ROW> |
13 |
| 1 Press the CLOCK button for more than 2 seconds. |
13 |
| 1 Press the CLOCK button for more than 2 seconds. |
13 |
| 1 Press the CLOCK button for more than 2 seconds. |
13 |
| 1 Press the CLOCK button for more than 2 seconds. |
13 |
| <TABLE ROW> |
13 |
| 2 Press the or button to select 12-hour or 24-hour display and then press the CLOCK button. |
13 |
| 2 Press the |
13 |
| 2 Press the |
13 |
| 2 Press the |
13 |
| <TABLE ROW> |
13 |
| <GRAPHIC> |
13 |
| “12:00 AM” |
13 |
| “12:00 AM” |
13 |
| <GRAPHIC> |
13 |
| <GRAPHIC> |
13 |
| The 12-hour display will appear. |
13 |
| <TABLE ROW> |
13 |
| (12:00 AM - 11:59 PM) |
13 |
| (12:00 AM - 11:59 PM) |
13 |
| <TABLE ROW> |
13 |
| “0:00 AM” |
13 |
| “0:00 AM” |
13 |
| <GRAPHIC> |
13 |
| <GRAPHIC> |
13 |
| The 12-hour display will appear. |
13 |
| <TABLE ROW> |
13 |
| (0:00 AM - 11:59 PM) |
13 |
| (0:00 AM - 11:59 PM) |
13 |
| <TABLE ROW> |
13 |
| “0:00” |
13 |
| “0:00” |
13 |
| <GRAPHIC> |
13 |
| <GRAPHIC> |
13 |
| The 24-hour display will appear. |
13 |
| <TABLE ROW> |
13 |
| (0:00 - 23:59) |
13 |
| (0:00 - 23:59) |
13 |
| <TABLE ROW> |
13 |
| 3 Press the or button to adjust the hour and then press the CLOCK button. |
13 |
| 3 Press the |
13 |
| 3 Press the |
13 |
| 3 Press the |
13 |
| <TABLE ROW> |
13 |
| <GRAPHIC> |
13 |
| Press the or button once to advance the time by 1�hour. Hold it down to advance continuously. |
13 |
| Press the |
13 |
| <TABLE> |
13 |
| <TABLE> |
13 |
| <TABLE BODY> |
13 |
| <TABLE ROW> |
13 |
| 4 Press the or button to adjust the minutes and then press the CLOCK button. |
13 |
| 4 Press the |
13 |
| 4 Press the |
13 |
| 4 Press the |
13 |
| <GRAPHIC> |
13 |
| <TABLE ROW> |
13 |
| Press the or button once to advance the time by 1�minute. Hold it down to change the time in 5-mi... |
13 |
| Press the |
13 |
| [When the unit is in the stand-by mode or in demonstration mode.] |
13 |
| Press the CLOCK button to enter the clock function. |
13 |
| [When the power is on] |
13 |
| Press DISPLAY button on remote control to toggle between the function information and clock display. |
13 |
| l The clock will continue counting for 8 hours should there be a power failure or the AC power co... |
13 |
| l The “CLOCK ADJ” will appear or time will flash to confirm the time display when the AC power su... |
13 |
| Perform “Setting the clock” from step 1. Step 2 (selecting the 12- hour or 24-hour display) will ... |
13 |
| <TABLE> |
13 |
| <TABLE> |
13 |
| <TABLE BODY> |
13 |
| <TABLE ROW> |
13 |
| 1 |
13 |
| 1 |
13 |
| Clear all the programmed contents. [Refer to “Clearing all the memory (reset)” on page 23 for det... |
13 |
| Clear all the programmed contents. [Refer to “Clearing all the memory (reset)” on page 23 for det... |
13 |
| <TABLE ROW> |
13 |
| 2 |
13 |
| 2 |
13 |
| Perform “Setting the clock” from step 1. |
13 |
| Perform “Setting the clock” from step 1. |
13 |
| <TABLE> |
13 |
| <TABLE> |
13 |
| <TABLE BODY> |
13 |
| <TABLE ROW> |
13 |
| 1 |
13 |
| 1 |
13 |
| Slide the ST switch to +1 to advance the time 1 hour. indicator will appear. |
13 |
| Slide the ST switch to +1 to advance the time 1 hour. |
13 |
| <TABLE ROW> |
13 |
| 2 |
13 |
| 2 |
13 |
| Slide the ST switch to -1 to turn the clock back 1 hour. |
13 |
| Slide the ST switch to -1 to turn the clock back 1 hour. |
13 |
| iPod |
14 |
| Listening to the iPod |
14 |
| Supported iPod models: |
14 |
| l iPod nano (software 1.0 above) |
14 |
| l iPod nano (software 1.0 above) |
14 |
| l iPod nano (software 1.0 above) |
14 |
| l iPod nano (software 1.0 above) |
14 |
| l iPod photo (software 1.0 above) |
14 |
| l iPod photo (software 1.0 above) |
14 |
| l iPod photo (software 1.0 above) |
14 |
| l iPod photo (software 1.0 above) |
14 |
| l iPod mini (software 1.2 above) |
14 |
| l iPod mini (software 1.2 above) |
14 |
| l iPod mini (software 1.2 above) |
14 |
| l iPod mini (software 1.2 above) |
14 |
| l 5th Generation iPod (software 1.0 above) (Dock connector equipped Click Wheel model) |
14 |
| l 5th Generation iPod (software 1.0 above) (Dock connector equipped Click Wheel model) |
14 |
| l 5th Generation iPod (software 1.0 above) (Dock connector equipped Click Wheel model) |
14 |
| l 5th Generation iPod (software 1.0 above) (Dock connector equipped Click Wheel model) |
14 |
| l 4th Generation iPod (software 3.0.2 above) (Dock connector equipped Click Wheel model) |
14 |
| l 4th Generation iPod (software 3.0.2 above) (Dock connector equipped Click Wheel model) |
14 |
| l 4th Generation iPod (software 3.0.2 above) (Dock connector equipped Click Wheel model) |
14 |
| l 4th Generation iPod (software 3.0.2 above) (Dock connector equipped Click Wheel model) |
14 |
| l 3rd Generation iPod (software 2.2 above) (Dock connector equipped Click Wheel model) |
14 |
| l 3rd Generation iPod (software 2.2 above) (Dock connector equipped Click Wheel model) |
14 |
| l 3rd Generation iPod (software 2.2 above) (Dock connector equipped Click Wheel model) |
14 |
| l 3rd Generation iPod (software 2.2 above) (Dock connector equipped Click Wheel model) |
14 |
| l Please update your iPod unit to the latest software version before using it. Please visit Apple... |
14 |
| l Please update your iPod unit to the latest software version before using it. Please visit Apple... |
14 |
| l Please update your iPod unit to the latest software version before using it. Please visit Apple... |
14 |
| l Please update your iPod unit to the latest software version before using it. Please visit Apple... |
14 |
| l Once the iPod is connected to the unit it will begin charging. |
14 |
| l Once the iPod is connected to the unit it will begin charging. |
14 |
| l Once the iPod is connected to the unit it will begin charging. |
14 |
| l Once the iPod is connected to the unit it will begin charging. |
14 |
| l The iPod unit can not be charged while the main unit is in the stand-by mode. |
14 |
| l The iPod unit can not be charged while the main unit is in the stand-by mode. |
14 |
| l The iPod unit can not be charged while the main unit is in the stand-by mode. |
14 |
| l The iPod unit can not be charged while the main unit is in the stand-by mode. |
14 |
| When you press any of the following buttons, the unit turns on. |
14 |
| l iPod button (main unit): The unit turns on and the iPod function is activated. |
14 |
| l iPod button (main unit): The unit turns on and the iPod function is activated. |
14 |
| l iPod button (main unit): The unit turns on and the iPod function is activated. |
14 |
| l iPod button (main unit): The unit turns on and the iPod function is activated. |
14 |
| <GRAPHIC> |
14 |
| <GRAPHIC> |
14 |
| <GRAPHIC> |
14 |
| <GRAPHIC> |
14 |
| <GRAPHIC> |
14 |
| n iPod adaptor connection |
14 |
| n iPod adaptor connection |
14 |
| <TABLE> |
14 |
| <TABLE> |
14 |
| <TABLE BODY> |
14 |
| <TABLE ROW> |
14 |
| iPod Adaptor No. |
14 |
| iPod Adaptor No. |
14 |
| iPod Description |
14 |
| iPod Description |
14 |
| Capacity |
14 |
| Capacity |
14 |
| <TABLE ROW> |
14 |
| 3 |
14 |
| 3 |
14 |
| iPod mini |
14 |
| iPod mini |
14 |
| 4GB & 6GB |
14 |
| 4GB & 6GB |
14 |
| <TABLE ROW> |
14 |
| <TABLE ROW> |
14 |
| 4 |
14 |
| 4 |
14 |
| 4G iPod & U2 iPod |
14 |
| 4G iPod & U2 iPod |
14 |
| 20GB |
14 |
| 20GB |
14 |
| <TABLE ROW> |
14 |
| <TABLE ROW> |
14 |
| 5 |
14 |
| 4G iPod |
14 |
| 40GB |
14 |
| 40GB |
14 |
| <TABLE ROW> |
14 |
| <TABLE ROW> |
14 |
| 6 |
14 |
| 6 |
14 |
| iPod photo & Color U2 iPod |
14 |
| 20GB & 30GB |
14 |
| <TABLE ROW> |
14 |
| <TABLE ROW> |
14 |
| 7 |
14 |
| 7 |
14 |
| iPod photo |
14 |
| 40GB & 60GB |
14 |
| 40GB & 60GB |
14 |
| <TABLE ROW> |
14 |
| <TABLE ROW> |
14 |
| 6 |
14 |
| iPod with color display |
14 |
| 20GB |
14 |
| 20GB |
14 |
| <TABLE ROW> |
14 |
| <TABLE ROW> |
14 |
| 7 |
14 |
| 7 |
14 |
| iPod with color display |
14 |
| 60GB |
14 |
| <TABLE ROW> |
14 |
| <TABLE ROW> |
14 |
| 8 |
14 |
| 8 |
14 |
| iPod nano |
14 |
| 2GB & 4GB |
14 |
| 2GB & 4GB |
14 |
| <TABLE ROW> |
14 |
| <TABLE ROW> |
14 |
| 9 |
14 |
| 9 |
14 |
| iPod (10/12/05 w/video) |
14 |
| 30GB |
14 |
| <TABLE ROW> |
14 |
| <TABLE ROW> |
14 |
| 10 |
14 |
| 10 |
14 |
| iPod (10/12/05 w/video) |
14 |
| 60GB |
14 |
| 60GB |
14 |
| <TABLE ROW> |
14 |
| iPod |
15 |
| 1. Push the iPod sliding door until end. |
15 |
| 2. Insert the iPod adaptor into unit and connect your iPod. |
15 |
| n To remove iPod adaptor |
15 |
| <GRAPHIC> |
15 |
| <GRAPHIC> |
15 |
| <TABLE> |
15 |
| <TABLE> |
15 |
| <TABLE BODY> |
15 |
| <TABLE ROW> |
15 |
| 1 Press the ON/STAND-BY button to turn the power on. |
15 |
| 1 Press the ON/STAND-BY button to turn the power on. |
15 |
| 1 Press the ON/STAND-BY button to turn the power on. |
15 |
| 1 Press the ON/STAND-BY button to turn the power on. |
15 |
| <TABLE ROW> |
15 |
| 2 Press the iPod button on main unit once or FUNCTION button on remote control repeatedly to sele... |
15 |
| 2 Press the iPod button on main unit once or FUNCTION button on remote control repeatedly to sele... |
15 |
| 2 Press the iPod button on main unit once or FUNCTION button on remote control repeatedly to sele... |
15 |
| 2 Press the iPod button on main unit once or FUNCTION button on remote control repeatedly to sele... |
15 |
| <TABLE ROW> |
15 |
| 3 Open the iPod terminal door and insert iPod unit in iPod dock of main unit. |
15 |
| 3 Open the iPod terminal door and insert iPod unit in iPod dock of main unit. |
15 |
| 3 Open the iPod terminal door and insert iPod unit in iPod dock of main unit. |
15 |
| 3 Open the iPod terminal door and insert iPod unit in iPod dock of main unit. |
15 |
| <TABLE ROW> |
15 |
| 4 Press the / button to start playback. |
15 |
| 4 Press the |
15 |
| 4 Press the |
15 |
| 4 Press the |
15 |
| iPod |
16 |
| Listening to the iPod (continued) |
16 |
| n Various iPod functions |
16 |
| <TABLE> |
16 |
| <TABLE> |
16 |
| <TABLE BODY> |
16 |
| <TABLE ROW> |
16 |
| Function |
16 |
| Function |
16 |
| Function |
16 |
| Main unit |
16 |
| Main unit |
16 |
| Main unit |
16 |
| Remote control |
16 |
| Remote control |
16 |
| Remote control |
16 |
| Operation |
16 |
| Operation |
16 |
| Operation |
16 |
| <TABLE ROW> |
16 |
| Play |
16 |
| Play |
16 |
| Play |
16 |
| <GRAPHIC> |
16 |
| Press in the pause mode. |
16 |
| <TABLE ROW> |
16 |
| <TABLE ROW> |
16 |
| Pause |
16 |
| Pause |
16 |
| Pause |
16 |
| <GRAPHIC> |
16 |
| Press in the playback mode. |
16 |
| <TABLE ROW> |
16 |
| <GRAPHIC> |
16 |
| Track up/ down |
16 |
| Track up/ down |
16 |
| <GRAPHIC> |
16 |
| Press in the playback or pause mode. If you press the button in the pause mode, press the |
16 |
| <TABLE ROW> |
16 |
| <TABLE ROW> |
16 |
| Fast forward/ reverse |
16 |
| Fast forward/ reverse |
16 |
| Fast forward/ reverse |
16 |
| Fast forward/ reverse |
16 |
| <GRAPHIC> |
16 |
| Press and hold down in the playback mode. |
16 |
| <TABLE ROW> |
16 |
| Release the button to resume playback. |
16 |
| Release the button to resume playback. |
16 |
| <TABLE ROW> |
16 |
| Display |
16 |
| Display |
16 |
| ____ |
16 |
| <GRAPHIC> |
16 |
| iPod back light ON. |
16 |
| <TABLE ROW> |
16 |
| <TABLE ROW> |
16 |
| Repeat |
16 |
| Repeat |
16 |
| ____ |
16 |
| <GRAPHIC> |
16 |
| Press to toggle repeat mode. |
16 |
| <TABLE ROW> |
16 |
| <TABLE ROW> |
16 |
| Shuffle |
16 |
| Shuffle |
16 |
| ____ |
16 |
| <GRAPHIC> |
16 |
| Press and hold down to toggle shuffle mode. |
16 |
| <TABLE ROW> |
16 |
| The operations described below depend on the generation iPod you are using. |
16 |
| When the main unit is powered on, the iPod unit will automatically power on when docked in the un... |
16 |
| * Invalid for 3rd iPod Generation. |
16 |
| Caution: |
16 |
| l Unplug all accessories for the iPod before inserting it into the iPod dock. |
16 |
| l Unplug all accessories for the iPod before inserting it into the iPod dock. |
16 |
| l Unplug all accessories for the iPod before inserting it into the iPod dock. |
16 |
| l Unplug all accessories for the iPod before inserting it into the iPod dock. |
16 |
| Radio |
17 |
| Listening to the radio |
17 |
| <GRAPHIC> |
17 |
| <GRAPHIC> |
17 |
| l TUNER button (main unit): The unit turns on and the TUNER function is activated. |
17 |
| l TUNER button (main unit): The unit turns on and the TUNER function is activated. |
17 |
| l TUNER button (main unit): The unit turns on and the TUNER function is activated. |
17 |
| l TUNER button (main unit): The unit turns on and the TUNER function is activated. |
17 |
| <GRAPHIC> |
17 |
| <GRAPHIC> |
17 |
| <GRAPHIC> |
17 |
| <GRAPHIC> |
17 |
| <GRAPHIC> |
17 |
| n Tuning |
17 |
| <TABLE> |
17 |
| <TABLE> |
17 |
| <TABLE BODY> |
17 |
| <TABLE ROW> |
17 |
| 1 Press the ON/STAND-BY button to turn the power on. |
17 |
| 1 Press the ON/STAND-BY button to turn the power on. |
17 |
| 1 Press the ON/STAND-BY button to turn the power on. |
17 |
| 1 Press the ON/STAND-BY button to turn the power on. |
17 |
| <TABLE ROW> |
17 |
| 2 Press the TUNER button on main unit or FUNCTION button on remote control repeatedly to select t... |
17 |
| 2 Press the TUNER button on main unit or FUNCTION button on remote control repeatedly to select t... |
17 |
| 2 Press the TUNER button on main unit or FUNCTION button on remote control repeatedly to select t... |
17 |
| 2 Press the TUNER button on main unit or FUNCTION button on remote control repeatedly to select t... |
17 |
| <TABLE ROW> |
17 |
| 3 Press the TUNING ( or ) button on remote control to tune in to the desired station. |
17 |
| 3 Press the TUNING ( |
17 |
| 3 Press the TUNING ( |
17 |
| 3 Press the TUNING ( |
17 |
| <TABLE ROW> |
17 |
| Manual tuning: |
17 |
| Manual tuning: |
17 |
| Manual tuning: |
17 |
| <TABLE ROW> |
17 |
| Press the TUNING ( or ) button as many times as required to tune in to the desired station. |
17 |
| Press the TUNING ( |
17 |
| <TABLE ROW> |
17 |
| Auto tuning: |
17 |
| Auto tuning: |
17 |
| Auto tuning: |
17 |
| <TABLE ROW> |
17 |
| When the TUNING ( or ) button is pressed for more than 0.5 seconds, scanning will start automatic... |
17 |
| When the TUNING ( |
17 |
| l When radio interference occurs, auto scan tuning may stop automatically at that point. |
17 |
| l When radio interference occurs, auto scan tuning may stop automatically at that point. |
17 |
| l When radio interference occurs, auto scan tuning may stop automatically at that point. |
17 |
| l When radio interference occurs, auto scan tuning may stop automatically at that point. |
17 |
| l Auto scan tuning will skip weak signal stations. |
17 |
| l Auto scan tuning will skip weak signal stations. |
17 |
| l Auto scan tuning will skip weak signal stations. |
17 |
| l Auto scan tuning will skip weak signal stations. |
17 |
| l To stop the auto tuning, press the TUNING ( |
17 |
| l To stop the auto tuning, press the TUNING ( |
17 |
| l To stop the auto tuning, press the TUNING ( |
17 |
| l To stop the auto tuning, press the TUNING ( |
17 |
| Press the TUNER button (main unit) or FUNCTION button (remote control) to display the “ST” indica... |
17 |
| l “ |
17 |
| l “ |
17 |
| l “ |
17 |
| l “ |
17 |
| l If the FM reception is weak, press the TUNER button (main unit) or FUNCTION button (remote cont... |
17 |
| l If the FM reception is weak, press the TUNER button (main unit) or FUNCTION button (remote cont... |
17 |
| l If the FM reception is weak, press the TUNER button (main unit) or FUNCTION button (remote cont... |
17 |
| l If the FM reception is weak, press the TUNER button (main unit) or FUNCTION button (remote cont... |
17 |
| <TABLE> |
17 |
| <TABLE> |
17 |
| <TABLE BODY> |
17 |
| <TABLE ROW> |
17 |
| FM stereo mode indicator |
17 |
| FM stereo mode indicator |
17 |
| <TABLE ROW> |
17 |
| <GRAPHIC> |
17 |
| FM stereo receiving indicator |
17 |
| FM stereo receiving indicator |
17 |
| Radio |
18 |
| Listening to the radio (continued) |
18 |
| n Memorizing a station |
18 |
| You can store 40 AM and FM stations in memory and recall them at the push of a button. (Preset tu... |
18 |
| <TABLE> |
18 |
| <TABLE> |
18 |
| <TABLE BODY> |
18 |
| <TABLE ROW> |
18 |
| 1 Perform steps 1 - 3 in “Tuning” on page 17. |
18 |
| 1 Perform steps 1 - 3 in “Tuning” on page 17. |
18 |
| 1 Perform steps 1 - 3 in “Tuning” on page 17. |
18 |
| 1 Perform steps 1 - 3 in “Tuning” on page 17. |
18 |
| <TABLE ROW> |
18 |
| 2 Press the MEMORY button on remote control to enter the preset tuning saving mode. |
18 |
| 2 Press the MEMORY button on remote control to enter the preset tuning saving mode. |
18 |
| 2 Press the MEMORY button on remote control to enter the preset tuning saving mode. |
18 |
| 2 Press the MEMORY button on remote control to enter the preset tuning saving mode. |
18 |
| <TABLE ROW> |
18 |
| <GRAPHIC> |
18 |
| 3 Within 1 minute, press the or button to select the preset channel number. |
18 |
| 3 Within 1 minute, press the |
18 |
| 3 Within 1 minute, press the |
18 |
| 3 Within 1 minute, press the |
18 |
| <TABLE ROW> |
18 |
| Store the stations in memory, in order, starting with preset channel 1. |
18 |
| Store the stations in memory, in order, starting with preset channel 1. |
18 |
| <TABLE ROW> |
18 |
| 4 Within 1 minute, press the MEMORY button on remote control to store that station in memory. |
18 |
| 4 Within 1 minute, press the MEMORY button on remote control to store that station in memory. |
18 |
| 4 Within 1 minute, press the MEMORY button on remote control to store that station in memory. |
18 |
| 4 Within 1 minute, press the MEMORY button on remote control to store that station in memory. |
18 |
| <TABLE ROW> |
18 |
| <GRAPHIC> |
18 |
| If the “MEMORY” and preset number indicators disappear before the station is memorized, repeat th... |
18 |
| If the “MEMORY” and preset number indicators disappear before the station is memorized, repeat th... |
18 |
| <TABLE ROW> |
18 |
| 5 Repeat steps 1 - 4 to set other stations, or to change a preset station. |
18 |
| 5 Repeat steps 1 - 4 to set other stations, or to change a preset station. |
18 |
| 5 Repeat steps 1 - 4 to set other stations, or to change a preset station. |
18 |
| 5 Repeat steps 1 - 4 to set other stations, or to change a preset station. |
18 |
| <TABLE ROW> |
18 |
| When a new station is stored in memory, the station previously memorized for that preset channel ... |
18 |
| When a new station is stored in memory, the station previously memorized for that preset channel ... |
18 |
| The backup function protects the memorized stations for a few days should there be a power failur... |
18 |
| n To recall a memorized station |
18 |
| <TABLE> |
18 |
| <TABLE> |
18 |
| <TABLE BODY> |
18 |
| <TABLE ROW> |
18 |
| Press the or button for less than 0.5 seconds to select the desired station. |
18 |
| Press the |
18 |
| n To scan the preset stations |
18 |
| The stations saved in memory can be scanned automatically. (Preset memory scan) |
18 |
| <TABLE> |
18 |
| <TABLE> |
18 |
| <TABLE BODY> |
18 |
| <TABLE ROW> |
18 |
| 1 |
18 |
| 1 |
18 |
| Press the or button for more than 0.5 seconds. |
18 |
| Press the |
18 |
| <TABLE ROW> |
18 |
| The preset number will flash and the programmed stations will be tuned in sequentially, for 5 sec... |
18 |
| The preset number will flash and the programmed stations will be tuned in sequentially, for 5 sec... |
18 |
| <TABLE ROW> |
18 |
| 2 |
18 |
| 2 |
18 |
| Press the or button again when the desired station is located. |
18 |
| Press the |
18 |
| <GRAPHIC> |
18 |
| <GRAPHIC> |
18 |
| <TABLE> |
18 |
| <TABLE> |
18 |
| <TABLE BODY> |
18 |
| <TABLE ROW> |
18 |
| 1 |
18 |
| 1 |
18 |
| Press and hold the CLEAR button on remote control for more than 3 seconds. “TUN CLEAR” will be di... |
18 |
| Press and hold the CLEAR button on remote control for more than 3 seconds. “TUN CLEAR” will be di... |
18 |
| <TABLE ROW> |
18 |
| 2 |
18 |
| 2 |
18 |
| Within 10 seconds, press the MEMORY button on remote control. “COMPLETE” will be displayed. |
18 |
| Within 10 seconds, press the MEMORY button on remote control. “COMPLETE” will be displayed. |
18 |
| <GRAPHIC> |
18 |
| <GRAPHIC> |
19 |
| Alarm and sleep operation |
19 |
| n Alarm |
19 |
| The unit turns on and play desired source (iPod, TUNER or AUX) or Buzzer sound for 30 minutes. |
19 |
| The unit turns on and play desired source (iPod, TUNER or AUX) or Buzzer sound for 30 minutes. |
19 |
| <TABLE> |
19 |
| <TABLE> |
19 |
| <TABLE BODY> |
19 |
| <TABLE ROW> |
19 |
| 1 |
19 |
| 1 |
19 |
| Check that the clock is set to the correct time (refer page 13). |
19 |
| Check that the clock is set to the correct time (refer page 13). |
19 |
| <TABLE ROW> |
19 |
| If it is not set, you cannot use the alarm function. |
19 |
| If it is not set, you cannot use the alarm function. |
19 |
| <TABLE ROW> |
19 |
| 2 |
19 |
| 2 |
19 |
| For iPOD playback: insert iPod to the unit. (refer page 15) |
19 |
| <TABLE ROW> |
19 |
| 3 |
19 |
| 3 |
19 |
| For TUNER: Set preset memory. (refer page 18) |
19 |
| <GRAPHIC> |
19 |
| <GRAPHIC> |
19 |
| <TABLE> |
19 |
| <TABLE BODY> |
19 |
| <TABLE ROW> |
19 |
| 1 Press and hold the ALARM button for more than 2 seconds. |
19 |
| 1 Press and hold the ALARM button for more than 2 seconds. |
19 |
| 1 Press and hold the ALARM button for more than 2 seconds. |
19 |
| 1 Press and hold the ALARM button for more than 2 seconds. |
19 |
| <TABLE ROW> |
19 |
| 2 Press the or button to select source or buzzer. |
19 |
| 2 Press the |
19 |
| 2 Press the |
19 |
| 2 Press the |
19 |
| <TABLE ROW> |
19 |
| <GRAPHIC> |
19 |
| Press the ALARM button. |
19 |
| Press the ALARM button. |
19 |
| <TABLE ROW> |
19 |
| 3 If TUNER is selected, press the or button to select a preset station. Press the ALARM button. |
19 |
| 3 If TUNER is selected, press the |
19 |
| 3 If TUNER is selected, press the |
19 |
| 3 If TUNER is selected, press the |
19 |
| <TABLE ROW> |
19 |
| 4 Press the or button to adjust the hour. Press the ALARM button. |
19 |
| 4 Press the |
19 |
| 4 Press the |
19 |
| 4 Press the |
19 |
| <TABLE ROW> |
19 |
| 5 Press the or button to adjust the minute. Press the ALARM button. |
19 |
| 5 Press the |
19 |
| 5 Press the |
19 |
| 5 Press the |
19 |
| <TABLE ROW> |
19 |
| 6 If other than BUZZER is selected in step 2, press the or or VOL (+ or –) button to select volum... |
19 |
| 6 If other than BUZZER is selected in step 2, press the |
19 |
| 6 If other than BUZZER is selected in step 2, press the |
19 |
| 6 If other than BUZZER is selected in step 2, press the |
19 |
| <TABLE> |
19 |
| <TABLE> |
19 |
| <TABLE BODY> |
19 |
| <TABLE ROW> |
19 |
| l After source is selected in step 2, press and hold the ALARM button. |
19 |
| l After source is selected in step 2, press and hold the ALARM button. |
19 |
| <TABLE ROW> |
19 |
| l If TUNER is selected, press and hold the ALARM button after preset station is selected in step 3. |
19 |
| l If TUNER is selected, press and hold the ALARM button after preset station is selected in step 3. |
19 |
| <TABLE ROW> |
19 |
| l The time and volume will be automatically set to the previous setting. |
19 |
| l The time and volume will be automatically set to the previous setting. |
19 |
| <TABLE> |
19 |
| <TABLE> |
19 |
| <TABLE BODY> |
19 |
| <TABLE ROW> |
19 |
| 1 |
19 |
| 1 |
19 |
| Press the ALARM ON/OFF button on main unit to activate and deactivate the alarm function. When ac... |
19 |
| Press the ALARM ON/OFF button on main unit to activate and deactivate the alarm function. When ac... |
19 |
| <TABLE ROW> |
19 |
| 2 |
19 |
| 2 |
19 |
| Set to CLOCK function, stand-by mode or demonstration mode. |
19 |
| Set to CLOCK function, stand-by mode or demonstration mode. |
19 |
| l Press the ALARM button. |
19 |
| l Press the ALARM button. |
19 |
| l Press the ALARM button. |
19 |
| l Press the ALARM button. |
19 |
| l The selected source or buzzer type will blink. |
19 |
| l The selected source or buzzer type will blink. |
19 |
| l The selected source or buzzer type will blink. |
19 |
| l The selected source or buzzer type will blink. |
19 |
| l The unit will display the alarm time for 3 seconds. |
19 |
| l The unit will display the alarm time for 3 seconds. |
19 |
| l The unit will display the alarm time for 3 seconds. |
19 |
| l The unit will display the alarm time for 3 seconds. |
19 |
| l During stand-by mode, the display will remain for 6 seconds. |
19 |
| l During stand-by mode, the display will remain for 6 seconds. |
19 |
| l During stand-by mode, the display will remain for 6 seconds. |
19 |
| l During stand-by mode, the display will remain for 6 seconds. |
19 |
| Example: The time is 10:00 AM and iPod function is selected. |
19 |
| <GRAPHIC> |
19 |
| <GRAPHIC> |
19 |
| l Buzzer sound will be output from right speaker only. |
19 |
| l Buzzer sound will be output from right speaker only. |
19 |
| l Buzzer sound will be output from right speaker only. |
19 |
| l Buzzer sound will be output from right speaker only. |
19 |
| l Alarm will not activate during power on mode. |
19 |
| l Alarm will not activate during power on mode. |
19 |
| l Alarm will not activate during power on mode. |
19 |
| l Alarm will not activate during power on mode. |
19 |
| l When iPod is selected in step 2, if iPod unit is not detected during alarm activation, source w... |
19 |
| l When iPod is selected in step 2, if iPod unit is not detected during alarm activation, source w... |
19 |
| l When iPod is selected in step 2, if iPod unit is not detected during alarm activation, source w... |
19 |
| l When iPod is selected in step 2, if iPod unit is not detected during alarm activation, source w... |
19 |
| l When performing alarm using another unit connected to AUX, select AUX in step 2. The unit will ... |
19 |
| l When performing alarm using another unit connected to AUX, select AUX in step 2. The unit will ... |
19 |
| l When performing alarm using another unit connected to AUX, select AUX in step 2. The unit will ... |
19 |
| l When performing alarm using another unit connected to AUX, select AUX in step 2. The unit will ... |
19 |
| n Snooze function |
19 |
| Once alarm has started, pressing the SNOOZE/DIMMER button will stop playback for 5 minutes. Once ... |
19 |
| To turn off the alarm function |
19 |
| During alarm or snooze, press the ALARM ON/OFF button to turn off. |
19 |
| Advanced Features |
20 |
| Alarm and sleep operation (continued) |
20 |
| n Sleep operation |
20 |
| The radio and iPod can be turned off automatically. |
20 |
| <TABLE> |
20 |
| <TABLE> |
20 |
| <TABLE BODY> |
20 |
| <TABLE ROW> |
20 |
| 1 Play back the desired sound source. |
20 |
| 1 Play back the desired sound source. |
20 |
| 1 Play back the desired sound source. |
20 |
| 1 Play back the desired sound source. |
20 |
| <TABLE ROW> |
20 |
| 2 Press the SLEEP button on remote control to select sleep time. |
20 |
| 2 Press the SLEEP button on remote control to select sleep time. |
20 |
| 2 Press the SLEEP button on remote control to select sleep time. |
20 |
| 2 Press the SLEEP button on remote control to select sleep time. |
20 |
| <GRAPHIC> |
20 |
| 3 Press the MEMORY button on remote control. |
20 |
| 3 Press the MEMORY button on remote control. |
20 |
| 3 Press the MEMORY button on remote control. |
20 |
| 3 Press the MEMORY button on remote control. |
20 |
| <GRAPHIC> |
20 |
| “SLEEP” will appear. |
20 |
| “SLEEP” will appear. |
20 |
| <TABLE ROW> |
20 |
| 4 The unit will enter the power stand-by mode automatically after the preset time has elapsed. |
20 |
| 4 The unit will enter the power stand-by mode automatically after the preset time has elapsed. |
20 |
| 4 The unit will enter the power stand-by mode automatically after the preset time has elapsed. |
20 |
| 4 The unit will enter the power stand-by mode automatically after the preset time has elapsed. |
20 |
| <TABLE ROW> |
20 |
| The volume will be turned down 1 minute before the sleep operation finishes. |
20 |
| The volume will be turned down 1 minute before the sleep operation finishes. |
20 |
| <TABLE> |
20 |
| <TABLE> |
20 |
| <TABLE BODY> |
20 |
| <TABLE ROW> |
20 |
| 1 |
20 |
| 1 |
20 |
| While “SLEEP” is indicated, press the SLEEP button once to select “SLEEP XXX”. |
20 |
| While “SLEEP” is indicated, press the SLEEP button once to select “SLEEP XXX”. |
20 |
| <TABLE ROW> |
20 |
| “XXX” is sleep remaining time. |
20 |
| “XXX” is sleep remaining time. |
20 |
| <TABLE ROW> |
20 |
| l The remaining sleep time is displayed for about 10 seconds. |
20 |
| l The remaining sleep time is displayed for about 10 seconds. |
20 |
| <TABLE ROW> |
20 |
| l You can change the remaining sleep time while it is displayed by pressing the SLEEP button (ste... |
20 |
| l You can change the remaining sleep time while it is displayed by pressing the SLEEP button (ste... |
20 |
| Press the ON/STAND-BY button while “SLEEP” is indicated. |
20 |
| To cancel the sleep operation without setting the unit to the stand-by mode, proceed as follows. |
20 |
| <TABLE> |
20 |
| <TABLE> |
20 |
| <TABLE BODY> |
20 |
| <TABLE ROW> |
20 |
| 1 |
20 |
| 1 |
20 |
| While “SLEEP” is indicated, press the SLEEP button to select “SLEEP OFF”, and press the MEMORY bu... |
20 |
| While “SLEEP” is indicated, press the SLEEP button to select “SLEEP OFF”, and press the MEMORY bu... |
20 |
| n To use alarm and sleep operation together |
20 |
| For example, you can fall asleep listening to the radio and wake up to iPod in the next morning. |
20 |
| <TABLE> |
20 |
| <TABLE> |
20 |
| <TABLE BODY> |
20 |
| <TABLE ROW> |
20 |
| 1 |
20 |
| 1 |
20 |
| Set the sleep time (see left, steps 1 - 4). |
20 |
| Set the sleep time (see left, steps 1 - 4). |
20 |
| <TABLE ROW> |
20 |
| 2 |
20 |
| 2 |
20 |
| While the sleep timer is set, set the alarm |
20 |
| While the sleep timer is set, set the alarm |
20 |
| (steps 1 - 5, page 19). |
20 |
| <GRAPHIC> |
20 |
| <GRAPHIC> |
21 |
| Enhancing your system |
21 |
| The connection cord is not included. Purchase a commercially available cord as shown below. |
21 |
| <GRAPHIC> |
21 |
| <GRAPHIC> |
21 |
| When you press any of the following buttons, the unit turns on. |
21 |
| l AUX button (main unit): The unit turns on and the AUX function is activated. |
21 |
| l AUX button (main unit): The unit turns on and the AUX function is activated. |
21 |
| l AUX button (main unit): The unit turns on and the AUX function is activated. |
21 |
| l AUX button (main unit): The unit turns on and the AUX function is activated. |
21 |
| <GRAPHIC> |
21 |
| <GRAPHIC> |
21 |
| <GRAPHIC> |
21 |
| <GRAPHIC> |
21 |
| <GRAPHIC> |
21 |
| n Listening to the playback sounds from VCR, DVD, etc. |
21 |
| <TABLE> |
21 |
| <TABLE> |
21 |
| <TABLE BODY> |
21 |
| <TABLE ROW> |
21 |
| 1 Use a connection cord to connect the VCR, DVD etc. to the AUX IN jacks. |
21 |
| 1 Use a connection cord to connect the VCR, DVD etc. to the AUX IN jacks. |
21 |
| 1 Use a connection cord to connect the VCR, DVD etc. to the AUX IN jacks. |
21 |
| <TABLE ROW> |
21 |
| When using video equipment, connect the audio output to this unit and the video output to a telev... |
21 |
| <TABLE ROW> |
21 |
| 2 Press the ON/STAND-BY button to turn the power on. |
21 |
| 2 Press the ON/STAND-BY button to turn the power on. |
21 |
| 2 Press the ON/STAND-BY button to turn the power on. |
21 |
| 2 Press the ON/STAND-BY button to turn the power on. |
21 |
| <TABLE ROW> |
21 |
| 3 Press the AUX button on main unit once or press the FUNCTION button on remote control repeatedl... |
21 |
| 3 Press the AUX button on main unit once or press the FUNCTION button on remote control repeatedl... |
21 |
| 3 Press the AUX button on main unit once or press the FUNCTION button on remote control repeatedl... |
21 |
| 3 Press the AUX button on main unit once or press the FUNCTION button on remote control repeatedl... |
21 |
| <TABLE ROW> |
21 |
| 4 Play the connected equipment. |
21 |
| 4 Play the connected equipment. |
21 |
| 4 Play the connected equipment. |
21 |
| 4 Play the connected equipment. |
21 |
| To prevent noise interference, place the unit away from the television. |
21 |
| n Headphones |
21 |
| l Before plugging in or unplugging the headphones, reduce the volume. |
21 |
| l Before plugging in or unplugging the headphones, reduce the volume. |
21 |
| l Before plugging in or unplugging the headphones, reduce the volume. |
21 |
| l Before plugging in or unplugging the headphones, reduce the volume. |
21 |
| l Be sure your headphones have a 1/8\ |
21 |
| l Be sure your headphones have a 1/8\ |
21 |
| l Be sure your headphones have a 1/8\ |
21 |
| l Be sure your headphones have a 1/8\ |
21 |
| l Plugging in the headphones disconnects the speakers automatically. Adjust the volume using the ... |
21 |
| l Plugging in the headphones disconnects the speakers automatically. Adjust the volume using the ... |
21 |
| l Plugging in the headphones disconnects the speakers automatically. Adjust the volume using the ... |
21 |
| l Plugging in the headphones disconnects the speakers automatically. Adjust the volume using the ... |
21 |
| l During alarm activation, sound will be output to the speaker even if headphones is plugged in. |
21 |
| l During alarm activation, sound will be output to the speaker even if headphones is plugged in. |
21 |
| l During alarm activation, sound will be output to the speaker even if headphones is plugged in. |
21 |
| l During alarm activation, sound will be output to the speaker even if headphones is plugged in. |
21 |
| References |
22 |
| Troubleshooting chart |
22 |
| Many potential problems can be resolved by the owner without calling a service technician. |
22 |
| If something is wrong with this product, check the following before calling your authorized SHARP... |
22 |
| n General |
22 |
| <TABLE> |
22 |
| <TABLE> |
22 |
| <TABLE BODY> |
22 |
| <TABLE ROW> |
22 |
| Symptom |
22 |
| Symptom |
22 |
| Symptom |
22 |
| Possible cause |
22 |
| Possible cause |
22 |
| Possible cause |
22 |
| <TABLE ROW> |
22 |
| l The clock is not set to the correct time. |
22 |
| l The clock is not set to the correct time. |
22 |
| l Is the ST switch set to the correct setting? |
22 |
| l Is the ST switch set to the correct setting? |
22 |
| l Is the ST switch set to the correct setting? |
22 |
| l Did a power failure occur? Reset the clock. |
22 |
| <TABLE ROW> |
22 |
| l When a button is pressed, the unit does not respond. |
22 |
| l When a button is pressed, the unit does not respond. |
22 |
| l Set the unit to the power stand-by mode and then turn it back on. |
22 |
| l Set the unit to the power stand-by mode and then turn it back on. |
22 |
| <TABLE ROW> |
22 |
| l If the unit still malfunctions, reset it. |
22 |
| l If the unit still malfunctions, reset it. |
22 |
| <TABLE ROW> |
22 |
| l No sound is heard. |
22 |
| l No sound is heard. |
22 |
| l Is the volume level set to “0”? |
22 |
| l Is the volume level set to “0”? |
22 |
| <TABLE ROW> |
22 |
| l Are the headphones connected? |
22 |
| l Are the headphones connected? |
22 |
| <TABLE ROW> |
22 |
| <TABLE> |
22 |
| <TABLE> |
22 |
| <TABLE BODY> |
22 |
| <TABLE ROW> |
22 |
| Symptom |
22 |
| Symptom |
22 |
| Symptom |
22 |
| Possible cause |
22 |
| Possible cause |
22 |
| Possible cause |
22 |
| <TABLE ROW> |
22 |
| l The remote control does not operate. |
22 |
| l The remote control does not operate. |
22 |
| l Is the AC power cord of the unit plugged in? |
22 |
| l Is the AC power cord of the unit plugged in? |
22 |
| <TABLE ROW> |
22 |
| l Is the battery polarity correct? |
22 |
| l Is the battery polarity correct? |
22 |
| <TABLE ROW> |
22 |
| l Is the battery dead? |
22 |
| l Is the battery dead? |
22 |
| <TABLE ROW> |
22 |
| l Is the distance or angle incorrect? |
22 |
| l Is the distance or angle incorrect? |
22 |
| <TABLE ROW> |
22 |
| l Does the remote control sensor receive strong light? |
22 |
| l Does the remote control sensor receive strong light? |
22 |
| n Tuner |
22 |
| <TABLE> |
22 |
| <TABLE> |
22 |
| <TABLE BODY> |
22 |
| <TABLE ROW> |
22 |
| Symptom |
22 |
| Symptom |
22 |
| Symptom |
22 |
| Possible cause |
22 |
| Possible cause |
22 |
| Possible cause |
22 |
| <TABLE ROW> |
22 |
| l The radio makes unusual noises continuously. |
22 |
| l The radio makes unusual noises continuously. |
22 |
| l Is the unit placed near the TV or computer? |
22 |
| l Is the unit placed near the TV or computer? |
22 |
| <TABLE ROW> |
22 |
| l Is the FM antenna or AM loop antenna placed properly? Move the antenna away from the AC power c... |
22 |
| l Is the FM antenna or AM loop antenna placed properly? Move the antenna away from the AC power c... |
22 |
| n iPod |
22 |
| <TABLE> |
22 |
| <TABLE> |
22 |
| <TABLE BODY> |
22 |
| <TABLE ROW> |
22 |
| Symptom |
22 |
| Symptom |
22 |
| Symptom |
22 |
| Possible cause |
22 |
| Possible cause |
22 |
| Possible cause |
22 |
| <TABLE ROW> |
22 |
| l No sound is produced. No image appears on the TV/monitor. |
22 |
| l No sound is produced. No image appears on the TV/monitor. |
22 |
| l The iPod is not playing. |
22 |
| l The iPod is not playing. |
22 |
| <TABLE ROW> |
22 |
| l The iPod is not properly connected to the unit. |
22 |
| l The iPod is not properly connected to the unit. |
22 |
| l Is the AC power cord of the unit plugged in? |
22 |
| l The video cable is not properly connected. |
22 |
| l The TV/monitor’s input selection is not properly set. |
22 |
| <TABLE ROW> |
22 |
| l iPod will not charge. |
22 |
| l iPod will not charge. |
22 |
| l The iPod is not making full contact with the iPod connector. |
22 |
| l The iPod is not making full contact with the iPod connector. |
22 |
| l The iPod is not making full contact with the iPod connector. |
22 |
| l The main unit is in stand-by mode. |
22 |
| <TABLE ROW> |
22 |
| Sudden temperature changes, storage or operation in an extremely humid environment may cause cond... |
22 |
| Condensation can cause the unit to malfunction. If this happens, leave the power on until normal ... |
22 |
| n If trouble occurs |
22 |
| When this product is subjected to strong external interference (mechanical shock, excessive stati... |
22 |
| If such a problem occurs, do the following: |
22 |
| If such a problem occurs, do the following: |
22 |
| 1 Set the unit to the stand-by mode and turn the power on again. |
22 |
| 1 Set the unit to the stand-by mode and turn the power on again. |
22 |
| 1 Set the unit to the stand-by mode and turn the power on again. |
22 |
| 1 Set the unit to the stand-by mode and turn the power on again. |
22 |
| 2 If the unit is not restored in the previous operation, unplug and plug in the unit, and then tu... |
22 |
| 2 If the unit is not restored in the previous operation, unplug and plug in the unit, and then tu... |
22 |
| 2 If the unit is not restored in the previous operation, unplug and plug in the unit, and then tu... |
22 |
| 2 If the unit is not restored in the previous operation, unplug and plug in the unit, and then tu... |
22 |
| If neither operation above restores the unit, clear all the memory by resetting it. |
22 |
| References |
23 |
| n Clearing all the memory (reset) |
23 |
| 1 Press the ON/STAND-BY button to enter the power stand-by mode or demonstration mode. |
23 |
| 1 Press the ON/STAND-BY button to enter the power stand-by mode or demonstration mode. |
23 |
| 1 Press the ON/STAND-BY button to enter the power stand-by mode or demonstration mode. |
23 |
| 1 Press the ON/STAND-BY button to enter the power stand-by mode or demonstration mode. |
23 |
| 2 While pressing down the SNOOZE/DIMMER button and the E SOUND button, press the POWER ON/STAND-B... |
23 |
| 2 While pressing down the SNOOZE/DIMMER button and the E SOUND button, press the POWER ON/STAND-B... |
23 |
| 2 While pressing down the SNOOZE/DIMMER button and the E SOUND button, press the POWER ON/STAND-B... |
23 |
| 2 While pressing down the SNOOZE/DIMMER button and the E SOUND button, press the POWER ON/STAND-B... |
23 |
| 3 Can be operate on main unit only. |
23 |
| 3 Can be operate on main unit only. |
23 |
| 3 Can be operate on main unit only. |
23 |
| 3 Can be operate on main unit only. |
23 |
| <GRAPHIC> |
23 |
| <GRAPHIC> |
23 |
| n Before transporting the unit |
23 |
| Remove the iPod from the unit. Then, set the unit to the power stand- by mode. Carrying the unit ... |
23 |
| Maintenance |
23 |
| n Cleaning the cabinet |
23 |
| Periodically wipe the cabinet with a soft cloth and a diluted soap solution, then with a dry cloth. |
23 |
| l Do not use chemicals for cleaning (gasoline, paint thinner, etc.). It may damage the cabinet fi... |
23 |
| l Do not use chemicals for cleaning (gasoline, paint thinner, etc.). It may damage the cabinet fi... |
23 |
| l Do not use chemicals for cleaning (gasoline, paint thinner, etc.). It may damage the cabinet fi... |
23 |
| l Do not use chemicals for cleaning (gasoline, paint thinner, etc.). It may damage the cabinet fi... |
23 |
| l Do not apply oil to the inside of the unit. It may cause malfunctions. |
23 |
| l Do not apply oil to the inside of the unit. It may cause malfunctions. |
23 |
| l Do not apply oil to the inside of the unit. It may cause malfunctions. |
23 |
| l Do not apply oil to the inside of the unit. It may cause malfunctions. |
23 |
| Specifications |
23 |
| As part of our policy of continuous improvement, SHARP reserves the right to make design and spec... |
23 |
| n General |
23 |
| <TABLE> |
23 |
| <TABLE> |
23 |
| <TABLE BODY> |
23 |
| <TABLE ROW> |
23 |
| Power source |
23 |
| Power source |
23 |
| Power source |
23 |
| AC 120 V, 60 Hz |
23 |
| AC 120 V, 60 Hz |
23 |
| <TABLE ROW> |
23 |
| Power consumption |
23 |
| Power consumption |
23 |
| Power consumption |
23 |
| 29 Watts |
23 |
| 29 Watts |
23 |
| <TABLE ROW> |
23 |
| Output power |
23 |
| Output power |
23 |
| Output power |
23 |
| Front Speakers: 2 watts minimum RMS per channel into 12 ohms from 50 Hz to 20 KHz, 10% total harm... |
23 |
| Front Speakers: 2 watts minimum RMS per channel into 12 ohms from 50 Hz to 20 KHz, 10% total harm... |
23 |
| <TABLE ROW> |
23 |
| Speaker |
23 |
| Speaker |
23 |
| 1-way type light-up speaker system |
23 |
| 1-way type light-up speaker system |
23 |
| Front Speakers: 2-1/2\ |
23 |
| Subwoofer: 4\ |
23 |
| <TABLE ROW> |
23 |
| <TABLE ROW> |
23 |
| <TABLE ROW> |
23 |
| Speaker maximum input power |
23 |
| Speaker maximum input power |
23 |
| Front Speakers: 4W/Channel |
23 |
| Front Speakers: 4W/Channel |
23 |
| Subwoofer: 10W/Channel |
23 |
| <TABLE ROW> |
23 |
| <TABLE ROW> |
23 |
| <TABLE ROW> |
23 |
| Speaker rated input power |
23 |
| Speaker rated input power |
23 |
| Front Speakers: 2W/Channel |
23 |
| Front Speakers: 2W/Channel |
23 |
| Subwoofer: 5W/Channel |
23 |
| <TABLE ROW> |
23 |
| <TABLE ROW> |
23 |
| <TABLE ROW> |
23 |
| Output terminals |
23 |
| Output terminals |
23 |
| Output terminals |
23 |
| Headphones: 16 - 50 ohms (recommended: 32 ohms) |
23 |
| Headphones: 16 - 50 ohms (recommended: 32 ohms) |
23 |
| Video output: 1Vp-p |
23 |
| <TABLE ROW> |
23 |
| <TABLE ROW> |
23 |
| <TABLE ROW> |
23 |
| Input terminals |
23 |
| Input terminals |
23 |
| Input terminals |
23 |
| Auxiliary (audio signal): 500 mV/47 k ohms |
23 |
| Auxiliary (audio signal): 500 mV/47 k ohms |
23 |
| <TABLE ROW> |
23 |
| <TABLE ROW> |
23 |
| <TABLE ROW> |
23 |
| Dimensions |
23 |
| Dimensions |
23 |
| Dimensions |
23 |
| Width: 15-3/4\ |
23 |
| Width: 15-3/4\ |
23 |
| Height: 5-3/4\ |
23 |
| Depth: 9-7/8\ |
23 |
| <TABLE ROW> |
23 |
| Weight |
23 |
| Weight |
23 |
| Weight |
23 |
| 9.5 lbs. (4.3 kg) |
23 |
| 9.5 lbs. (4.3 kg) |
23 |
| n Tuner |
23 |
| <TABLE> |
23 |
| <TABLE> |
23 |
| <TABLE BODY> |
23 |
| <TABLE ROW> |
23 |
| Frequency range |
23 |
| Frequency range |
23 |
| Frequency range |
23 |
| FM: 87.5 - 108.0 MHz |
23 |
| FM: 87.5 - 108.0 MHz |
23 |
 1
1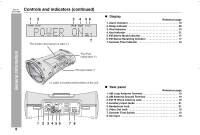 8
8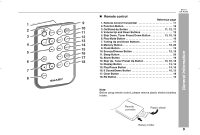 9
9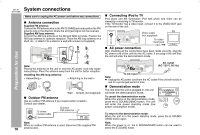 10
10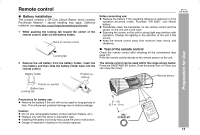 11
11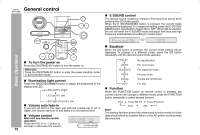 12
12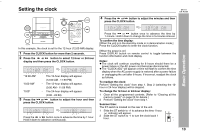 13
13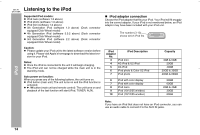 14
14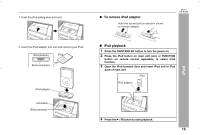 15
15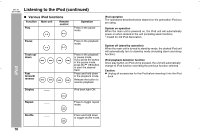 16
16 17
17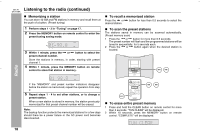 18
18