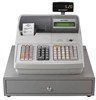
Sharp ER-A520 ER-A520 ER-A530 Operation Manual - Page 223
Cleaning the print head
 |
View all Sharp ER-A520 manuals
Add to My Manuals
Save this manual to your list of manuals |
Page 223 highlights
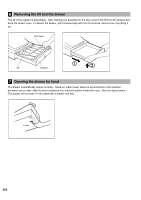
5 Cleaning the print head When the printed text is getting dark or faint, paper dust may be stuck to the print head. Clean the print head as follows: Pull all the way forward 1. Turn the mode switch to the "OFF" position. 2. Remove the printer cover. 3. Pull the print head release lever all the way forward (after it stops at one position, continue pulling forward until it stops again and cannot be pulled forward any further). Print head 4. Clean the print head with a soft rag moist with ethyl alcohol or isopropyl alcohol. 5. Return the print head release lever to its original position immediately after cleaning. 6. Reset the paper roll correctly by following the steps in "Installing the paper roll". 7. Replace the printer cover. Caution: • Never touch the print head with a tool or anything hard as it may damage the head. • The paper cutter is mounted on the printer (receipt side). Be careful not to cut yourself. 221
-
 1
1 -
2
-
3
-
4
-
5
-
6
-
7
-
8
-
9
-
10
-
11
-
12
-
13
-
14
-
15
-
16
-
17
-
18
-
19
-
20
-
21
-
22
-
23
-
24
-
25
-
26
-
27
-
28
-
29
-
30
-
31
-
32
-
33
-
34
-
35
-
36
-
37
-
38
-
39
-
40
-
41
-
42
-
43
-
44
-
45
-
46
-
47
-
48
-
49
-
50
-
51
-
52
-
53
-
54
-
55
-
56
-
57
-
58
-
59
-
60
-
61
-
62
-
63
-
64
-
65
-
66
-
67
-
68
-
69
-
70
-
71
-
72
-
73
-
74
-
75
-
76
-
77
-
78
-
79
-
80
-
81
-
82
-
83
-
84
-
85
-
86
-
87
-
88
-
89
-
90
-
91
-
92
-
93
-
94
-
95
-
96
-
97
-
98
-
99
-
100
-
101
-
102
-
103
-
104
-
105
-
106
-
107
-
108
-
109
-
110
-
111
-
112
-
113
-
114
-
115
-
116
-
117
-
118
-
119
-
120
-
121
-
122
-
123
-
124
-
125
-
126
-
127
-
128
-
129
-
130
-
131
-
132
-
133
-
134
-
135
-
136
-
137
-
138
-
139
-
140
-
141
-
142
-
143
-
144
-
145
-
146
-
147
-
148
-
149
-
150
-
151
-
152
-
153
-
154
-
155
-
156
-
157
-
158
-
159
-
160
-
161
-
162
-
163
-
164
-
165
-
166
-
167
-
168
-
169
-
170
-
171
-
172
-
173
-
174
-
175
-
176
-
177
-
178
-
179
-
180
-
181
-
182
-
183
-
184
-
185
-
186
-
187
-
188
-
189
-
190
-
191
-
192
-
193
-
194
-
195
-
196
-
197
-
198
-
199
-
200
-
201
-
202
-
203
-
204
-
205
-
206
-
207
-
208
-
209
-
210
-
211
-
212
-
213
-
214
-
215
-
216
-
217
-
 218
218 -
 219
219 -
 220
220 -
 221
221 -
 222
222 -
 223
223 -
 224
224 -
 225
225 -
 226
226 -
 227
227 -
 228
228 -
229
 |
 |
