Sharp KB3300JK Service Manual - Page 40
Oven / Microwave Drawer Disassembly
 |
UPC - 074000612334
View all Sharp KB3300JK manuals
Add to My Manuals
Save this manual to your list of manuals |
Page 40 highlights
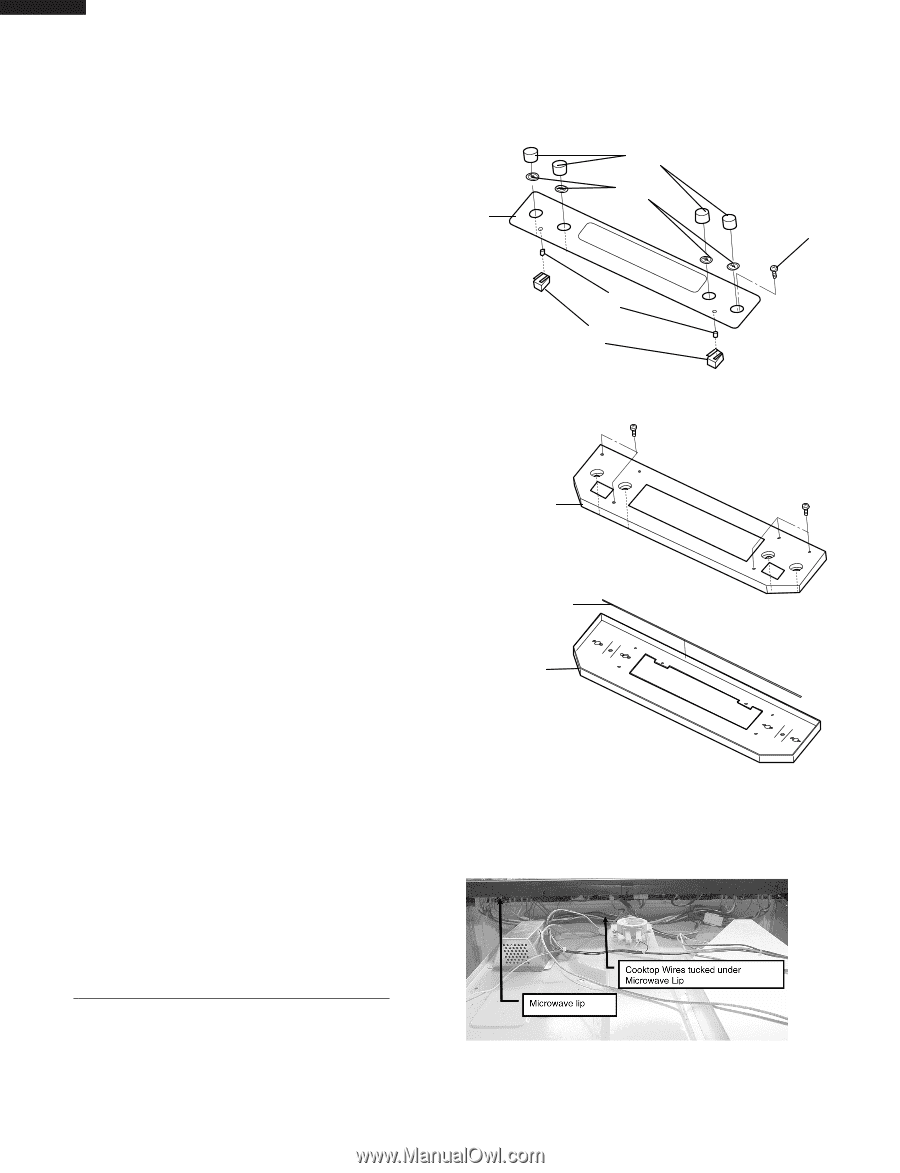
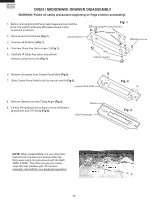
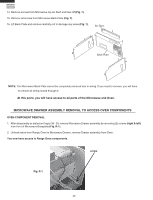
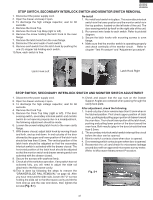
KB-3300JS KB-3300JK KB-3300JW OVEN / MICROWAVE DRAWER DISASSEMBLY WARNING: Follow all safety precautions beginning on Page 2 before proceeding! 1. Before removing Control Panel, take measures to protect the Cook Top surface and keep Microwave Drawer open to prevent scratches. 2. Remove all Control Knobs (Fig 1). 3. Unscrew all Retainers (Fig 1). Glass Key Deco 4. Unscrew Glass Key Deco screw (1) (Fig 1). 5. Carefully lift Glass Key Deco and unhook Indicator Lamp from Lens (Fig 1). Fig. 1 Control Knobs Retainers GND Deco Screw Lens Indicator Lamps 6. Remove all screws from Control Panel Mold (Fig 2). 7. Slide Control Panel Mold to left (to unlock) and lift (Fig 2). Control Panel Mold Fig. 2 8. Remove Gasket from Key Fixing Angle (Fig 3). 9. Lift Key Fixing Mold and carefully unhook all Molex's, ground wire and C/P wiring (Fig 3). Gasket Key Fixing Angle Fig. 3 NOTE: When reassembling, it is very important that all Cook Top wires are tucked under the Microwave cavity lip and secured with the RED WIRE STRAP. The 240v harness can create noise that can interfere with C/P function (example: intermittent or no keyboard operation). 38
-
 1
1 -
2
-
3
-
4
-
5
-
6
-
7
-
8
-
9
-
10
-
11
-
12
-
13
-
14
-
15
-
16
-
17
-
18
-
19
-
20
-
21
-
22
-
23
-
24
-
25
-
26
-
27
-
28
-
29
-
30
-
31
-
32
-
33
-
34
-
 35
35 -
 36
36 -
 37
37 -
 38
38 -
 39
39 -
 40
40 -
 41
41 -
 42
42 -
 43
43 -
 44
44 -
 45
45 -
46
-
47
-
48
-
49
-
50
-
51
-
52
-
53
-
54
-
55
-
56
-
57
-
58
-
59
-
60
-
61
-
62
-
63
-
64
-
65
-
66
-
67
-
68
-
69
-
70
-
71
-
72
 |
 |