Sharp LC-46D62U LC-46D62U LC-52D62U Operation Manual - Page 21
Basic adjustment settings
 |
UPC - 074000363700
View all Sharp LC-46D62U manuals
Add to My Manuals
Save this manual to your list of manuals |
Page 21 highlights
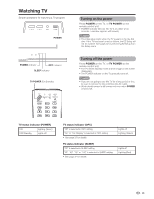
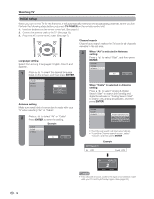
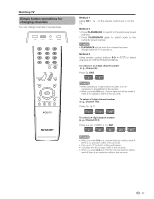
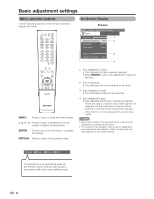
Basic adjustment settings Menu operation buttons Use the following buttons on the remote control to operate the menu. On-Screen Display Example MENU [Option ... Digital Noise Reduction] Option Audio Only 1 Digital Noise Reduction [Off] 2 Input Select [VIDEO] Output select [Fixed] Color System [Auto] Caption Setup 3 Program Title Display [No] 4 MENU: Press to open or close the menu screen. a/b/c/d: Press to select a desired item on the screen or adjust a selected item. ENTER: Press to go to the next step or complete the setting. RETURN: Press to return to the previous step. 1 Item displayed in yellow • This indicates the item currently selected. • Press ENTER to go to the adjustment screen for this item. 2 Item in brackets • This indicates the current setting for the item. 3 Item displayed in white • This indicates an item can be selected. 4 Item displayed in grey • This indicates that the item cannot be selected. There are various reasons why items cannot be selected, but the main reasons are as follows: - Nothing is connected to the selected input terminal. - The function is not compatible with the current input signal. NOTE • Menu options differ in the selected input modes, but the operating procedures are the same. • The screens in the operation manual are for explanation purposes (some are enlarged, others cropped) and may vary slightly from the actual screens. : Select ENTER : Enter RETURN : Back MENU : Exit The bar above is an operational guide for the remote control. The bar will change in accordance with each menu setting screen. 20
-
 1
1 -
2
-
3
-
4
-
5
-
6
-
7
-
8
-
9
-
10
-
11
-
12
-
13
-
14
-
15
-
 16
16 -
 17
17 -
 18
18 -
 19
19 -
 20
20 -
 21
21 -
 22
22 -
 23
23 -
 24
24 -
 25
25 -
 26
26 -
27
-
28
-
29
-
30
-
31
-
32
-
33
-
34
-
35
-
36
-
37
-
38
-
39
-
40
-
41
-
42
-
43
-
44
-
45
-
46
-
47
-
48
-
49
-
50
-
51
-
52
-
53
-
54
-
55
-
56
 |
 |