Sharp LC-46D92U LC-46D92U LC-52D92U Operation Manual - Page 33
Using external equipment
 |
UPC - 074000363885
View all Sharp LC-46D92U manuals
Add to My Manuals
Save this manual to your list of manuals |
Page 33 highlights
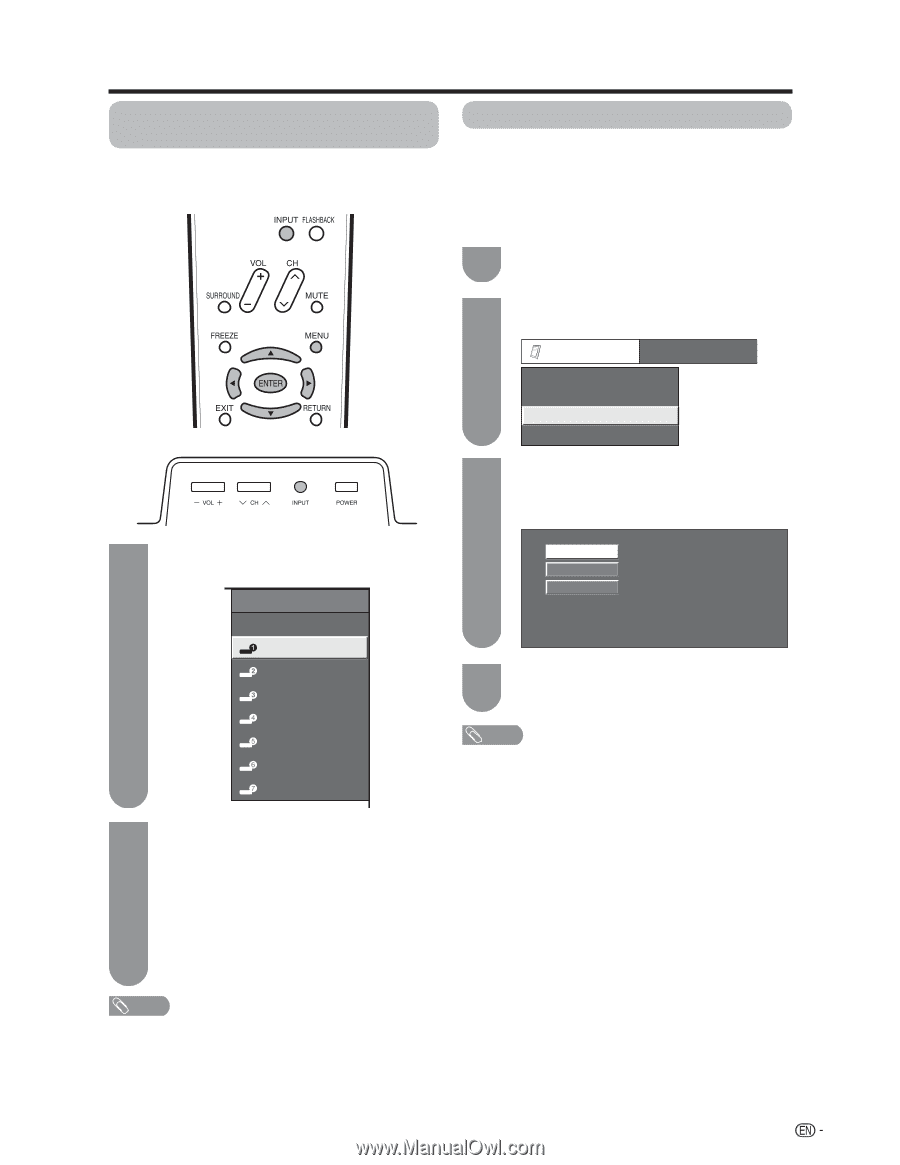
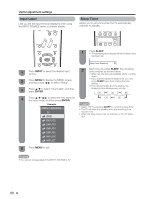
Using external equipment Displaying an external equipment image To view external source images, select the input source from INPUT on the remote control unit or on the TV. Input Select If the image does not come in clearly from the external equipment connected to INPUT 1 or INPUT 7 (DVI), you may need to change the input signal type setting on the "Input Select" menu. Selecting input signal type (INPUT 1) 1 Press MENU to display the MENU screen, and then press c/d to select "Option". 2 Press a/b to select "Input Select", and then press ENTER. Option Audio Only Digital Noise Reduction [Off] Input Select [Auto] Output Select [Fixed] 3 Press a/b to select the signal type you want to set, and then press ENTER. • If the selected signal type is incorrect, images are not displayed or displayed without any color. 1 Press INPUT. • A list of selectable sources appears. INPUT SOURCE Auto COMPONENT VIDEO TV INPUT1 INPUT2 INPUT3 INPUT4 4 Press MENU to exit. • The setting is stored and can be selected on the "INPUT SOURCE" menu. INPUT5 NOTE • Refer to your external equipment operation manual for the INPUT6 signal type. INPUT7 • If you set INPUT 1 to Auto, the TV will automatically select the input signal. • Check the operation manual of the external equipment for Press INPUT again to select the input 2 source. the signal type. • Setting INPUT 1 signal selection to "Auto" when other equipment is connected will result in the following • An image from the selected source automatically connection priority. displays. INPUT 1: • Each time INPUT is pressed, the input source 1 COMPONENT VIDEO toggles. 2 VIDEO • You can also select the input source by pressing a/b. • If the corresponding input is not plugged in, you cannot change the input. Be sure to connect the equipment beforehand. NOTE • See pages 14 to 16 for external equipment connection. 31
-
 1
1 -
2
-
3
-
4
-
5
-
6
-
7
-
8
-
9
-
10
-
11
-
12
-
13
-
14
-
15
-
16
-
17
-
18
-
19
-
20
-
21
-
22
-
23
-
24
-
25
-
26
-
27
-
 28
28 -
 29
29 -
 30
30 -
 31
31 -
 32
32 -
 33
33 -
 34
34 -
 35
35 -
 36
36 -
 37
37 -
 38
38 -
39
-
40
-
41
-
42
-
43
-
44
-
45
-
46
-
47
-
48
-
49
-
50
-
51
-
52
-
53
-
54
-
55
-
56
-
57
-
58
-
59
-
60
-
61
-
62
-
63
-
64
 |
 |