Sharp LC-70UD1U Operation Manual - Page 50
Setting the TV on the Wall - dimensions
 |
View all Sharp LC-70UD1U manuals
Add to My Manuals
Save this manual to your list of manuals |
Page 50 highlights
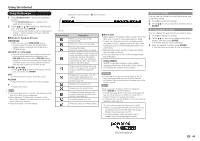
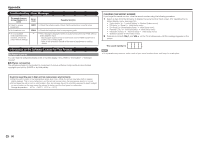
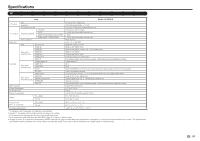
Appendix Setting the TV on the Wall The wall mount kit (sold separately) allows you to mount the TV on the wall. For detailed information on installing the wall mount, see the instructions provided with the product. We recommend you to contact a technician for assistance when installing it. SHARP is not responsible for any damage to the product or injury to yourself or others if you elect to install the wall mount on your own. CAUTION • Install your wall mount on a solid wall perpendicular to the floor. Do not attach the wall mount to plaster board or similarly weak materials. Please contact your nearest retailer/adviser for additional information. If you install the TV on a ceiling or slanted wall, it may fall and result in severe personal injury. Always have two people mount the TV on a wall. NOTE • Due to the terminal configuration on this TV, when you wall-mount this model, make sure there is enough space between the wall and the TV for the cables. • To use this TV mounted on a wall, remove the AC cord holder on the rear of the TV, and then use the screws supplied with the wall mount bracket to secure the bracket to the rear of the TV. The location of the AC cord holder differs depending on whether it is in its shipment location A or has been used as a cable tie B . Attached location at shipment 2 A 1 1 B 1 1 2 If used as a cable tie Wall Mount Kit Specifications Standard dimensions for wall mount kits are shown below. 2 61/64 (75) 10 27/32 (275) WALL MOUNT KIT WALL 15 3/4 (400) 7 7/8 (200) 14 11/64 (360) 6 5/16 (160) 15 3/4 (400) WALL MOUNT KIT 2 49/64 (70) NOTE • When mounting your TV on a wall, avoid that the DuoBass unit on the rear does not come in contact with the wall. Use a Wall Mount Kit with bracket thickness*1 of 2 /49 64 inches (70 mm) or more and inter-bracket space*2 of 12 /39 64 inches (320 mm) or more. 12 /39 64 (320) or more Space*2 2 /49 64 (70) or more Thickness*1 2 19 64/ (58) WALL MOUNT KIT 11 /13 16 (300) Duo Bass WALL MOUNT KIT 15 3/4 (400) (VESA pitch) WALL MOUNT UNIT SCREW CABINET MOUNTING HOLES DEPTH OF MOUNTING HOLES For the screws, refer to the table shown below. Standard screws Length (Depth of mounting holes) Quantity M6 (Use 1.0 pitch screws.) 15/32 (12) 4 pcs. NOTE • Do not mount the TV at a tilt. • To use this TV mounted on a wall, remove the cable tie as needed. • Do not use screws that do not comply with the VESA standard screw specifications. • Do not use screws that are longer than the standard length. Screws that are too long may cause damage to the inside of the TV. • Do not fasten the screws too firmly or loosely. This may damage the product or cause the product to fall, leading to personal injury. SHARP is not liable for these kinds of accidents. • SHARP is not liable for product damage or personal injury when a non-VESA or non-specified wall mount is used or the consumer fails to follow the product installation instructions. Do not install the wall mount kit while your TV is turned on. It may result in personal injury due to electric shock. 48
-
 1
1 -
2
-
3
-
4
-
5
-
6
-
7
-
8
-
9
-
10
-
11
-
12
-
13
-
14
-
15
-
16
-
17
-
18
-
19
-
20
-
21
-
22
-
23
-
24
-
25
-
26
-
27
-
28
-
29
-
30
-
31
-
32
-
33
-
34
-
35
-
36
-
37
-
38
-
39
-
40
-
41
-
42
-
43
-
44
-
 45
45 -
 46
46 -
 47
47 -
 48
48 -
 49
49 -
 50
50 -
 51
51 -
 52
52 -
 53
53 -
 54
54 -
 55
55 -
56
-
57
-
58
 |
 |
