Sharp LC19DV12U LC-19DV28UT LC-22DV28UT Operation Manual - Page 10
Supplied accessories, QUICK REFERENCE - tv
 |
UPC - 683728102685
View all Sharp LC19DV12U manuals
Add to My Manuals
Save this manual to your list of manuals |
Page 10 highlights
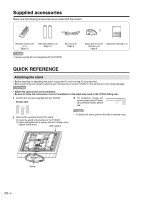
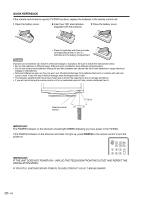
Supplied accessories Make sure the following accessories are provided with the product. Remote control unit (×1) Page 10 "AA" size battery (×2) Page 10 AC cord (×1) Page 9 NOTE • Always use the AC cord supplied with the TV/DVD. Stand unit (×1) and Screws (×3) Page 8 Operation manual (×1) QUICK REFERENCE Attaching the stand • Before attaching (or detaching) the stand, unplug the AC cord from the AC input terminal. • Before performing work spread cushioning over the base area to lay the TV/DVD on. This will prevent it from being damaged. CAUTION • Attach the stand in the correct direction. • Be sure to follow the instructions. Incorrect installation of the stand may result in the TV/DVD falling over. 1 Confirm the 3 screws supplied with the TV/DVD. Screws (X3) 3 For protection, sheets are covering the product. Please remove these sheets before use. 2 Remove the covering sheet of the stand. 1 Insert the stand to the bottom of the TV/DVD. 2 Insert and tighten the 3 screws into the 3 holes on the bottom of the stand. Soft cushion NOTE • To detach the stand, perform the step in reverse order. Screw 8
-
 1
1 -
2
-
3
-
4
-
 5
5 -
 6
6 -
 7
7 -
 8
8 -
 9
9 -
 10
10 -
 11
11 -
 12
12 -
 13
13 -
 14
14 -
 15
15 -
16
-
17
-
18
-
19
-
20
-
21
-
22
-
23
-
24
-
25
-
26
-
27
-
28
-
29
-
30
-
31
-
32
-
33
-
34
-
35
-
36
-
37
-
38
-
39
-
40
-
41
-
42
-
43
 |
 |