Sharp LC42BT10U LC42BT10U Operation Manual - Page 40
Input Signal for PC input mode, AV MODE - user manual
 |
View all Sharp LC42BT10U manuals
Add to My Manuals
Save this manual to your list of manuals |
Page 40 highlights
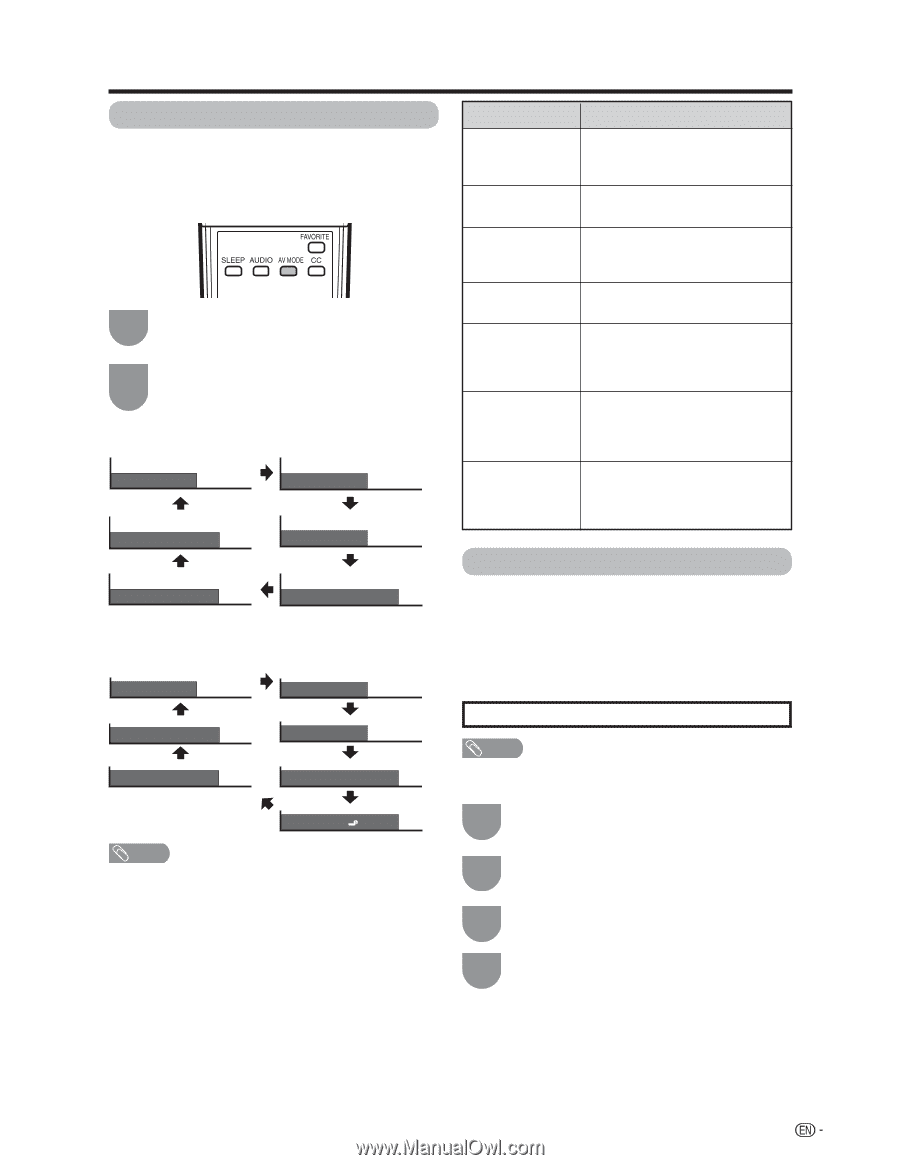
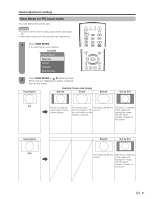
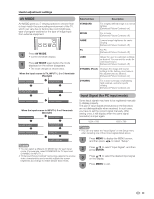
Useful adjustment settings AV MODE AV MODE gives you 7 viewing options to choose from to best match the surrounding environment of the TV, which can vary due to factors like room brightness, type of program watched or the type of image input from external equipment. 1 Press AV MODE. • Current AV MODE displays. 2 Press AV MODE again before the mode displayed on the screen disappears. • The mode changes as shown below. When the input source is TV, INPUT 1, 2 or 3 terminals (Example) AV MODE: STANDARD AV MODE: MOVIE AV MODE: DYNAMIC AV MODE: GAME AV MODE: DYNAMIC (Fixed) AV MODE: USER [TV] When the input source is INPUT 4, 5 or 6 terminals (Example) AV MODE: STANDARD AV MODE: MOVIE AV MODE: DYNAMIC AV MODE: GAME AV MODE: DYNAMIC (Fixed) AV MODE: PC AV MODE: USER [ ] NOTE • You can select a different AV MODE item for each input mode. (For example, select STANDARD for TV input and DYNAMIC for INPUT 1.) • "Enhanced Picture Contrast" technology detects the source video characteristics and smoothly adjusts the screen brightness accordingly to realize deeper black levels. Selected item Description STANDARD For a highly defined image in a normal lighting [Enhanced Picture Contrast: on] MOVIE For a movie [Enhanced Picture Contrast: off] GAME Lowers image brightness for easier viewing [Enhanced Picture Contrast: off] PC For PC [Enhanced Picture Contrast: off] USER Allows the user to customize settings as desired. You can set the mode for each input source. [Enhanced Picture Contrast: off] DYNAMIC (Fixed) Changes the image and sound settings to the factory preset values. No adjustments are allowed. [Enhanced Picture Contrast: on] DYNAMIC For a clear-cut image emphasizing high contrast, useful for sports viewing [Enhanced Picture Contrast: on] Input Signal (for PC input mode) Some input signals may have to be registered manually to display properly. The pair of input signals (resolutions) in the list below are not distinguishable when received. In such case, you have to set the correct signal manually. After setting once, it will display when the same signal (resolution) is input again. 1024g768 1360g768 NOTE • You can only select the "Input Signal" on the Setup menu when receiving one of the 2 input signals listed above. 1 Press MENU to display the MENU screen, and then press c/d to select "Setup". 2 Press a/b to select "Input Signal", and then press ENTER. 3 Press a/b to select the desired input signal on the display. 4 Press MENU to exit. 39
-
 1
1 -
2
-
3
-
4
-
5
-
6
-
7
-
8
-
9
-
10
-
11
-
12
-
13
-
14
-
15
-
16
-
17
-
18
-
19
-
20
-
21
-
22
-
23
-
24
-
25
-
26
-
27
-
28
-
29
-
30
-
31
-
32
-
33
-
34
-
 35
35 -
 36
36 -
 37
37 -
 38
38 -
 39
39 -
 40
40 -
 41
41 -
 42
42 -
 43
43 -
 44
44 -
 45
45 -
46
-
47
-
48
-
49
-
50
-
51
-
52
-
53
-
54
-
55
-
56
-
57
-
58
-
59
-
60
-
61
 |
 |