Sharp LC46D43U Service Manual - Page 19
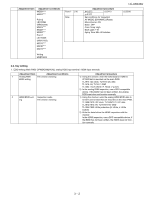
Tray Fixing Angle R, Tray Fixing Angle L, Lug Angle Top, Lug Angle Bottom - lcd
 |
UPC - 890552648849
View all Sharp LC46D43U manuals
Add to My Manuals
Save this manual to your list of manuals |
Page 19 highlights
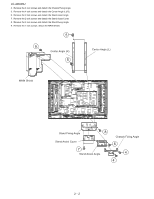
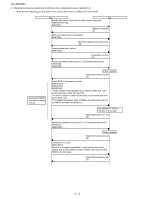
19.Remove the 4 lock screws and detach the Tray Fixing Angle (L)(R). 20.Remove the 7 lock screws and detach the Lug Angle Top. 21.Remove the 9 lock screws and detach the Lug Angle Bottom. 22.Remove the LCD Panel Module. 20 19 Lug Angle Top 20 20 20 LC-42D43U 20 19 Tray Fixing Angle (R) 19 21 21 21 21 21 21 Tray Fixing Angle (L) 19 21 Lug Angle Bottom 2 - 5
-
 1
1 -
2
-
3
-
4
-
5
-
6
-
7
-
8
-
9
-
10
-
11
-
12
-
13
-
 14
14 -
 15
15 -
 16
16 -
 17
17 -
 18
18 -
 19
19 -
 20
20 -
 21
21 -
 22
22 -
 23
23 -
 24
24 -
25
-
26
-
27
-
28
-
29
-
30
-
31
-
32
-
33
-
34
-
35
-
36
-
37
-
38
-
39
-
40
-
41
-
42
-
43
-
44
-
45
-
46
-
47
-
48
-
49
-
50
-
51
-
52
-
53
-
54
-
55
-
56
-
57
-
58
-
59
-
60
-
61
-
62
-
63
-
64
-
65
-
66
-
67
-
68
-
69
-
70
-
71
-
72
-
73
-
74
-
75
-
76
-
77
-
78
-
79
-
80
-
81
-
82
-
83
-
84
-
85
-
86
-
87
-
88
-
89
-
90
-
91
-
92
-
93
-
94
-
95
-
96
-
97
-
98
-
99
-
100
-
101
-
102
-
103
-
104
 |
 |

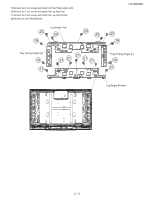
LC-42D43U
2 – 5
19.Remove the 4 lock screws and detach the Tray Fixing Angle (L)(R).
20.Remove the 7 lock screws and detach the Lug Angle Top.
21.Remove the 9 lock screws and detach the Lug Angle Bottom.
22.Remove the LCD Panel Module.
Tray Fixing Angle (R)
Tray Fixing Angle (L)
19
19
19
20
20
20
20
20
21
21
21
21
21
21
19
Lug Angle Top
Lug Angle Bottom
21