Sharp MX-C301W Installation Manual - Page 5
B.Scanner lock release, C.Installation of toner cartridges
 |
View all Sharp MX-C301W manuals
Add to My Manuals
Save this manual to your list of manuals |
Page 5 highlights
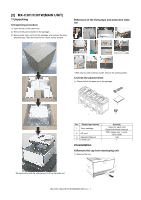
2) Open the front cover. B.Scanner lock release 1) Remove the optical unit fixing screw and the red label. 3) Remove the silica gel material. 4) Remove fixing tapes and the caps on the developing units. C.Installation of toner cartridges * The life of each toner cartridge is as follows: Black toner cartridge: equivalent to approximately 1K (A4/LT 5%) Color toner cartridge: equivalent to approximately 1K (A4/LT 5%) 1) Shake the toner cartridge (included in package) vertically several times. 2) Insert the toner cartridge horizontally and straight until it locks. NOTE: Be sure to install the color cartridges to their proper positions. Avoid installation to a different color position. NOTE: Do not forcibly insert the toner cartridge. Keep holding the cartridge and completely insert it. NOTE: When the machine is transported with the developing unit removed, be sure to remove the toner cartridge. (if not toner may become clogged.) NOTE: Do not remove or insert the toner cartridge with the developer cartridge removed. NOTE: Press the center of the cartridge until it is locked when installing the cartridge. Magenta Cyan Black Yellow NOTE: Be sure to keep the caps. Caps are used when the machine is transferred to the different location. MX-C301 MX-C301/C301W(MAIN UNIT) 2 - 2
-
 1
1 -
 2
2 -
 3
3 -
 4
4 -
 5
5 -
 6
6 -
 7
7
 |
 |