Sharp PN-E603 PN-E603 PN-E703 Quick Start Guide
Sharp PN-E603 Manual
 |
View all Sharp PN-E603 manuals
Add to My Manuals
Save this manual to your list of manuals |
Sharp PN-E603 manual content summary:
- Sharp PN-E603 | PN-E603 | PN-E703 Quick Start Guide - Page 1
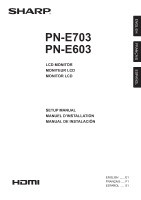
ENGLISH FRANÇAIS ESPAÑOL PN-E703 PN-E603 LCD MONITOR MONITEUR LCD MONITOR LCD SETUP MANUAL MANUEL D'INSTALLATION MANUAL DE INSTALACIÓN ENGLISH ...... E1 FRANÇAIS ..... F1 ESPAÑOL .... S1 - Sharp PN-E603 | PN-E603 | PN-E703 Quick Start Guide - Page 2
SEULEMENT Les produits labellisés ENERGY STAR® sont conçus pour protéger l'environnement par un rendement énergétique supérieur. PN-E603 SÓLO Los Productos que han conseguido el ENERGY STAR® están diseñados para proteger el medio ambiente a través de una mejor eficiencia en el consumo - Sharp PN-E603 | PN-E603 | PN-E703 Quick Start Guide - Page 3
1 SAFETY PRECAUTIONS 2 SAFETY INSTRUCTION 3 MOUNTING PRECAUTIONS 4 Supplied Components 5 Preparing the Remote Control Unit 5 Connections 6 Turning Power On/Off 7 Specifications 8 Mounting Precautions (For SHARP dealers and service engineers 8 Read the manuals in the "Manual" folder of the - Sharp PN-E603 | PN-E603 | PN-E703 Quick Start Guide - Page 4
service life of your LCD product, please read the following precautions carefully before using the product. 1. Read instructions - All operating instructions must be read and understood before the product is operated. 2. Keep this manual . In order to avoid these problems, make sure to observe the - Sharp PN-E603 | PN-E603 | PN-E703 Quick Start Guide - Page 5
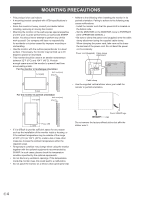
support the monitor. • Ensuring the monitor is not overhanging the edge of the supporting be pulled or grabbed by curious children. SAFETY INSTRUCTION - Do not use the monitor where there is inside of the monitor from an authorized SHARP servicing dealer or service center. - The AC outlet shall - Sharp PN-E603 | PN-E603 | PN-E703 Quick Start Guide - Page 6
special expertise and the work must be performed by an authorized SHARP dealer. You should never attempt to perform any of this work side. - Set the MONITOR on the MONITOR menu to PORTRAIT. (See OPERATION MANUAL.) - Be sure to clamp the power cord (supplied) onto the cable clamp attachment - Sharp PN-E603 | PN-E603 | PN-E703 Quick Start Guide - Page 7
Setup Manual (this manual): 1 Vertical sticker (Logo): 1 Cover SHARP logo: 1 Place this sticker onto the SHARP logo to cover the logo. * SHARP Corporation and slide it in the direction of the arrow. 2. See the instructions in the compartment and put in the supplied batteries (R-6 ("AA" size - Sharp PN-E603 | PN-E603 | PN-E703 Quick Start Guide - Page 8
the plug from the power outlet before connecting/disconnecting cables. Also, read the manual of the equipment to be connected. • Be careful not to confuse the to the input and output terminals may cause malfunctions and the other problems. 1 Power cord (Supplied) 1. AC input terminal 8 2. - Sharp PN-E603 | PN-E603 | PN-E703 Quick Start Guide - Page 9
the power is turned on, the internal battery may be exhausted. Please contact an authorized SHARP servicing dealer or service center for assistance with battery replacement. • Estimated service life of the internal battery: About 5 years (depending on monitor operation) • The initial battery was - Sharp PN-E603 | PN-E603 | PN-E703 Quick Start Guide - Page 10
(1578 x 39.4 x 916) lbs. (kg) Approx. 94.8 (43) PN-E603 AC 100 - 240 V, 2.1-1.0 A, 50/60 Hz 180 W Approx. 54-1/4 (W) x 1-9/16 (D) x 31-1/4 (H) (1378 SHARP dealers and service engineers) • When installing, removing or moving the monitor, ensure that this is carried out by at least 3 people. (PN-E603 - Sharp PN-E603 | PN-E603 | PN-E703 Quick Start Guide - Page 11
SHARP) ...8 Lisez les manuels se trouvant dans le dossier "Manual L'UTILISATEUR À L'INTÉRIEUR. AVERTIR LE PERSONNEL DE SERVICE QUALIFIÉ POUR TOUTE PROCÉDURE D'ENTRETIEN. Le symbole : Cet équipement, après les tests, a été jugé conforme aux utilisé conformément aux instructions du mode d'emploi, - Sharp PN-E603 | PN-E603 | PN-E703 Quick Start Guide - Page 12
d'assurer votre propre sécurité et de prolonger la durée de service de votre moniteur LCD, veuillez lire attentivement les précautions ci- faisant bien attention aux polarités plus (+) et moins (-) des piles selon les instructions dans le compartiment. • Ne mélangez pas des piles usagées avec des - Sharp PN-E603 | PN-E603 | PN-E703 Quick Start Guide - Page 13
étagères, par exemple, sans fixer le meuble concerné et le moniteur à un support approprié. • Ne pas intercaler de tissu ou toute autre matière entre le moniteur Faites nettoyer l'intérieur du moniteur par un revendeur SHARP ou un centre de services autorisé. - La prise de secteur doit être install - Sharp PN-E603 | PN-E603 | PN-E703 Quick Start Guide - Page 14
produit est destiné à être utilisé en intérieur. • Un support de montage conforme aux spécifications VESA est nécessaire. • Comme le tences techniques spéciales et le travail doit être fait par un revendeur agréé par SHARP. Vous ne devez jamais tenter de faire ce travail vous-même. Notre société dé - Sharp PN-E603 | PN-E603 | PN-E703 Quick Start Guide - Page 15
(Logo) : 1 Logo SHARP sur le couvercle : 1 Placez cet autocollant sur le logo SHARP pour le couvrir. * SHARP Corporation détient les droits d'auteur le glisser dans la direction de la flèche. 2. Reportez-vous aux instructions dans le compartiment et insérez les piles fournies (2 piles du format - Sharp PN-E603 | PN-E603 | PN-E703 Quick Start Guide - Page 16
Connexions Attention • Veillez à bien mettre hors tension l'interrupteur principal puis débranchez la prise de l'alimentation secteur avant de connecter ou de déconnecter les câbles. Lisez également le manuel de l'équipement à connecter. • Veillez à ne pas confondre la borne d'entrée avec la borne - Sharp PN-E603 | PN-E603 | PN-E703 Quick Start Guide - Page 17
de réglage de la date/de l'heure apparaît lors de la mise sous tension, alors la batterie est déchargée. Contactez votre revendeur SHARP ou un centre de services autorisé pour le remplacement de la batterie. • Durée de vie estimée de la batterie interne : environ 5 ans (selon le fonctionnement du - Sharp PN-E603 | PN-E603 | PN-E703 Quick Start Guide - Page 18
ments qui dépassent) Poids PN-E703 PN-E603 CA 100 - 240 V, 2,8-1,2 A, 50/60 Hz CA 100 - 240 V, 2,1-1,0 A, 50/60 Hz 0°C à 40°C SHARP) • L'installation, le démontage ou le déplacement du moniteur doit être fait par 3 personnes ou plus. (PN-E603: 2 personnes ou plus.) • Veillez à utiliser un support - Sharp PN-E603 | PN-E603 | PN-E703 Quick Start Guide - Page 19
8 Precauciones de montaje (para distribuidores y técnicos de servicio de SHARP) ...8 Lea los manuales que se encuentran en la carpeta "Manual" del CD-ROM provisto. (Se necesita Adobe Reader para ver los manuales.) INFORMACIÓN IMPORTANTE ADVERTENCIA: PARA REDUCIR EL RIESGO DE INCENDIO O DESCARGAS - Sharp PN-E603 | PN-E603 | PN-E703 Quick Start Guide - Page 20
de usar el producto. 1. Lea las instrucciones - Todas las instrucciones operativas deberán leerse y comprenderse antes de utilizar el producto. 2. Mantenga este manual en un lugar seguro - Estas instrucciones de seguridad y operativas deberán guardarse en un lugar seguro para referencia en el futuro - Sharp PN-E603 | PN-E603 | PN-E703 Quick Start Guide - Page 21
excesivo, un incendio o fallos de funcionamiento. Solicite la limpieza del interior del monitor a un distribuidor o servicio técnico autorizado de SHARP. - La toma de corriente deberá estar instalada cerca del equipo y ser accesible fácilmente. Cable de alimentación - Emplee únicamente el - Sharp PN-E603 | PN-E603 | PN-E703 Quick Start Guide - Page 22
y el trabajo deberá ser efectuado por un distribuidor autorizado de SHARP. Nunca deberá intentar realizar este trabajo usted mismo. Nuestra empresa ón MONITOR del menú MONITOR en PORTRAIT . (Véase el MANUAL DE INSTRUCCIONES.) - Asegúrese de apretar el cable de alimentación ( - Sharp PN-E603 | PN-E603 | PN-E703 Quick Start Guide - Page 23
"AA"): 2 CD-ROM (Disco de utilidades para Windows): 1 Manual de Instalación (este manual): 1 Etiqueta vertical (Logotipo): 1 Cobertura logo SHARP: 1 Coloque esta etiqueta sobre el logotipo de SHARP para tapar el logotipo. * SHARP Corporation posee los derechos de autor del programa Disco de - Sharp PN-E603 | PN-E603 | PN-E703 Quick Start Guide - Page 24
• Asegúrese de apagar el interruptor primario y desconectar el enchufe de la toma de corriente antes de conectar/desconectar los cables. Asimismo, lea el manual del equipo que desea conectar. • Tenga cuidado de no confundir el terminal de entrada con el terminal de salida al conectar los cables. La - Sharp PN-E603 | PN-E603 | PN-E703 Quick Start Guide - Page 25
y la hora en el encendido, la pila interna podría estar gastada. Póngase en contacto con su distribuidor o servicio técnico autorizado de SHARP para obtener ayuda sobre la sustitución de la pila. • Vida estimada de la pila interna: aproximadamente 5 años (dependiendo del funcionamiento del monitor - Sharp PN-E603 | PN-E603 | PN-E703 Quick Start Guide - Page 26
W (mm) Aprox. 1578 (An) x 39,4 (Pr) x 916 (Al) (kg) Aprox. 43 PN-E603 100 - 240 V ca, 2,1-1,0 A, 50/60 Hz 180 W Aprox. 1378 (An) x 39,4 (Pr) x 794 (Al) Aprox. 32 * Las equipos opcionales. Como parte de la política de mejoras continuas, SHARP se reserva el derecho de realizar cambios en el diseño y - Sharp PN-E603 | PN-E603 | PN-E703 Quick Start Guide - Page 27
- Sharp PN-E603 | PN-E603 | PN-E703 Quick Start Guide - Page 28
Printed in Mexico Imprimé au Mexique Impreso en México 14L SM1 TINSE1378MPZZ(1)
-
 1
1 -
 2
2 -
 3
3 -
 4
4 -
 5
5 -
 6
6 -
 7
7 -
8
-
9
-
10
-
11
-
12
-
13
-
14
-
15
-
16
-
17
-
18
-
19
-
20
-
21
-
22
-
23
-
24
-
25
-
26
-
27
-
28
 |
 |
PN-E703
PN-E603
LCD MONITOR
MONITEUR LCD
MONITOR LCD
SETUP MANUAL
MANUEL D’INSTALLATION
MANUAL DE INSTALACIÓN
ENGLISH
......
E1
FRANÇAIS
.....
F1
ESPAÑOL
....
S1
ENGLISH
FRANÇAIS
ESPAÑOL
ENGLISH
FRANÇAIS
ESPAÑOL