Sharp PN-K322B Setup Manual - Page 8
Connections
 |
View all Sharp PN-K322B manuals
Add to My Manuals
Save this manual to your list of manuals |
Page 8 highlights
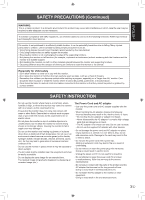
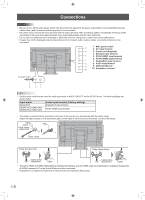
Connections Caution • Be sure to turn off the main power switch and disconnect the plug from the power outlet before connecting/disconnecting cables. Also, read the manual of the equipment to be connected. • Be careful not to confuse the input terminal with the output terminal when connecting cables. Accidentally reversing cables connected to the input and output terminals may cause malfunctions and the other problems. • Do not use any cable that has a damaged or deformed terminal. Using such a cable may cause malfunctions. • Images may not be displayed properly depending on the computer (video cards), cables, or peripheral devices to be connected. 4 1. Main power switch 2. AC input terminal 5 3. Power cord (Supplied) 4. RS-232C input terminal 6 5. PC/AV HDMI1 input terminal 6. PC/AV HDMI2 input terminal 7 7. DisplayPort input terminal 8 8. Audio input terminal 9 9. USB (mini-B) port 10. Headphone terminal 10 For power outlet 3 21 TIPS • Set the audio input terminal used for each input mode in AUDIO SELECT on the SETUP menu. The factory settings are shown below. Input mode DisplayPort HDMI1 [PC], HDMI1 [AV] HDMI2 [PC], HDMI2 [AV] Audio input terminal (Factory setting) DisplayPort input terminal PC/AV HDMI input terminal • The cables connected to the terminals on the rear of the monitor can be fastened with the cable clamp. Attach the cable clamps to the attachment parts on the back of the monitor and the stand, and bind the cables. Cable Cable clamp attachment Cable clamp Cable clamp (small) Cable clamp (large) Cable clamp attachment Cable Cable clamp attachment Cable • The terms HDMI and HDMI High-Definition Multimedia Interface, and the HDMI Logo are trademarks or registered trademarks of HDMI Licensing LLC in the United States and other countries. • DisplayPort is a registered trademark of Video Electronics Standards Association. E6
-
 1
1 -
2
-
 3
3 -
 4
4 -
 5
5 -
 6
6 -
 7
7 -
 8
8 -
 9
9 -
 10
10 -
 11
11 -
 12
12 -
 13
13 -
14
-
15
-
16
-
17
-
18
-
19
-
20
-
21
-
22
-
23
-
24
-
25
-
26
-
27
-
28
 |
 |