Sharp PN-R603 Operation Manual - Page 21
Menu item details, SCREEN, Menu Items
 |
View all Sharp PN-R603 manuals
Add to My Manuals
Save this manual to your list of manuals |
Page 21 highlights
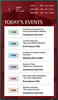
Menu Items Menu item details The menu will differ depending on the input mode. nSCREEN You can move the menu screen display position each time DISPLAY is pressed. AUTO (D-SUB[RGB]/DVI-I (analog)) The CLOCK, PHASE, H-POS, and V-POS are automatically adjusted. ENTER Pressing performs adjustment. Use this automatic adjustment when you use the D-SUB[RGB] or DVI-I (analog) to display a PC screen for the first time or when you change the setting of the PC. (See page 31.) CLOCK (D-SUB[RGB]/DVI-I (analog)) Adjusts frequency for sampling clock for applicable video. Adjust when there is flickering in the form of vertical stripes. When using the adjustment pattern (see page 31), make adjustments so that no vertical stripe noise appears in it. PHASE (D-SUB[RGB]/DVI-I (analog)) Adjusts sampling clock phase for applicable video. Useful when small characters appear with low contrast and/or there are flickers at corners. When using the adjustment pattern (see page 31), make adjustments so that no horizontal stripe noise appears in it. * Adjustments to PHASE should be made only after CLOCK has been correctly set. H-POS Adjust the horizontal position of the image. V-POS Adjust the vertical position of the image. H-SIZE Adjust the horizontal size of the image. V-SIZE Adjust the vertical size of the image. RESOLUTION SETTING (D-SUB[RGB]/DVI-I (analog)) H-RESOLUTION Sets proper horizontal resolution when the resolution of input signals is not recognized properly. (Adjustment may be impossible with some signals.) V-RESOLUTION Sets proper vertical resolution when the resolution of input signals is not recognized properly. (Adjustment may be impossible with some signals.) RESET Resets the values of the SCREEN menu items to the factory preset values. Select "ON" and then press . ENTER 21 E
-
 1
1 -
2
-
3
-
4
-
5
-
6
-
7
-
8
-
9
-
10
-
11
-
12
-
13
-
14
-
15
-
 16
16 -
 17
17 -
 18
18 -
 19
19 -
 20
20 -
 21
21 -
 22
22 -
 23
23 -
 24
24 -
 25
25 -
 26
26 -
27
-
28
-
29
-
30
-
31
-
32
-
33
-
34
-
35
-
36
-
37
-
38
-
39
-
40
-
41
-
42
-
43
-
44
-
45
-
46
-
47
-
48
-
49
-
50
-
51
-
52
-
53
-
54
-
55
-
56
-
57
-
58
-
59
-
60
-
61
-
62
 |
 |
