Sharp R-820JS R-820BC , R-820JS Microwave Operation Manual - Page 25
Cleaning And Care - stainless steel
 |
UPC - 074000612235
View all Sharp R-820JS manuals
Add to My Manuals
Save this manual to your list of manuals |
Page 25 highlights
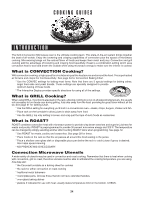
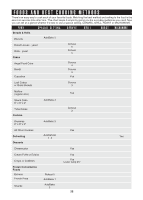
OTHER CONVENIENT FEATURES KITCHEN TIMER • Suppose you want to time a 3 minute long distance phone call. PROCEDURE 1 Touch Kitchen Timer pad. KITCHEN TIMER 2 Enter time. 300 3 Touch Start/ Touch On pad. START TOUCH ON DEMONSTRATION MODE To demonstrate, touch Clock, the number 0 and touch Start/Touch On and hold for 3 seconds. DEMO ON will appear in the display. Cooking operations and specific special features can now be demonstrated with no power in the oven. For example, touch Minute Plus and the display will show 1.00 and count down quickly to END. To cancel, touch Clock, then the number 0 and Stop/Clear. If easier, unplug the oven from the electrical outlet and replug. CLEANING AND CARE Disconnect the power cord before cleaning or leave the door open to inactivate the oven during cleaning. IMPORTANT: Before cleaning, make sure the oven door, outer cabinet, oven cavity, air vent openings, turntable, turntable support and racks are cool. Exterior Clean the outside with mild soap and water. Then wipe with a clean dampened cloth and polish dry with a soft cloth. Do not use any type of household or abrasive cleaner. Door Wipe the window on both sides with a soft damp cloth to remove any spills or spatters. Metal parts will be easier to maintain if wiped frequently with a soft damp cloth. Avoid the use of spray and other harsh cleaners as they may stain, streak or dull the door surface. Touch Control Panel Wipe the panel with a soft cloth dampened slightly with water only. Dry with a soft cloth. Do not scrub or use any sort of chemical cleaners. Close door and touch Stop/Clear. Interior The oven should be wiped using hot soapy water and a sponge or soft cloth whenever spatters occur. Polish dry. You can hold the bottom heater up while cleaning under it. After cleaning, return it to the oven bottom. For heavy stains, it may be necessary to use an oven cleaning gel; use only on the stainless steel interior of the oven. Follow the cleaner's directions exactly, always being sure to wipe using a sponge or soft cloth until all traces of cleaner are removed and then polish dry with a soft cloth. DO NOT USE ABRASIVES OR SCOURING PADS ON YOUR OVEN AS THEY MAY SCRATCH. NEVER SPRAY OVEN CLEANERS DIRECTLY ON ANY PART OF YOUR OVEN. After cleaning the interior thoroughly,residual grease may be removed from the interior ducts and heater by simply operating the oven on 450 °F. for 20 minutes without food. Ventilate the room if necessary. Waveguide Cover The waveguide cover is made from mica so requires special care. Keep the waveguide cover clean to assure good oven performance. Carefully wipe with a soft damp cloth any food spatters from the surface of the cover immediately after they occur. Built-up splashes may overheat and cause smoke or possibly catch fire. Do not remove the waveguide cover. Odor Removal Occasionally, a cooking odor may remain in the oven. To remove, combine 1 cup water, grated peel and juice of 1 lemon and several whole cloves in a 2-cup glass measuring cup. Boil for several minutes using 100% power. Allow to set in oven until cool. Wipe interior with a soft cloth. Turntable/Turntable Support/Rack The turntable, turntable support and rack can be removed for easy cleaning. Wash them in mild, sudsy water; for stubborn stains use a mild cleanser and non-abrasive scouring sponge. They are also dishwasher-proof. Use upper rack of dishwasher for turntable support. Foods with high acidity, such as tomatoes or lemons, may cause the porcelain enamel turntable to discolor. Do not cook highly acidic foods directly on the turntable; if spills occur, wipe up immediately. The turntable motor shaft is not sealed, so excess water or spills should be wiped up immediately. Exterior Interior Turntable Bottom heater 22 Turntable support Rack
-
 1
1 -
2
-
3
-
4
-
5
-
6
-
7
-
8
-
9
-
10
-
11
-
12
-
13
-
14
-
15
-
16
-
17
-
18
-
19
-
 20
20 -
 21
21 -
 22
22 -
 23
23 -
 24
24 -
 25
25 -
 26
26 -
 27
27 -
 28
28 -
 29
29 -
 30
30 -
31
-
32
-
33
-
34
-
35
-
36
-
37
-
38
-
39
-
40
-
41
-
42
-
43
-
44
-
45
-
46
-
47
 |
 |
