Sharp R420E R-420E Microwave Operation Manual - Page 11
Before Operating, Manual Operation
 |
View all Sharp R420E manuals
Add to My Manuals
Save this manual to your list of manuals |
Page 11 highlights
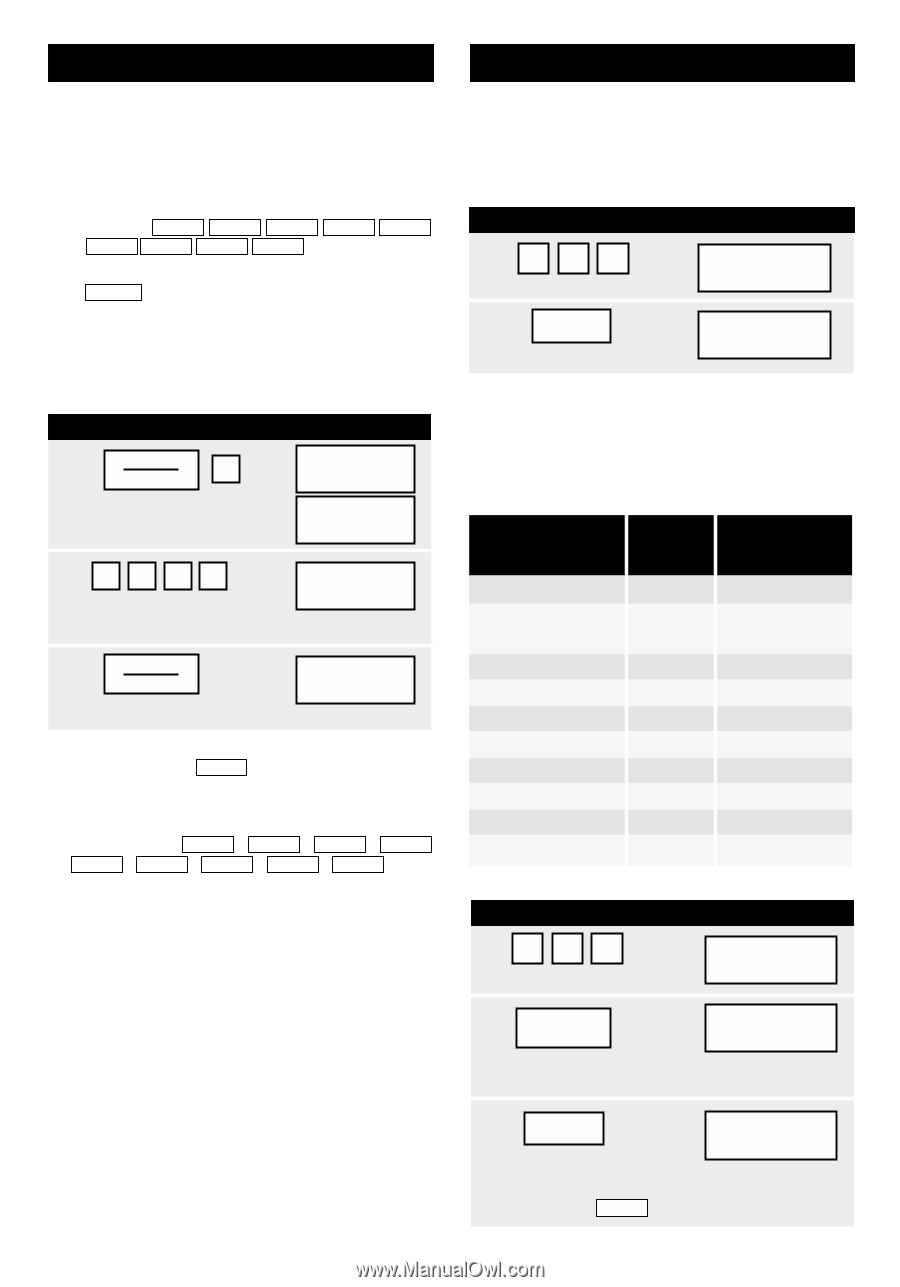
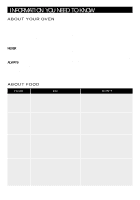
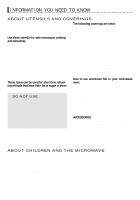
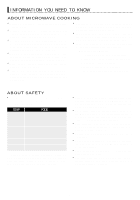
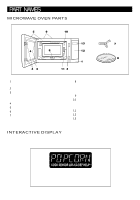
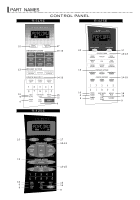
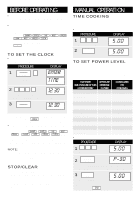
BEFORE OPERATING • Before operating your new microwave oven make sure you read and understand this operation manual completely. • Before the oven can be used, follow these procedures: 1. Plug in the oven. Close the door. The oven display will show SHARP SIMPLY THE BEST PRESS . CLEAR AND PRESS CLOCK . 2. Touch the STOP/CLEAR pad. : will appear. 3. Set clock. TO SET THE CLOCK • Suppose you want to enter the correct time of day 12:30 (A.M. or P.M.). PROCEDURE DISPLAY 1 TIMER CLOCK 2 ENTER Touch CLOCK pad and number 2. T I ME 21 2 3 0 12. 30 Enter the correct time of day by touching the numbers in sequence. 3 TIMER CLOCK Touch CLOCK pad again. 12. 30 This is a 12 hour clock. If you attempt to enter an incorrect clock time, ERROR will appear in the display. Touch the STOP/CLEAR pad and re-enter the time. • If the electrical power supply to your microwave oven should be interrupted, the display will inter- mittently show SHARP SIMPLY THE BEST . PRESS CLEAR AND PRESS CLOCK after the power is reinstated. If this occurs during cook- ing, the program will be erased. The time of day will also be erased. Simply touch STOP/CLEAR pad and reset the clock for the correct time of day. NOTE: Your oven can be programmed with the door open except for START, MINUTE PLUS, SENSOR COOK, INSTANT ACTION and COMPU DEFROST. STOP/CLEAR Touch the STOP/CLEAR pad to: 1. Erase if you make a mistake during programming. 2. Cancel timer. 3. Stop the oven temporarily during cooking. 4. Return the time of day to the display. 5. Cancel a program during cooking, touch twice. MANUAL OPERATION TIME COOKING Your oven can be programmed for 99 minutes 99 seconds (99.99). Always enter the seconds after the minutes, even if they are both zeros. • Suppose you want to cook for 5 minutes at 100%. PROCEDURE DISPLAY 1 500 Enter cooking time. 15.00 2 START Touch START pad. 15.00 COOK DEFROST TO SET POWER LEVEL There are eleven preset power levels. Using lower power levels increases the cooking time which is recommended for foods such as cheese, milk and long slow cooking of meats. Consult cookbook or recipes for specific recommendations. TOUCH POWER APPROXIMATE LEVEL PAD NUMBER OF TIMES PERCENTAGE FOR DESIRED POWER OF POWER COMMON WORDS FOR POWER LEVELS POWER LEVEL x 1 100% High POWER LEVEL x 2 90% POWER LEVEL x 3 80% POWER LEVEL x 4 70% Medium High POWER LEVEL x 5 60% POWER LEVEL x 6 50% POWER LEVEL x 7 40% Medium POWER LEVEL x 8 POWER LEVEL x 9 30% Med Low/Defrost 20% POWER LEVEL x 10 10% Low POWER LEVEL x 11 0% • Suppose you want to defrost for 5 minutes at 30%. PROCEDURE DISPLAY 15 0 0 Enter defrosting time. 15.00 POWER 2 LEVEL x 8 1P-30 Touch POWER LEVEL pad eight times or hold down until the desired power level appears. 3 START Touch START pad. 15.00 COOK DEFROST When the defrost time is complete, a long tone will sound and END will appear in the display. 9
-
 1
1 -
2
-
3
-
4
-
5
-
 6
6 -
 7
7 -
 8
8 -
 9
9 -
 10
10 -
 11
11 -
 12
12 -
 13
13 -
 14
14 -
 15
15 -
 16
16 -
17
-
18
-
19
-
20
-
21
-
22
-
23
-
24
 |
 |