Sharp VL-AH130U VLAH130U Operation Manual - Page 17
Charging the Battery Pack
 |
View all Sharp VL-AH130U manuals
Add to My Manuals
Save this manual to your list of manuals |
Page 17 highlights
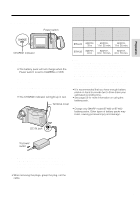
Preparation Charging the Battery Pack Power switch CHARGE indicator Charging time and maximum continuous recording and playback times Max. Battery Charging continuous pack time recording time Max. continuous playback time BT-H22 approx. 3 hr. approx. 1 hr. 35 min. approx. 1 hr. 35 min. BT-H32 approx. 6 hr. approx. 3 hr. 10 min. approx. 3 hr. 10 min. 1 Insert the battery pack into the VIEWCAM (see page 7). Make sure that the Power switch is set to OFF. • The battery pack will not charge when the Power switch is set to CAMERA or VCR. 2 Insert the AC plug of the AC adapter into a power outlet. 3 Open the terminal cover on the VIEWCAM and insert the DC plug of the AC adapter into the DC IN jack on the VIEWCAM. • The CHARGE indicator will light up in red. Notes: • Using the zoom (see page 19) and other functions or turning the power on and off frequently will increase power consumption. This may result in a decrease of more than 50% in the actual recording time compared to the maximum continuous recording time listed above. • The charging time and recording time may vary depending on the ambient temperature and the condition of the battery pack. • It is recommended that you have enough battery packs on hand to provide two to three times your estimated recording time. • See page 52 for more information on using the battery pack. Terminal cover Caution: • Charge only SHARP model BT-H22 or BT-H32 battery packs. Other types of battery packs may burst, causing personal injury and damage. DC IN jack To power outlet 4 When the battery is fully charged, the CHARGE indicator will light up in green. Remove the DC plug from the VIEWCAM, and close the terminal cover. Caution: • When removing the plugs, grasp the plug, not the cable. 8
-
 1
1 -
2
-
3
-
4
-
5
-
6
-
7
-
8
-
9
-
10
-
11
-
 12
12 -
 13
13 -
 14
14 -
 15
15 -
 16
16 -
 17
17 -
 18
18 -
 19
19 -
 20
20 -
 21
21 -
 22
22 -
23
-
24
-
25
-
26
-
27
-
28
-
29
-
30
-
31
-
32
-
33
-
34
-
35
-
36
-
37
-
38
-
39
-
40
-
41
-
42
-
43
-
44
-
45
-
46
-
47
-
48
-
49
-
50
-
51
-
52
-
53
-
54
-
55
-
56
-
57
-
58
-
59
-
60
-
61
-
62
-
63
-
64
-
65
-
66
-
67
-
68
-
69
-
70
-
71
-
72
 |
 |
