Sharp VL-AH160U Operation Manual - Page 64
Editing
 |
View all Sharp VL-AH160U manuals
Add to My Manuals
Save this manual to your list of manuals |
Page 64 highlights
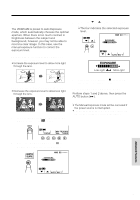
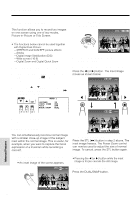
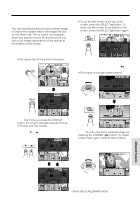
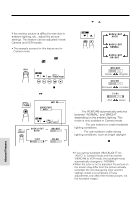
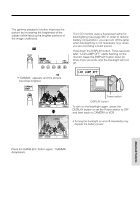
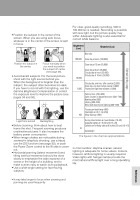
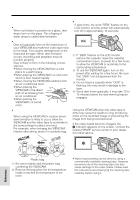
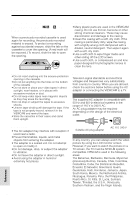
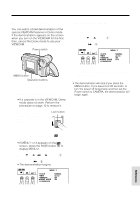
Advanced Features Editing Video editing lets you refine your videos by removing unwanted sequences from your tape, or transposing one sequence with another. This VIEWCAM lets you monitor the source program on the built-in LCD monitor without having to connect it to an external TV or video monitor. Connect the VIEWCAM to a VCR with the supplied audio/video cable, as shown. Recording Yellow: To VIDEO IN jack White: To AUDIO IN (L) jack POWER TV/VCR SET UP PLAY PAUSE /STILL STOP/ EJECT CHANNEL REC Audio/video cable (supplied) Playback To AUDIO/VIDEO jack 4 Press the Pause/Still button on the VCR to pause recording when the source tape reaches the beginning of the sequence to be cut. 5 Press the Pause/Still or Record button on the VCR to resume recording when the source tape reaches the end of the sequence to be cut. To stop editing Press the Stop buttons on the VIEWCAM and the VCR. Notes: • Some of the transitions between edited sequences may be slightly off. • There may be picture noise during video search or still picture playback. This does not imply a defect in the VIEWCAM. Setting Edit Mode Picture quality inevitably decreases when dubbing from the VIEWCAM to a VCR. To minimize the quality reduction, set the VIEWCAM to Edit mode. 1 Set the Power switch to VCR, then press the MENU button until appears. MENU ED I T REMOT E OF F AUTO ON Cutting Unwanted Sequences 1 Play back the tape to be edited, and locate the beginning and end of the sequence you wish to cut. Write down the tape counter readings at the beginning and end of that sequence (see page 41). Then rewind the tape to the beginning of the portion that you wish to keep. 2 Load a video cassette into the recording VCR. 3 Set the Power switch on the VIEWCAM to VCR. Press the PLAY button (D) on the VIEWCAM and the Record button on the VCR at the same time. 55 33 P I CSET TURE 2 Press the ĭ or İ button (Q) to select "EDIT", then press the SET button (B) (W) to select "ON". MENU ED I T ON SET REMOT E AUTO ON P I CSET TURE Notes: • The EDIT mode does not function when the VIEWCAM is recording. • After you finish editing, set the EDIT menu item back to "OFF". Advanced Features
-
 1
1 -
2
-
3
-
4
-
5
-
6
-
7
-
8
-
9
-
10
-
11
-
12
-
13
-
14
-
15
-
16
-
17
-
18
-
19
-
20
-
21
-
22
-
23
-
24
-
25
-
26
-
27
-
28
-
29
-
30
-
31
-
32
-
33
-
34
-
35
-
36
-
37
-
38
-
39
-
40
-
41
-
42
-
43
-
44
-
45
-
46
-
47
-
48
-
49
-
50
-
51
-
52
-
53
-
54
-
55
-
56
-
57
-
58
-
 59
59 -
 60
60 -
 61
61 -
 62
62 -
 63
63 -
 64
64 -
 65
65 -
 66
66 -
 67
67 -
 68
68 -
 69
69 -
70
-
71
-
72
-
73
-
74
-
75
-
76
-
77
-
78
-
79
-
80
 |
 |
