Sharp XE-A106 Quick Start Guide - Page 1
Sharp XE-A106 Manual
 |
UPC - 074000049505
View all Sharp XE-A106 manuals
Add to My Manuals
Save this manual to your list of manuals |
Page 1 highlights
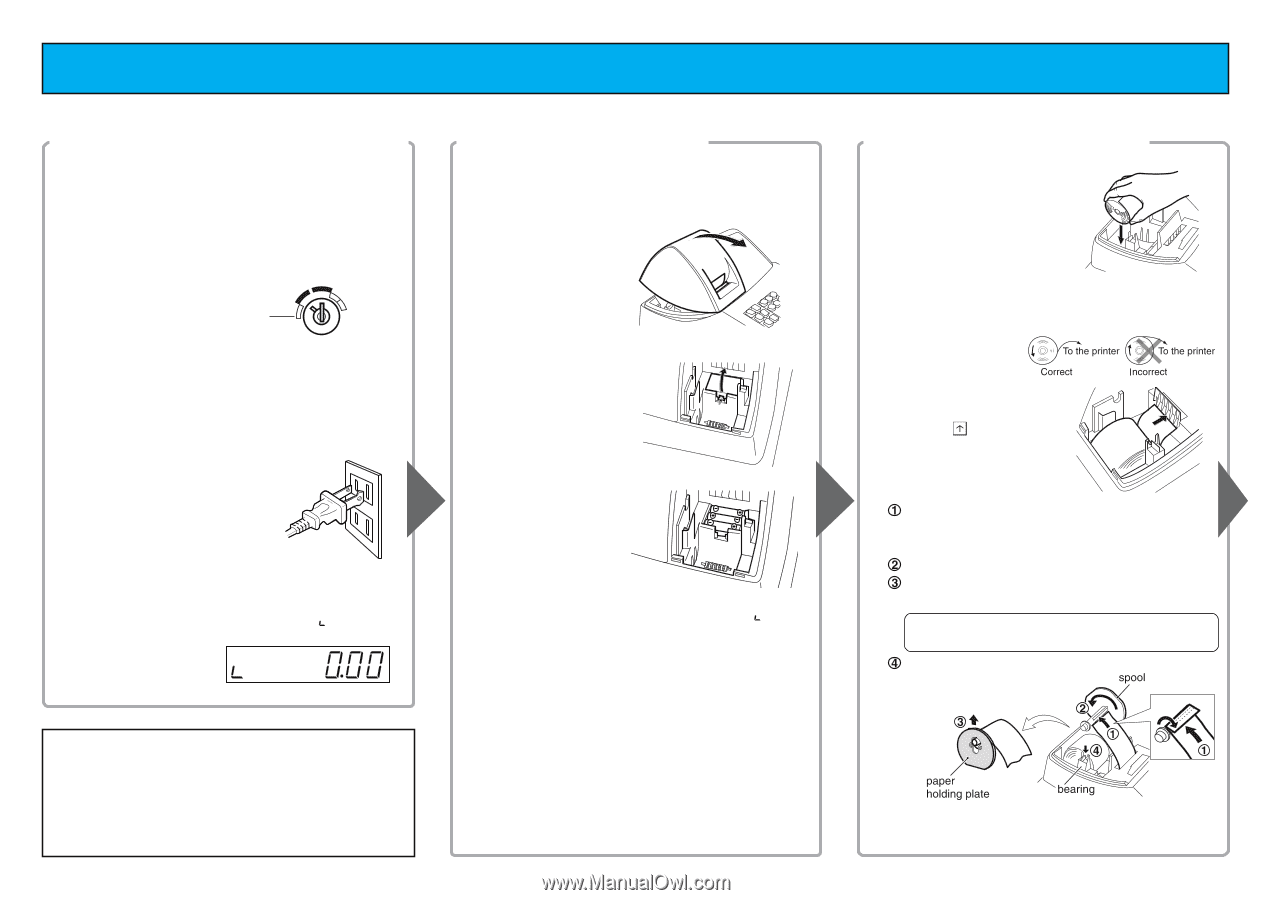
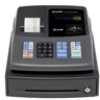
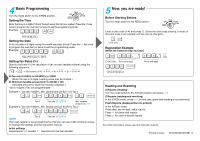
XE-A106 Quick Start Guide English The following describes how to get your cash register ready to operate. Follow these steps when you use the cash register for the first time. 1 Initializing the Cash Register To ensure the cash register operates properly, 2 Installing Batteries Install batteries for back-up of sales data and 3 Installing a Paper Roll initialize it using the following procedure: programmed contents. 1.Place a paper roll in the paper roll cradle so that the 1. With the power cable unplugged, insert the 1.Push the printer cover paper unrolls from the supplied mode key into the mode switch and turn forward and detach it. bottom. it to the REG position. REG OFF X/Flash VOID Z/PGM NOTE Before placing a new paper roll in the paper roll cradle, cut off the pasted (taped) part of the paper and confirm that the cut end of the paper is straight. 2. Insert the plug of the power cable into the AC outlet. IMPORTANT This operation must be performed without batteries loaded. The buzzer will sound three times. 3. Now the cash register has been initialized. The register display will show "0.00" with " " . The following are supplied with your cash register. 1 paper roll 1 Quick Start Guide (English) 1 mode key 1 Quick Start Guide (Spanish) 1 drawer lock key 1 ink roller (pre-installed) 1 instruction manual (English) 1 take-up spool 1 instruction manual (Spanish) 1 paper holding plate 1 mounting bracket 2.Open the battery cover next to the paper roll cradle. View from rear 3.Insert three new "AA" batteries. (Batteries are not supplied with the cash register.) View from rear 4. When the batteries are properly installed, " " on the display will disappear. Close the battery cover. IMPORTANT Improper use of batteries may damage the cash register. Please take the following precautions. • Be sure that the positive (+) and negative (-) poles of each battery are oriented properly. • Never mix batteries of different types. • Never mix old batteries and new ones. Please read the instruction manual for other battery handling precautions. 2.Insert the paper straight into the paper inlet, and press the key. The inserted end comes out at the printing area. 3. (For journal printing) Insert the top end of the paper into the slit in the take-up spool shaft and fold the inserted end toward you. Wind the paper two or three turns. Mount the supplied paper holding plate onto the take-up spool. Put the spool shaft in the larger hole of the paper holding plate and push the plate in the direction of the arrow. Place the take-up spool on the bearing. 4.Attach the printer cover. (For receipt printing, step 3 should be omitted.)
-
 1
1 -
 2
2
 |
 |