Sharp XE-A20S XE-A20S Operation Manual in English and Spanish - Page 10
Installing a paper roll, Precaution: The paper cutter is mounted on the printer cover. - register
 |
View all Sharp XE-A20S manuals
Add to My Manuals
Save this manual to your list of manuals |
Page 10 highlights
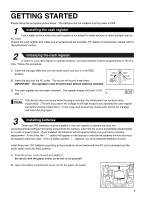
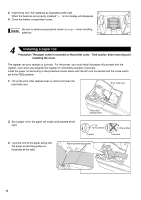
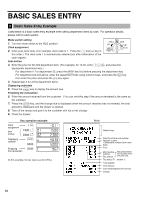
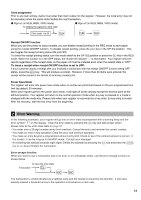
3. Insert three new "AA" batteries as illustrated at the right. When the batteries are properly installed " " on the display will disappear. 4. Close the battery compartment cover. Be sure to observe precautions shown on page 1 when handling batteries. 4 Installing a paper roll Precaution: The paper cutter is mounted on the printer cover. Take caution when removing and installing the cover. The register can print receipts or journals. For the printer, you must install the paper roll provided with the register, even when you program the register for not printing receipts or journals. Install the paper roll according to the procedure shown below with the AC cord connected and the mode switch set to the REG position: 1. Lift up the print roller release lever to unlock and open the print roller arm. Print roller arm Print roller release lever 2. Set a paper roll in the paper roll cradle as illustrated at the right. To the printer Correct To the printer Incorrect 3. Feed the end of the paper along with the paper positioning guides as illustrated at the right. Paper positioning guides 8
-
 1
1 -
2
-
3
-
4
-
 5
5 -
 6
6 -
 7
7 -
 8
8 -
 9
9 -
 10
10 -
 11
11 -
 12
12 -
 13
13 -
 14
14 -
 15
15 -
16
-
17
-
18
-
19
-
20
-
21
-
22
-
23
-
24
-
25
-
26
-
27
-
28
-
29
-
30
-
31
-
32
-
33
-
34
-
35
-
36
-
37
-
38
-
39
-
40
-
41
-
42
-
43
-
44
-
45
-
46
-
47
-
48
-
49
-
50
-
51
-
52
-
53
-
54
-
55
-
56
-
57
-
58
-
59
-
60
-
61
-
62
-
63
-
64
-
65
-
66
-
67
-
68
-
69
-
70
-
71
-
72
-
73
-
74
-
75
-
76
-
77
-
78
-
79
-
80
-
81
-
82
-
83
-
84
-
85
-
86
-
87
-
88
-
89
-
90
-
91
-
92
-
93
-
94
-
95
-
96
-
97
-
98
-
99
-
100
-
101
-
102
-
103
-
104
-
105
-
106
-
107
-
108
 |
 |
