Sharp XG-C465X XG-C435X XG-C465X Operation Manual - Page 34
Correcting Trapezoidal Distortion, Press, KEYSTONE on the remote, control to enter the Keystone Correc
 |
View all Sharp XG-C465X manuals
Add to My Manuals
Save this manual to your list of manuals |
Page 34 highlights
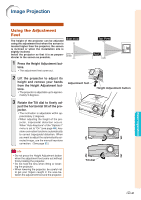
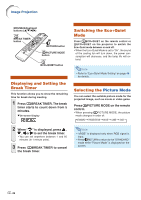
Image Projection Correcting Trapezoidal Distortion Auto Keystone Correction When the image is projected either from the top or from the bottom towards the screen at an angle, the image becomes distorted trapezoidally. The function for correcting trapezoidal distortion is called Keystone Correction. This projector is equipped with an "Auto Keystone Correction" function that automatically corrects any trapezoidal distortion within the projected image.The correction is made automatically provided the vertical incline or decline is within ±12 degrees. Note • When not using the Auto Keystone Correction function, set "Auto Keystone" on the "Options1" menu to "Off". Manual Keystone Correction When you want to make fine adjustments after the Auto Keystone Correction function has been activated, or when you want to make corrections without using the Auto Keystone Correction function, you can make corrections manually using the following procedure. 1 Press KEYSTONE on the remote control to enter the Keystone Correction mode. • You can also use KEYSTONE on the projector. 2 Press ', | or ", \ on the re- mote control to adjust the Keystone Correction. • You can also adjust the Keystone Correction using the ', | or ", \ buttons on the projector. Note • Press RETURN to return to the default setting. • Straight lines or the edges of images may appear jagged while adjusting the image. 3 Press KEYSTONE. • The on-screen display of the Keystone Correction mode will disappear. • You can also use KEYSTONE on the projector. -32 KEYSTONE button MOUSE/Adjustment buttons ('/"/\/|) RETURN button "On-screen Display (Keystone Correction mode) Compresses upper side. Compresses lower side. Note • The Manual Keystone Correction can be adjusted up to an angle of approximately ±40 degrees and the screen can also be set up to an angle of approximately ±40 degrees (when the resize mode is set to "Normal" (see page 47)).
-
 1
1 -
2
-
3
-
4
-
5
-
6
-
7
-
8
-
9
-
10
-
11
-
12
-
13
-
14
-
15
-
16
-
17
-
18
-
19
-
20
-
21
-
22
-
23
-
24
-
25
-
26
-
27
-
28
-
 29
29 -
 30
30 -
 31
31 -
 32
32 -
 33
33 -
 34
34 -
 35
35 -
 36
36 -
 37
37 -
 38
38 -
 39
39 -
40
-
41
-
42
-
43
-
44
-
45
-
46
-
47
-
48
-
49
-
50
-
51
-
52
-
53
-
54
-
55
-
56
-
57
-
58
-
59
-
60
-
61
-
62
-
63
-
64
-
65
-
66
-
67
-
68
-
69
-
70
-
71
 |
 |
