Sharp XR-11XC-L PG-MB56X , PG-MB66X Operation Manual - Page 29
Basic Operation, Turning the Projector On/Off, Turning the Projector on, Turning the Power off ( - projector lamp replacement
 |
UPC - 074000364769
View all Sharp XR-11XC-L manuals
Add to My Manuals
Save this manual to your list of manuals |
Page 29 highlights
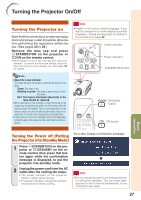
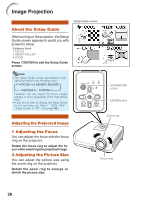
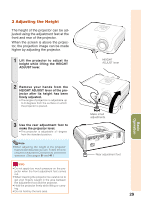
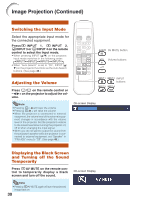
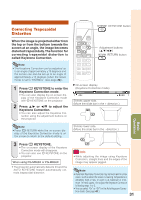
Turning the Projector On/Off Turning the Projector on Note that the connections to external equipment and power outlet should be done before performing the operations written below. (See pages 23 to 26.) Remove the lens cap and press S STANDBY/ON on the projector or fON on the remote control. • When System Lock is set, the keycode input box appears. To cancel the keycode setting, input the keycode that you have already set. See page 44 for details. Info • English is the factory default language. If you want to change the on-screen display to another language, change the language according to the procedure on page 42. Lamp indicator Power indicator STANDBY/ON button Note • About the Lamp Indicator The lamp indicator illuminates to indicate the status of the lamp. Green: The lamp is on. Blinking in green: The lamp is warming up or shutting down. Red: The lamp is shut down abnormally or the lamp should be replaced. • When switching on the projector, a slight flickering of the image may be experienced within the first minute after the lamp has been illuminated. This is normal operation as the lamp's control circuitry is stabilising the lamp output characteristics. It should not be regarded as faulty operation. • If the projector is put into standby mode and immediately turned on again, the lamp may take some time to start projection. STANDBY button ON button Turning the Power off (Putting the Projector into Standby Mode) 1 Press SSTANDBY/ON on the projector or eSTANDBY on the remote control, then press that button again while the confirmation message is displayed, to put the projector into standby mode. 2 Unplug the power cord from the AC outlet after the cooling fan stops. • The power indicator on the projector blinks in green while cooling. • The power indicator changes to red when the projector finishes cooling. On-screen Display (confirmation message) R Info • Do not unplug the power cord during projection or cooling fan operation. This can cause damage due to rise in internal temperature, as the cooling fan also stops. 27 Basic Operation
-
 1
1 -
2
-
3
-
4
-
5
-
6
-
7
-
8
-
9
-
10
-
11
-
12
-
13
-
14
-
15
-
16
-
17
-
18
-
19
-
20
-
21
-
22
-
23
-
 24
24 -
 25
25 -
 26
26 -
 27
27 -
 28
28 -
 29
29 -
 30
30 -
 31
31 -
 32
32 -
 33
33 -
 34
34 -
35
-
36
-
37
-
38
-
39
-
40
-
41
-
42
-
43
-
44
-
45
-
46
-
47
-
48
-
49
-
50
-
51
-
52
-
53
-
54
-
55
-
56
-
57
-
58
-
59
-
60
-
61
-
62
-
63
-
64
-
65
-
66
-
67
-
68
-
69
-
70
 |
 |