Singer 1 One Instruction Manual 40 - Page 14
holding, thread, finger, around, tension, clockwise, caught, properly, locat, between, discs., While
 |
View all Singer 1 One manuals
Add to My Manuals
Save this manual to your list of manuals |
Page 14 highlights
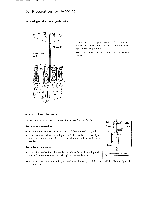
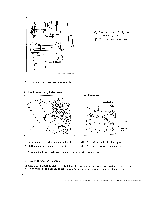
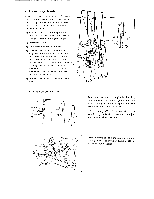
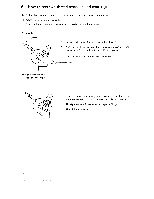
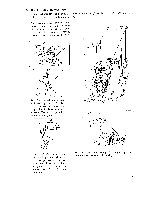
(3a) Thread the right needle for standard 3.5mm stitch width Os • To thread the right needle Thread right needle thread in the order (ID to O as shown.. (Green thread path) For easy thread- , ing of needle 10 set movable knife in non-operating position. While holding thread with finger wrap thread around tension disk clockwise till caught in hook and pull thread down to mark certain it is properly located in between the tension discs. • Lower needle bar when threading C) and T. 0)1 4 • Use tweezers to thread j needle eye . 10 • Draw about 5cm (2 a inches) of thread from needle eye. Or (3b) Thread the left needle for 5.7mm width (blue path)(page 12) IP 0 Thread left needle thread in the order C) to ® as shown. (Blue thread path) For easy threading of needle C), set movable knife in non-operating position. (See page 21 for setting movable knife to non-operating position) I) While holding thread with finger wrap thread around tension disk clockwise till caught in hook and pull thread down to mark certain it is properly located in between the tension discs. N s X 15 ~i • Lower needle bar when 5 threading ® and C) . 0 7 8 • Use tweezers to thread needle eye ® . a • Draw about 5cm (2 inches) of thread from needle eye. 12
-
 1
1 -
2
-
3
-
4
-
5
-
6
-
7
-
8
-
 9
9 -
 10
10 -
 11
11 -
 12
12 -
 13
13 -
 14
14 -
 15
15 -
 16
16 -
 17
17 -
 18
18 -
 19
19 -
20
-
21
-
22
-
23
-
24
-
25
-
26
-
27
-
28
-
29
-
30
-
31
-
32
-
33
-
34
-
35
-
36
 |
 |
