Singer 14T967DC Quantumlock Instruction Manual 26 - Page 16
Needle Position, To Remove Needle s, To Insert Needles s
 |
View all Singer 14T967DC Quantumlock manuals
Add to My Manuals
Save this manual to your list of manuals |
Page 16 highlights
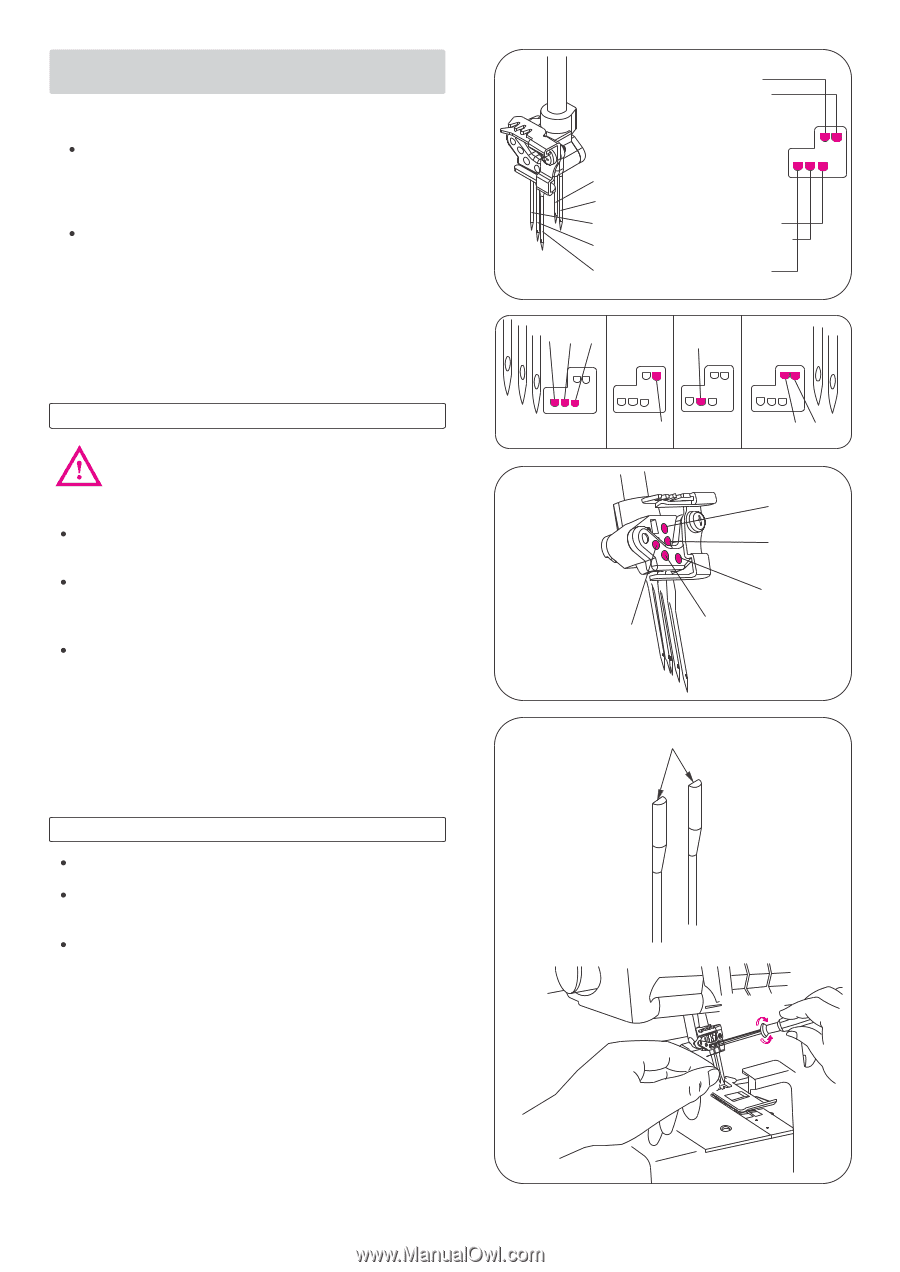
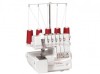
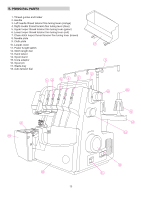
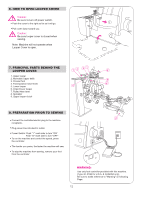
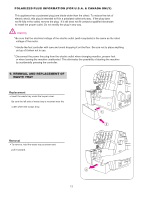
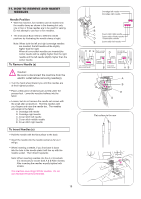
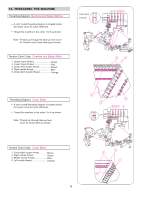
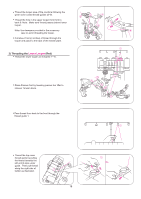
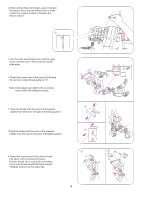
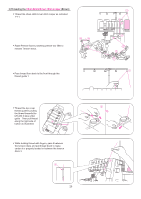
11. HOW TO REMOVE AND INSERT NEEDLES Needle Position With this machine, five needles can be inserted into the needle clamp as shown in the drawing but only one or two or three needles are to be used for sewing. Do not attempt to use four or five needles. The Instruction Book refers to different needle positions by illustrating the needle clamp at right. Note: When both the left and right overedge needles are inserted, the left needle will be slightly higher than the right. When all cover stitch needles are inserted,the center needle will be slightly higher than the right needle and the left needle slightly higher than the center needle. To Remove Needle (s) Caution: Be sure to disconnect the machine from the electric outlet before removing needle(s). Turn the hand wheel toward you until the needles are at their highest position. Place a thick piece of fabric [such as felt] under the presser foot. Lower the needles halfway into the fabric. Loosen, but do not remove the needle set screws with the small allen screwdriver. Hold the needles with your fingers and raise the needle bar. The needles will remain in the fabric. A. Overedge left needle B. Overedge right needle C. Cover stitch left needle D. Cover stitch middle needle E. Cover stitch right needle To Insert Needles (s) Hold the needle with the flat surface to the back. Insert the needle into the needle socket as far as it will go. When inserting a needle, if you first lower it down into the hole in the needle plate it will line up with the needle socket. Then direct it upwards Note: When inserting needles into the A or B sockets it is necessary to loosen both A & B Allen Screws. After inserting the needles equally tighten both screws. This machine uses Singer #2022 needles. Do not use Standard Household Needles. Overedge left needle Overedge right needle A B C Cover stitch right needle Cover stitch middle needle D / Chain stitch needle E Cover stitch left needle C D E Right overedge needle thread D Left and right overedge needle thread Left, middle and right cover stitch needle thread Chain stitch B needle thread AB A B E D C Flat surface to the rear To tighten To loosen 15
-
 1
1 -
2
-
3
-
4
-
5
-
6
-
7
-
8
-
9
-
10
-
 11
11 -
 12
12 -
 13
13 -
 14
14 -
 15
15 -
 16
16 -
 17
17 -
 18
18 -
 19
19 -
 20
20 -
 21
21 -
22
-
23
-
24
-
25
-
26
-
27
-
28
-
29
-
30
-
31
-
32
-
33
-
34
-
35
-
36
-
37
-
38
-
39
-
40
-
41
-
42
-
43
-
44
-
45
-
46
-
47
-
48
-
49
-
50
-
51
-
52
-
53
-
54
-
55
-
56
-
57
-
58
-
59
-
60
-
61
-
62
-
63
-
64
-
65
-
66
-
67
-
68
-
69
-
70
-
71
-
72
 |
 |