Singer 7363 CONFIDENCE Instruction Manual - Page 32
Control Panel Functions
 |
View all Singer 7363 CONFIDENCE manuals
Add to My Manuals
Save this manual to your list of manuals |
Page 32 highlights
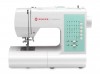
LED indicator Témoin a diode Indicador LED Pattern selection buttons Touches de sélection de motif Botones de selección de patrón LED indicator Témoin a diode Indicador LED Stitch length control * Longueur de point * Control longitud puntada * Stitch width/needle position control * Commande de largeur de point/position d'aiguille * Control de ancho de puntada/posición de aguja * *NOTE: The provided scales and numbers on the length and width controls are for reference only and do not represent actual sewing parameters of length and width. *REMARQUE: les échelles et les nombres sur les commandes de longueur et de largeur ne sont fournis que pour référence et ne représentent pas les paramètres réels de longueur et de largeur. *NOTA: Las escalas y números provistos en los controles de largo y ancho son sólo para referencia y no representan los parámetros actuales de costura de largo y ancho. CONTROL PANEL FUNCTIONS Pattern selection buttons Turn on the power switch and the LED indicator above the straight stitch pattern will be lit. At this point you may sew Straight Stitch. To select other patterns, push the pattern selection button to the right of the row that contains your desired pattern. Stop when the LED indicator above your pattern is lit. Stitch length and width/needle position controls Your sewing machine will produce most of your stitching requirements at an Auto/Default Stitch Length and Width. When a pattern is selected, it will automatically sew at default settings of stitch length, width and needle position for straight stitch. Auto (preprogrammed) default settings are easily determined by moving the Stitch Length and Width / Needle Position Control Knob. The LED Indicator next to the Control will light without blinking and a beep will sound indicating you are at the Auto / Default Position. Once you have determined the Auto / Default position you can manually change the length, width or straight stitch needle postition according to your preference. Starting at the Auto position, slide the control knob left or right to locate each of the potential adjustments. At each manual adjustment point, the LED will blink 3 times and a beep will sound. Note: Instructions for manually changing the Straight Stitch Needle Position are contained in the "Other Information" Section. Notes: 1. Some patterns offer more opportunities for manual adjustments than others. 2. An alternate method of determining available adjustments is to move the control knobs while sewing slowly. 26
-
 1
1 -
2
-
3
-
4
-
5
-
6
-
7
-
8
-
9
-
10
-
11
-
12
-
13
-
14
-
15
-
16
-
17
-
18
-
19
-
20
-
21
-
22
-
23
-
24
-
25
-
26
-
 27
27 -
 28
28 -
 29
29 -
 30
30 -
 31
31 -
 32
32 -
 33
33 -
 34
34 -
 35
35 -
 36
36 -
 37
37 -
38
-
39
-
40
-
41
-
42
-
43
-
44
-
45
-
46
-
47
-
48
-
49
-
50
-
51
-
52
-
53
-
54
-
55
-
56
-
57
-
58
-
59
-
60
-
61
-
62
-
63
-
64
-
65
-
66
-
67
-
68
-
69
-
70
-
71
-
72
 |
 |
