Singer 7640 CONFIDENCE Instruction Manual and Troubleshooting Guide - Page 13
Winding the Bobbin
 |
View all Singer 7640 CONFIDENCE manuals
Add to My Manuals
Save this manual to your list of manuals |
Page 13 highlights
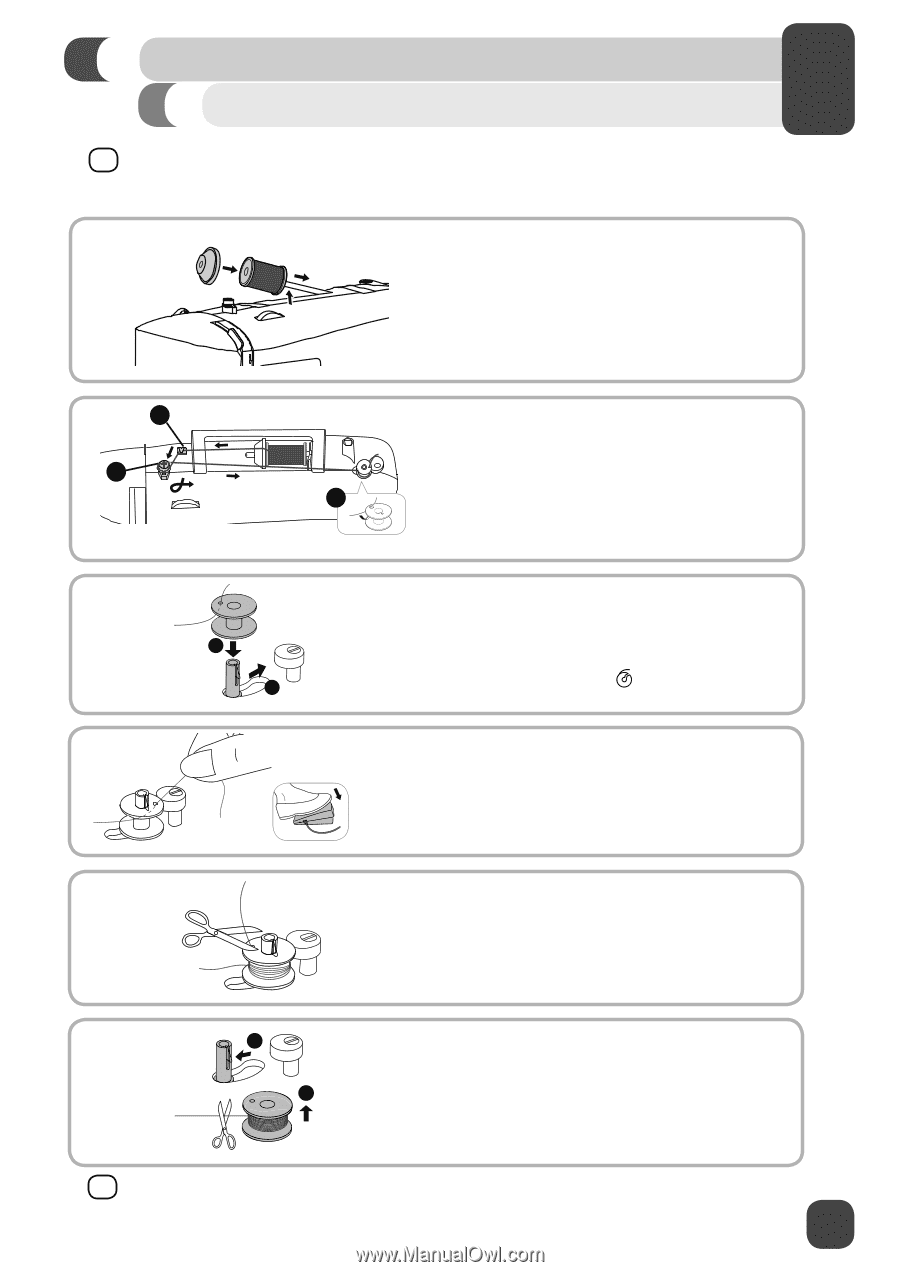
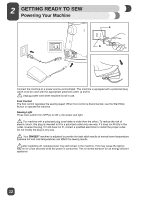
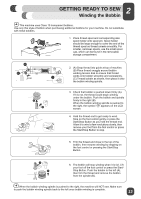
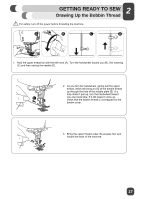
2 GETTING READY TO SEW Winding the Bobbin ¤ This machine uses Class 15 transparent bobbins. Use only this style of bobbin when purchasing additional bobbins for your machine. Do not substitute with metal bobbins. 1. Place thread spool and corresponding size spool holder onto spool pin. Spool holder should be large enough to cover the end of the thread spool so thread unreels smoothly. For smaller, narrower spools, use the small spool cap, which can be found in the removable storage compartment. A B 7 2. (A) Snap thread into guide at top of machine. (B) Place thread snuggly around bobbin winding tension disk to ensure that thread C winds onto bobbin smoothly and consistently. (C) Thread bobbin as shown, then place it onto the bobbin winding spindle. A B 3. Check that bobbin is pushed down ¿rmly (A). If it is not, the thread could begin winding under the bobbin. Push the bobbin and spindle ¿rmly to the right (B). When the bobbin winding spindle is pushed to the right, the symbol " " appears on the LCD screen. 4. Hold the thread end to get ready to wind. Step on the foot control gently or press the Start/Stop Button as you hold the thread end. Allow it to wind a few revolutions slowly, then remove your foot from the foot control or press the Start/Stop Button to stop. 5. Trim the thread end close to the top of the bobbin, then resume winding by stepping on the foot control or pressing the Start/Stop Button. A B 6. The bobbin will stop winding when it is full. Lift your foot off the foot control or press the Start/ Stop Button. Push the bobbin to the left (A), then trim the thread and remove the bobbin from the spindle (B). ¤ When the bobbin winding spindle is pushed to the right, the machine will NOT sew. Make sure to push the bobbin winding spindle back to the left once bobbin winding is complete. 13
-
 1
1 -
2
-
3
-
4
-
5
-
6
-
7
-
 8
8 -
 9
9 -
 10
10 -
 11
11 -
 12
12 -
 13
13 -
 14
14 -
 15
15 -
 16
16 -
 17
17 -
 18
18 -
19
-
20
-
21
-
22
-
23
-
24
-
25
-
26
-
27
-
28
-
29
-
30
-
31
-
32
-
33
-
34
-
35
-
36
-
37
-
38
-
39
-
40
-
41
-
42
-
43
-
44
-
45
-
46
-
47
-
48
-
49
-
50
-
51
-
52
-
53
-
54
-
55
-
56
-
57
-
58
-
59
-
60
-
61
-
62
-
63
-
64
-
65
-
66
-
67
-
68
-
69
-
70
-
71
-
72
-
73
-
74
-
75
-
76
-
77
-
78
-
79
-
80
-
81
-
82
-
83
-
84
-
85
-
86
-
87
-
88
-
89
-
90
-
91
-
92
-
93
-
94
-
95
-
96
-
97
-
98
-
99
-
100
-
101
-
102
-
103
-
104
-
105
-
106
-
107
-
108
-
109
-
110
-
111
-
112
-
113
-
114
-
115
-
116
-
117
-
118
-
119
-
120
 |
 |