Singer 7640 CONFIDENCE Instruction Manual and Troubleshooting Guide - Page 16
Automatic Needle Threader
 |
View all Singer 7640 CONFIDENCE manuals
Add to My Manuals
Save this manual to your list of manuals |
Page 16 highlights
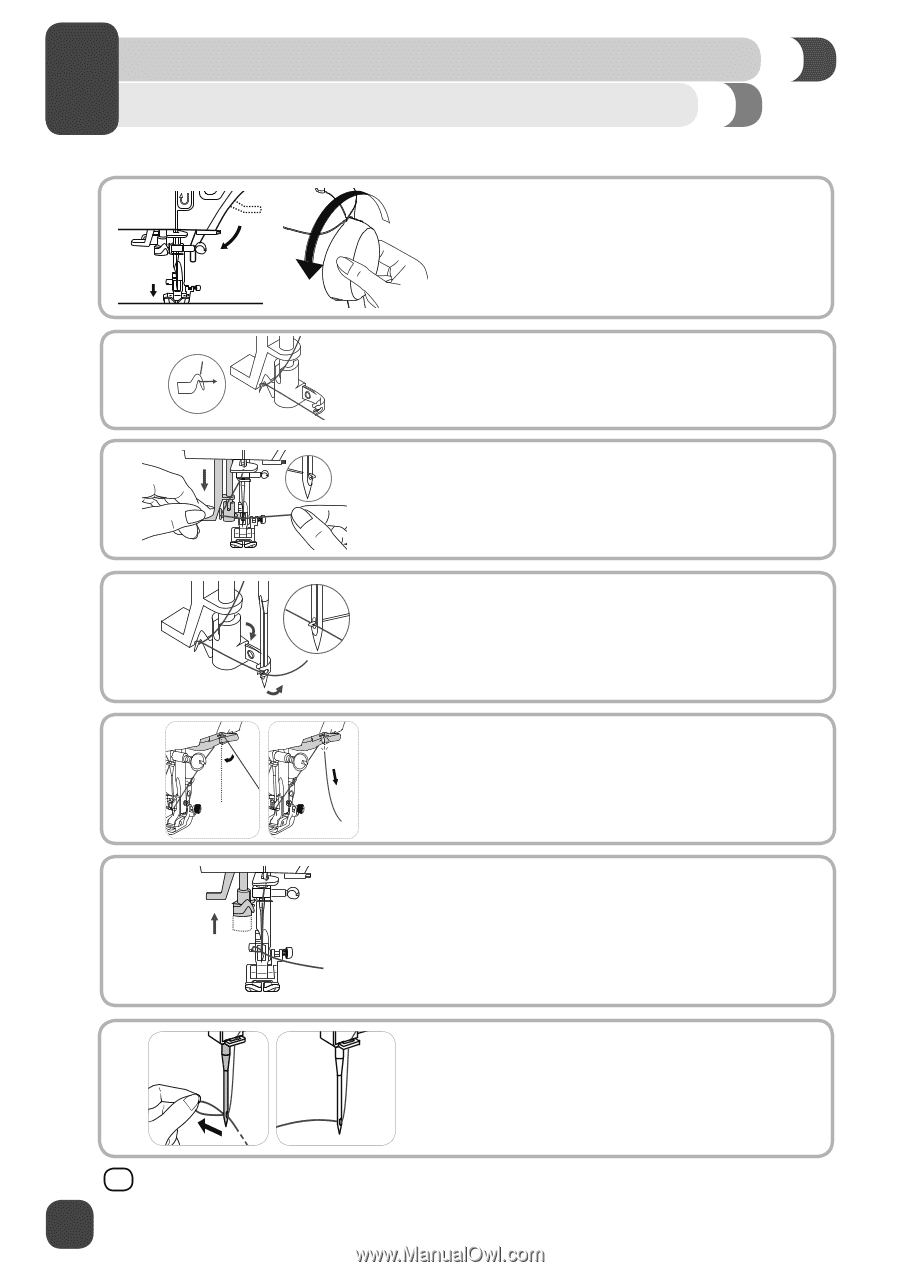
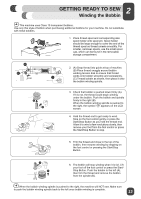
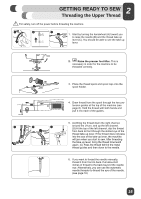
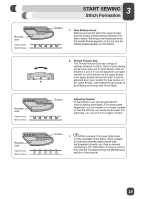
2 GETTING READY TO SEW Automatic Needle Threader ⚠ For safety, turn off the power before using the automatic needle threader. 1. Lower the presser foot lifter. Raise the needle to its highest position by turning the handwheel toward you. If you turn the handwheel backward, the machine will jam when you start to sew. 2. Pass thread around thread guide. 3. Press lever down as far as it will go. The threader automatically swings to the threading position. 4. Pass the thread in front of the needle and under the hook. 5. To cut the excess thread, take thread tail and gently slip it over the thread cutter located to the right of the needle. 6. Release the lever & the thread tail at the same time, this will form a loop at the back of the needle. 7. Pull the thread through the needle eye. While holding the thread, raise the presser foot lifter and pull the thread under the foot toward the back. ¤ Pull about 6-8" of thread to the back beyond the eye of the needle. This will help prevent the needle from becoming unthreaded when you start to sew. 16
-
 1
1 -
2
-
3
-
4
-
5
-
6
-
7
-
8
-
9
-
10
-
 11
11 -
 12
12 -
 13
13 -
 14
14 -
 15
15 -
 16
16 -
 17
17 -
 18
18 -
 19
19 -
 20
20 -
 21
21 -
22
-
23
-
24
-
25
-
26
-
27
-
28
-
29
-
30
-
31
-
32
-
33
-
34
-
35
-
36
-
37
-
38
-
39
-
40
-
41
-
42
-
43
-
44
-
45
-
46
-
47
-
48
-
49
-
50
-
51
-
52
-
53
-
54
-
55
-
56
-
57
-
58
-
59
-
60
-
61
-
62
-
63
-
64
-
65
-
66
-
67
-
68
-
69
-
70
-
71
-
72
-
73
-
74
-
75
-
76
-
77
-
78
-
79
-
80
-
81
-
82
-
83
-
84
-
85
-
86
-
87
-
88
-
89
-
90
-
91
-
92
-
93
-
94
-
95
-
96
-
97
-
98
-
99
-
100
-
101
-
102
-
103
-
104
-
105
-
106
-
107
-
108
-
109
-
110
-
111
-
112
-
113
-
114
-
115
-
116
-
117
-
118
-
119
-
120
 |
 |