Singer Heavy Duty Combo Instruction Manual - Page 25
Automatic Needle Threader
 |
View all Singer Heavy Duty Combo manuals
Add to My Manuals
Save this manual to your list of manuals |
Page 25 highlights
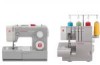
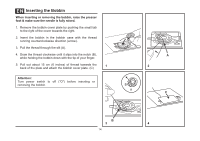
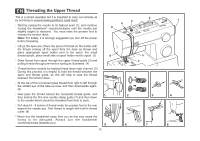
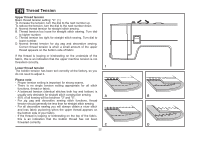
EN Automatic Needle Threader - Thread upper tension of machine up to the thin wire in front of the needle clamp. - Raise the needle to its highest position. - Set the Pattern Selector Dial (see item # 13 on page 2 of the manual) to Straight Stitch. - Set Stitch Width Dial (see item # 11 on page 2 of the manual) to "0". - Set Three Needle Position Dial (see item # 9 on page 2 of the manual) to center position. - Lower the needle threader (A) as far down as it will go, then push it back gently so that the hook inside the threader will slip into the eye of the needle. - The threader automatically swings to the threading position (B). 1 - Pass thread under thread guide (C), from left to right. - Pass the thread in front of the needle around the hook (D) from bottom to top. - Release lever (A), by swinging it away from you & then pushing it back up to the resting position. - Pull the thread through the needle eye. Attention: Turn power switch to off ("O")! The needle threader is designed to work best with a size 14 needle. Your machine is equipped with a standard size 14 needle at the factory. 2 18 A C B D A
-
 1
1 -
2
-
3
-
4
-
5
-
6
-
7
-
8
-
9
-
10
-
11
-
12
-
13
-
14
-
15
-
16
-
17
-
18
-
19
-
 20
20 -
 21
21 -
 22
22 -
 23
23 -
 24
24 -
 25
25 -
 26
26 -
 27
27 -
 28
28 -
 29
29 -
 30
30 -
31
-
32
-
33
-
34
-
35
-
36
-
37
-
38
-
39
-
40
-
41
-
42
-
43
-
44
-
45
-
46
-
47
-
48
-
49
-
50
-
51
-
52
-
53
-
54
-
55
-
56
-
57
-
58
-
59
-
60
-
61
-
62
-
63
-
64
-
65
-
66
-
67
-
68
-
69
-
70
-
71
-
72
-
73
-
74
-
75
-
76
-
77
-
78
-
79
-
80
-
81
-
82
-
83
-
84
-
85
-
86
-
87
-
88
-
89
-
90
-
91
-
92
-
93
-
94
-
95
-
96
-
97
-
98
-
99
-
100
-
101
-
102
-
103
-
104
-
105
-
106
-
107
-
108
-
109
-
110
-
111
-
112
-
113
-
114
-
115
-
116
-
117
-
118
-
119
-
120
-
121
 |
 |