Singer SM024 Accessory User Guide - Page 14
Button Sewing Foot, Overcasting Foot
 |
View all Singer SM024 manuals
Add to My Manuals
Save this manual to your list of manuals |
Page 14 highlights
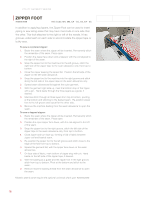
UTILITY GARMENT SEWING BUTTON SEWING FOOT #2250060196 M/C Code: MA, MB, CA, CC, EA, EC The Sew-On Button Foot holds buttons in position while attaching them with the sewing machine. This saves time while securely sewing the buttons onto the fabric. This foot can also be used to sew on hook and eye closures. 1. Depending on your machine model, adjust the drop feed lever or attach the feed dog cover plate. 2. Snap-on the Sew-On Button Foot. 3. Position the button under the foot - the holes of the button should be in the blue open area of the foot. This area has a textured rubberized coating that holds the button in position. 4. Set the machine for either a Button Sew Stitch or a Zigzag Stitch on 0 length setting. 5. Slowly turn the handwheel towards you to be certain that the needle inserts in the middle of the each hole of the button. The stitch width may need to be adjusted until the needle clears the holes. 6. Make 6-8 stitches then knot by changing to the straight stitch at 0 length for 3-4 stitches, first checking to be certain that the needle clears the hole. 7. If using a four hole button, re-position the button and repeat Step 6. Note: If a shank is needed to allow for ease of buttoning, position a straight pin or toothpick under the button before stitching. OVERCASTING FOOT #250059796 M/C Code: MA - MC*, CA - CC, EA - EC The Overcasting Foot is used to keep the fabric edges from curling up when you overlock or zigzag stitch the edge to prevent raveling. The metal bar in the center of the foot holds the fabric flat as the thread wraps over the edge for a serged effect. 1. Snap on the Overcasting Foot. 2. Place fabric under the foot with the edge aligned against the guide on the right side. 3. Select overlock, zigzag or other desired stitch. 4. Adjust length. Adjust width so that the needle doesn't hit the bar in the center of the opening in the foot. 5. Sew, keeping fabric edge aligned against the guide on the foot. *Models 4208 and 4212 require the optional universal shank part #250052596 14
-
 1
1 -
2
-
3
-
4
-
5
-
6
-
7
-
8
-
 9
9 -
 10
10 -
 11
11 -
 12
12 -
 13
13 -
 14
14 -
 15
15 -
 16
16 -
 17
17 -
 18
18 -
 19
19 -
20
-
21
-
22
-
23
-
24
-
25
-
26
-
27
-
28
-
29
-
30
-
31
-
32
-
33
-
34
-
35
-
36
-
37
-
38
-
39
-
40
-
41
-
42
-
43
-
44
-
45
-
46
-
47
-
48
-
49
-
50
-
51
-
52
-
53
-
54
-
55
-
56
-
57
-
58
-
59
-
60
-
61
-
62
-
63
-
64
-
65
-
66
-
67
-
68
-
69
-
70
-
71
-
72
 |
 |
