Smeg CMSU6451X Instruction Manual - Page 5
Automatic Cup Tray Light
 |
View all Smeg CMSU6451X manuals
Add to My Manuals
Save this manual to your list of manuals |
Page 5 highlights
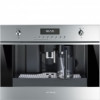
A5. Infuser A6. Lights A7. Control panel A8. Hot water and steam nozzle A9. Water tank A10. Coffee spout (adjustable height) A11. Drip tray A12. Bean container lid A13. Container for coffee beans A14. Grinding adjustment knob A15. Pre-ground coffee funnel door A16. Compartment for measure A17. Pre-ground coffee funnel A18. Power cable A19. Main switch A20. Tray A21. IEC connector Description of milk container and accessories (page 3 - B) B1. Frothed milk regulator B2. Milk container handle B3. CLEAN button B4. Milk intake tube B5. Frothed milk spout B6. Milk frother B7. Hot water spout B8. Measure C10. button to deliver one or two cups of long coffee C11. knob to deliver cappuccino or frothed milk PRELIMINARY CHECKS Controls after transport After removing the packaging, make sure the product is complete and undamaged and that all accessories are present. Do not use the appliance if it is visibly damaged. Contact Customer Services. Installing the appliance Important! When installing the appliance, respect the following safety warnings: • Installation must be performed by a qualified professional in compliance with legislation in force in the country of installation (see section: BUILT-IN INSTALLATION). • The packing elements (plastic bags, polystyrene foam, etc.) should be kept out of reach of children as they are a safety hazard. • Do not install the appliance in rooms where the temperature may drop to 0°C / 32°F or lower (the water in the appliance could freeze and cause damage). • You should customise the water hardness as soon as possible following the instructions in the "SETTING WATER HARDNESS" section. Connecting the appliance Description of control panel (page 3 - C) Danger! Check that the mains power supply voltage A number of buttons on the panel have a double function. This is corresponds to the value indicated on the appliance rating plate. indicated in brackets in the description. Connect the appliance to an efficiently earthed and correctly C1. Display: guides the user in using the appliance. installed socket with a minimum current rating of 10A only. C2. MENU button to activate or deactivate menu parameter If the power socket does not match the plug on the appliance, setting mode have the socket replaced with a suitable type by a qualified pro- C3. button to select pre-ground coffee fessional. (When in the MENU: NEXT button to display the next menu To comply with safety directives, an omnipolar switch with a parameter). minimum contact distance of 3 mm / 0.12 in must be installed. C4. Rinse button to perform a brief rinse to heat the infus- Do not use multiple sockets or extensions. er. To learn to use the appliance correctly, the first time you use it (When you access the MENU: "CHANGE" button to modify follow the detailed instructions in the following sections. menu parameters). C5. button to deliver hot water. Important! Safety cutout devices must be included (When you access the MENU: OK button to confirm menu in the mains power supply in compliance with the installation parameters). regulations in the country concerned. C6. knob to turn the appliance on and off. C7. button to select the coffee taste C8. button to deliver one or two cups of short coffee C9. button to deliver one or two cups of standard coffee AUTOMATIC CUP TRAY LIGHT When the appliance is turned on, the lights (A6) automatically 9
-
 1
1 -
 2
2 -
 3
3 -
 4
4 -
 5
5 -
 6
6 -
 7
7 -
 8
8 -
 9
9 -
 10
10 -
 11
11 -
12
-
13
-
14
-
15
-
16
-
17
-
18
-
19
-
20
-
21
-
22
-
23
 |
 |
