Sony BDP-S5000ES Operating Instructions - Page 38

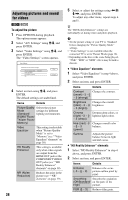
Adjusting pictures and sound for videos, To adjust the picture

Page 38 highlights

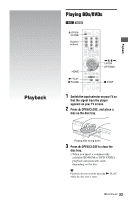
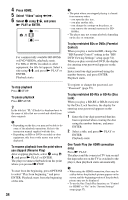
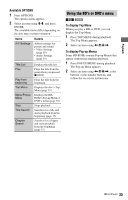
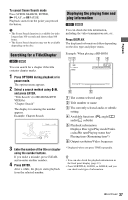
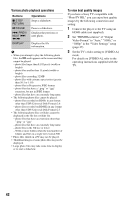
Adjusting pictures and sound for videos BD DVD To adjust the picture 1 Press OPTIONS during playback. The options menu appears. 2 Select "A/V Settings" using M/m, and press ENTER. 3 Select "Video Settings" using M/m, and press ENTER. The "Video Settings" screen appears. 4 Select an item using M/m, and press ENTER. The default settings are underlined. Items Details Picture Quality Selects the picture Mode settings for different (Standard/ lighting environments. Brighter Room/ Theater Room/ Memory) Video Equalizer This setting is selectable when "Picture Quality Mode" is set to "Memory" (see ""Video Equalizer" elements" on page 38). HD Reality Enhancer This setting is available only when video signals are output from the HDMI OUT jack or the COMPONENT VIDEO OUT jacks (see ""HD Reality Enhancer" elements" on page 38). NR (Noise Reduction) Reduces the noise in the picture (see ""NR" elements" on page 39). 38 5 Select or adjust the settings using

  • 1
  • 2
  • 3
  • 4
  • 5
  • 6
  • 7
  • 8
  • 9
  • 10
  • 11
  • 12
  • 13
  • 14
  • 15
  • 16
  • 17
  • 18
  • 19
  • 20
  • 21
  • 22
  • 23
  • 24
  • 25
  • 26
  • 27
  • 28
  • 29
  • 30
  • 31
  • 32
  • 33
  • 34
  • 35
  • 36
  • 37
  • 38
  • 39
  • 40
  • 41
  • 42
  • 43
  • 44
  • 45
  • 46
  • 47
  • 48
  • 49
  • 50
  • 51
  • 52
  • 53
  • 54
  • 55
  • 56
  • 57
  • 58
  • 59
  • 60
  • 61
  • 62
  • 63
  • 64
  • 65
  • 66
  • 67
  • 68
  • 69
  • 70
  • 71
  • 72
  • 73
  • 74
  • 75
  • 76
  • 77
  • 78
  • 79
  • 80
  • 81
  • 82
  • 83
  • 84
  • 85
  • 86
  • 87

38
To adjust the picture
1
Press OPTIONS during playback.
The options menu appears.
2
Select “A/V Settings” using
M
/
m
, and
press ENTER.
3
Select “Video Settings” using
M
/
m
, and
press ENTER.
The “Video Settings” screen appears.
4
Select an item using
M
/
m
, and press
ENTER.
The default settings are underlined.
5
Select or adjust the settings using
<
/
M
/
m
/
,
, and press ENTER.
To adjust any other items, repeat steps 4
and 5.
z
The “HD Reality Enhancer” settings are
individually set during video and photo playback.
b
Set the picture setting of your TV to ‘Standard’
before changing the “Picture Quality Mode”
settings.
“Video Settings” is not available when the
connected TV is set to Theater Mode (page 16).
Depending on the disc or the scene being played,
“FNR,” “BNR” or “MNR” effects may be hard to
discern.
“Video Equalizer” elements
1
Select “Video Equalizer” in step 4 above,
and press ENTER.
2
Select an item, and press ENTER.
“HD Reality Enhancer” elements
1
Select “HD Reality Enhancer” in step 4
above, and press ENTER.
2
Select an item, and press ENTER.
Adjusting pictures and sound
for videos
Items
Details
Picture Quality
Mode
(Standard
/
Brighter Room
/
Theater Room
/
Memory)
Selects the picture
settings for different
lighting environments.
Video
Equalizer
This setting is selectable
when “Picture Quality
Mode” is set to
“Memory” (see ““Video
Equalizer” elements” on
page 38).
HD Reality
Enhancer
This setting is available
only when video signals
are output from the
HDMI OUT jack or the
COMPONENT VIDEO
OUT jacks (see ““HD
Reality Enhancer”
elements” on page 38).
NR (Noise
Reduction)
Reduces the noise in the
picture (see ““NR”
elements” on page 39).
DVD
BD
Items
Details
Contrast
((weak) –3 ~ 0
~ 3 (strong))
Changes the contrast.
Brightness
((dark) –3 ~ 0
~ 3 (bright))
Changes the overall
brightness.
Chroma
((light) –3 ~ 0
~ 3 (deep))
Deepens deep colors, or
lightens light colors.
Hue ((red) –3
~ 0
~ 3
(green))
Changes overall color
balance.
Gamma
Adjusts the picture
balance between light
and dark areas.
Items
Details
Enhance
(–3 ~ 0
~ 3)
Enhances the scene
picture outline pixel by
pixel.
Smoothing
(Off/Standard
/
High)
Smooths the gradation
on flat parts of the
picture.
FGR (0
~ 3)
Reduces film grain.