Sony CCD-TRV81 Operating Instructions - Page 10
Sony CCD-TRV81 Manual
 |
View all Sony CCD-TRV81 manuals
Add to My Manuals
Save this manual to your list of manuals |
Page 10 highlights
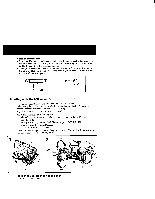
Basic operations Camera recording Make sure that the power source is installed and a cassette is inserted and that the START/STOP MODE switch inside the LCD panel is set to a . Before you record one- time events, you may want to make a trial recording to make sure that the camcorder is working correctly. When you use the camcorder for the first time, power on it and reset the date and time to your time before you start recording (p. 62). The date is automatically recorded for 10 seconds after you start recording (AUTO DATE feature) (CCD-TRV41 only). This feature works only once a day. (1) While pressing the small green button on the POWER switch, set it to CAMERA. (2) Turn STANDBY up. (3) Press START/STOP. The camcorder starts recording. The "REC" indicator appears and the red lamp lights up in the viewfinder. The camera recording/ battery lamp located on the front of the camcorder also lights up. You can also select Recording mode, SP (standard play) mode or LP (long play) mode. Set REC MODE in the menu system according to the length of your planned recording before you start. POWER CAMERA J1 OFF ■ VTR STBY 0:00:00 40 min 4 aid ~f 30i 41. REC 0:00:01 40 min -;* To stop recording momentarily [a] Press START/STOP again. The "STBY" indicator appears in the viewfinder (Standby mode). TO finish recording [b] Press START/STOP again. Turn STANDBY down and set the POWER switch to OFF. Then, eject the cassette and remove the battery pack. [a] STBY C 0:35:20 • 10 • tlT4
-
 1
1 -
2
-
3
-
4
-
 5
5 -
 6
6 -
 7
7 -
 8
8 -
 9
9 -
 10
10 -
 11
11 -
 12
12 -
 13
13 -
 14
14 -
 15
15 -
16
-
17
-
18
-
19
-
20
-
21
-
22
-
23
-
24
-
25
-
26
-
27
-
28
-
29
-
30
-
31
-
32
-
33
-
34
-
35
-
36
-
37
-
38
-
39
-
40
-
41
-
42
-
43
-
44
-
45
-
46
-
47
-
48
-
49
-
50
-
51
-
52
-
53
-
54
-
55
-
56
-
57
-
58
-
59
-
60
-
61
-
62
-
63
-
64
-
65
-
66
-
67
-
68
-
69
-
70
-
71
-
72
-
73
-
74
-
75
-
76
-
77
-
78
-
79
-
80
-
81
-
82
-
83
-
84
-
85
-
86
 |
 |
