Sony CDP-CX450 Operating Instructions - Page 32
Storing Custom File Information Using a Keyboard, Storing Specific Tracks (Delete Bank
 |
View all Sony CDP-CX450 manuals
Add to My Manuals
Save this manual to your list of manuals |
Page 32 highlights
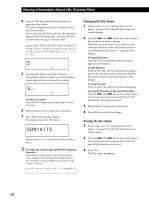
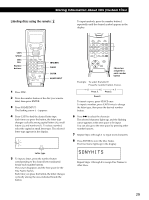
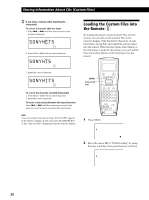
Storing Information About CDs (Custom Files) Storing Custom File Information Using a Keyboard You can store the Disc Name for each disc, one by one, using an IBM-compatible PC keyboard* (not supplied). * The keyboard's power consumption must be 120 mA or less. Keyboard jack Storing Specific Tracks (Delete Bank) You can delete unwanted tracks and store only the tracks you want. When you select the disc containing a Delete Bank, the player will play only the remaining tracks. CONTINUE SHUFFLE CHECK CLEAR JOG I / 1 I / 1 1 Connect a keyboard to the keyboard jack on the front panel of the player. I / 1 2 After selecting the desired disc on the player, press the Enter key. 3 Input the desired characters, then press the Enter key to store the information. z You can delete all characters of a selected item While holding down the Shift key, press the Delete key. Notes • If the cursor keys do not work correctly and you cannot complete the task using the keyboard, disconnect the keyboard then reconnect it to the player and try again. • If the keyboard is not a USA model (shown below), the characters may be input differently from those on the keys. ~ ! @# $%^ & ( ) -+ 1 2 3 4 5 6 7 8 9 0-= ' QWE R T Y U I O P { } [] Caps Lock A S D F G H J K L Enter Z XCV BNM< > ? Shift Shift Ctrl Alt Alt Ctrl 1 Press CONTINUE or SHUFFLE before you start playing. 2 Turn the JOG dial to select the disc. 3 Press CHECK repeatedly until the track you want to delete appears in the display. 2nd NEXT DISC ART. HIT TRACK GROUP ART. MIN STEP SEC *DISC-20***** ALL 1 DISCS SHUFFLE REPEAT 1 GROUP PROGRAM 1 2 3 X-FADE DELETE MULTI CD TEXT NO DELAY CD1 CD2 CD3 4 Press CLEAR. "DELETE" and "OFF" appear in the display. 2nd NEXT DISC ART. HIT TRACK GROUP ART. MIN STEP SEC *DISC-20***** ALL 1 DISCS SHUFFLE REPEAT 1 GROUP PROGRAM 1 2 3 X-FADE DELETE MULTI CD TEXT NO DELAY CD1 CD2 CD3 If you want to recover the track, press CLEAR again. 5 Repeat steps 3 and 4 to delete more tracks. z You can recover all the tracks you have deleted Hold down CLEAR until "ALL ON" appears in the display. Note The deleted tracks are skipped even in Shuffle or Program Play modes (when the whole disc containing a Delete Bank is programmed as one step). 32
-
 1
1 -
2
-
3
-
4
-
5
-
6
-
7
-
8
-
9
-
10
-
11
-
12
-
13
-
14
-
15
-
16
-
17
-
18
-
19
-
20
-
21
-
22
-
23
-
24
-
25
-
26
-
 27
27 -
 28
28 -
 29
29 -
 30
30 -
 31
31 -
 32
32 -
 33
33 -
 34
34 -
 35
35 -
 36
36 -
 37
37 -
38
-
39
-
40
-
41
-
42
-
43
-
44
-
45
-
46
-
47
-
48
 |
 |
