Sony CDX-GT40U Operating Instructions (CDX-GT40U) - Page 7
Radio - receiver
 |
View all Sony CDX-GT40U manuals
Add to My Manuals
Save this manual to your list of manuals |
Page 7 highlights
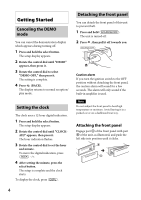
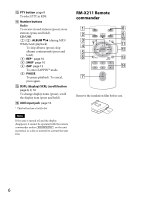
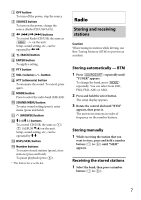
OFF button To turn off the power; stop the source. SOURCE button To turn on the power; change the source (Radio/CD/USB/AUX). buttons To control Radio/CD/USB, the same as on the unit. Setup, sound setting, etc., can be operated by . (BACK) button ENTER button To apply a setting. PTY button VOL (volume) +*/- button ATT (attenuate) button To attenuate the sound. To cancel, press again. MODE button Press to select the radio band (FM/AM). SOUND/MENU button To enter sound setting (press); enter menu (press and hold). (BROWSE) button buttons To control CD/USB, the same as ALBUM /) on the unit. Setup, sound setting, etc., can be operated by . DSPL/SCRL button Number buttons To receive stored stations (press); store stations (press and hold). To pause playback (press ). * This button has a tactile dot. Radio Storing and receiving stations Caution When tuning in stations while driving, use Best Tuning Memory (BTM) to prevent an accident. Storing automatically - BTM 1 Press repeatedly until "TUNER" appears. To change the band, press repeatedly. You can select from FM1, FM2, FM3, AM1 or AM2. 2 Press and hold the select button. The setup display appears. 3 Rotate the control dial until "BTM" appears, then press it. The unit stores stations in order of frequency on the number buttons. Storing manually 1 While receiving the station that you want to store, press and hold a number button ( to ) until "MEM" appears. Receiving the stored stations 1 Select the band, then press a number button ( to ). 7
-
 1
1 -
 2
2 -
 3
3 -
 4
4 -
 5
5 -
 6
6 -
 7
7 -
 8
8 -
 9
9 -
 10
10 -
 11
11 -
 12
12 -
13
-
14
-
15
-
16
-
17
-
18
-
19
-
20
-
21
-
22
-
23
-
24
-
25
-
26
-
27
-
28
-
29
-
30
-
31
-
32
-
33
-
34
-
35
-
36
-
37
-
38
-
39
-
40
-
41
-
42
-
43
-
44
-
45
-
46
-
47
-
48
 |
 |