Sony CDX GT52W Operating Instructions - Page 9
Other functions, Changing the sound settings, Adjusting the sound characteristics - xplod
 |
UPC - 027242718593
View all Sony CDX GT52W manuals
Add to My Manuals
Save this manual to your list of manuals |
Page 9 highlights
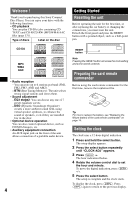
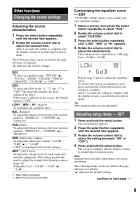
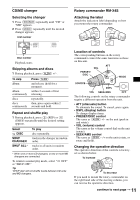
Other functions Changing the sound settings Adjusting the sound characteristics 1 Press the select button repeatedly until the desired item appears. 2 Rotate the volume control dial to adjust the selected item. After 3 seconds, the setting is complete and the display returns to normal play/reception mode. The following items can be set (follow the page reference for details): "z" indicates the default settings. EQ3 To select an equalizer type: "XPLOD" (z), "VOCAL," "EDGE," "CRUISE," "SPACE," "GRAVITY," "CUSTOM" or "OFF." DSO To select the DSO mode: "1," "2" (z), "3" or "OFF." The larger the number, the more enhanced the effect. When tuner is selected as the source, the default setting is "OFF." LOW*1, MID*1, HI*1 (page 9) To customize the equalizer curve. BAL (Balance) To adjust the balance between the right and left speakers: "RIGHT-10" - "CENTER" (z) - "LEFT-10" FAD (Fader) To adjust the balance between the front and rear speakers: "FRONT-10" - "CENTER" (z) - "REAR-10" SUB (Subwoofer volume) To adjust the subwoofer volume: "+10 dB" - "0 dB" (z) - "-10 dB" ("ATT" is displayed at the lowest setting.) AUX*2 (AUX level) To adjust the volume level for each connected auxiliary equipment. This setting negates the need to adjust the volume level between sources (page 10). Adjustable level: "+18 dB" - "0 dB" (z) - "-8 dB" *1 When EQ3 is activated. *2 When AUX source is activated. Customizing the equalizer curve - EQ3 "CUSTOM" of EQ3 allows you to make your own equalizer settings. 1 Select a source, then press the select button repeatedly to select "EQ3." 2 Rotate the volume control dial to select "CUSTOM." 3 Press the select button repeatedly until "LOW," "MID" or "HI" appears. 4 Rotate the volume control dial to adjust the selected item. The volume level is adjustable in 1 dB steps, from -10 dB to +10 dB. Repeat steps 3 and 4 to adjust the equalizer curve. To restore the factory-set equalizer curve, press and hold the select button before the setting is complete. After 3 seconds, the setting is complete and the display returns to normal play/reception mode. Tip Other equalizer types are also adjustable. Adjusting setup items - SET 1 Press and hold the select button. The setup display appears. 2 Press the select button repeatedly until the desired item appears. 3 Rotate the volume control dial to select the setting (example "ON" or "OFF"). 4 Press and hold the select button. The setup is complete and the display returns to normal play/reception mode. Note Displayed items will differ, depending on the source and setting. The following items can be set (follow the page reference for details): "z" indicates the default settings. continue to next page t 9
-
 1
1 -
2
-
3
-
 4
4 -
 5
5 -
 6
6 -
 7
7 -
 8
8 -
 9
9 -
 10
10 -
 11
11 -
 12
12 -
 13
13 -
 14
14 -
15
-
16
-
17
-
18
-
19
-
20
-
21
-
22
-
23
-
24
-
25
-
26
-
27
-
28
-
29
-
30
-
31
-
32
-
33
-
34
-
35
-
36
-
37
-
38
-
39
-
40
 |
 |