Sony CDXM10 Operating Instructions - Page 4
Welcome !, Getting Started, Setting the clock, Detaching the front panel - cdx m10 radio
 |
UPC - 027242718746
View all Sony CDXM10 manuals
Add to My Manuals
Save this manual to your list of manuals |
Page 4 highlights
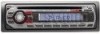
Welcome ! Thank you for purchasing this Sony Compact Disc Player. You can enjoy your boating with the following functions. • CD playback You can play CD-DA (also containing CD TEXT) and CD-R/CD-RW (MP3/WMA files (page 15)). Type of discs Label on the disc CD-DA MP3 WMA • Radio reception - You can store up to 6 stations per band. CDX-M10: FM1, FM2, FM3, AM1 and AM2 CDX-MR10: FM1, FM2, FM3, MW and LW - BTM (Best Tuning Memory): The unit selects strong signal stations and stores them. • RDS services - You can listen to FM stations with the Radio Data System (RDS) in Europe. (CDX-MR10) • Sound adjustment - EQ3 stage2: You can choose any one of 7 preset equalizer curves. • Auxiliary equipment connection An AUX input jack on the front of the unit allows connection of a portable audio device. Getting Started Setting the clock CDX-M10: 12-hour indication CDX-MR10: 24-hour indication 1 Press and hold the select button. The setup display appears. 2 Press the select button repeatedly until "CLOCK-ADJ" appears. 3 Press (SEEK) +. The hour indication flashes. 4 Rotate the volume control dial to set the hour and minute. To move the digital indication, press (SEEK) -/+. 5 Press the select button. The setup is complete and the clock starts. To display the clock, press (DSPL). Press (DSPL) again to return to the previous display. Tip You can set the clock automatically with the RDS feature (page 10). (CDX-MR10) Detaching the front panel You can detach the front panel of this unit to prevent theft. Caution alarm If you turn the ignition switch to the OFF position without detaching the front panel, the caution alarm will sound for a few seconds. The alarm will only sound if the built-in amplifier is used. 1 Press (OFF). The unit is turned off. 2 Press , then pull it off towards you. Notes • Do not drop or put excessive pressure on the front panel and display window. • Do not subject the front panel to heat/high temperature or moisture. Avoid leaving it in a 4 moored boat.
-
 1
1 -
 2
2 -
 3
3 -
 4
4 -
 5
5 -
 6
6 -
 7
7 -
 8
8 -
 9
9 -
 10
10 -
11
-
12
-
13
-
14
-
15
-
16
-
17
-
18
-
19
-
20
-
21
-
22
-
23
-
24
-
25
-
26
-
27
-
28
-
29
-
30
-
31
-
32
-
33
-
34
-
35
-
36
-
37
-
38
-
39
-
40
-
41
-
42
-
43
-
44
-
45
-
46
-
47
-
48
-
49
-
50
-
51
-
52
-
53
-
54
-
55
-
56
-
57
-
58
-
59
-
60
-
61
-
62
-
63
-
64
-
65
-
66
-
67
-
68
-
69
-
70
-
71
-
72
-
73
-
74
-
75
-
76
-
77
-
78
-
79
-
80
-
81
-
82
-
83
-
84
-
85
-
86
-
87
-
88
-
89
-
90
-
91
-
92
-
93
-
94
-
95
-
96
-
97
-
98
-
99
-
100
-
101
-
102
-
103
-
104
-
105
-
106
-
107
-
108
-
109
-
110
-
111
-
112
-
113
-
114
-
115
-
116
 |
 |
