Sony DAV-HDX266 Operating Instructions - Page 70
Using the Setup Display, The Control Menu display appears.
 |
View all Sony DAV-HDX266 manuals
Add to My Manuals
Save this manual to your list of manuals |
Page 70 highlights
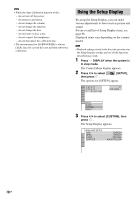
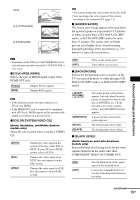
Note • While the Auto Calibration function works: - do not turn off the power. - do not press any button. - do not change the volume. - do not change the function. - do not change the disc. - do not insert or eject a disc. - do not connect the headphones. - do not disconnect the calibration mic. • The measurement for [SUBWOOFER] is always [YES] since the system does not perform subwoofer calibration. Using the Setup Display By using the Setup Display, you can make various adjustments to items such as picture and sound. For an overall list of Setup Display items, see page 98. Displayed items vary depending on the country model. Note • Playback settings stored in the disc take priority over the Setup Display settings and not all the functions described may work. 1 Press DISPLAY when the system is in stop mode. The Control Menu display appears. 2 Press X/x to select [SETUP], then press . The options for [SETUP] appear. 1 2 ( 2 7 ) 1 8 ( 3 4 ) T 0:00:02 DVD VIDEO QUICK QUICK CUSTOM RESET BNR 3 Press X/x to select [CUSTOM], then press . The Setup Display appears. LANGUAGE SETUP OSD: MENU: AUDIO: SUBTITLE: ENGLISH ENGLISH ORIGINAL AUDIO FOLLOW 70GB
-
 1
1 -
2
-
3
-
4
-
5
-
6
-
7
-
8
-
9
-
10
-
11
-
12
-
13
-
14
-
15
-
16
-
17
-
18
-
19
-
20
-
21
-
22
-
23
-
24
-
25
-
26
-
27
-
28
-
29
-
30
-
31
-
32
-
33
-
34
-
35
-
36
-
37
-
38
-
39
-
40
-
41
-
42
-
43
-
44
-
45
-
46
-
47
-
48
-
49
-
50
-
51
-
52
-
53
-
54
-
55
-
56
-
57
-
58
-
59
-
60
-
61
-
62
-
63
-
64
-
 65
65 -
 66
66 -
 67
67 -
 68
68 -
 69
69 -
 70
70 -
 71
71 -
 72
72 -
 73
73 -
 74
74 -
 75
75 -
76
-
77
-
78
-
79
-
80
-
81
-
82
-
83
-
84
-
85
-
86
-
87
-
88
-
89
-
90
-
91
-
92
-
93
-
94
-
95
-
96
-
97
-
98
-
99
-
100
-
101
-
102
-
103
-
104
 |
 |