Sony DCR-SR300 Handycam® Handbook - Page 80
To perform [One Touch Disc Burn] on, To perform [DISC BURN] on the [USB - handycam hdd camcorder
 |
View all Sony DCR-SR300 manuals
Add to My Manuals
Save this manual to your list of manuals |
Page 80 highlights
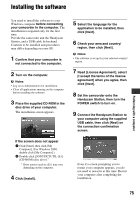
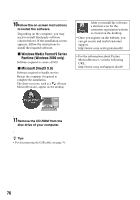
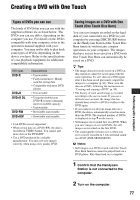
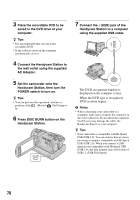
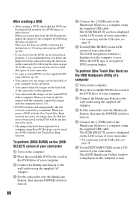
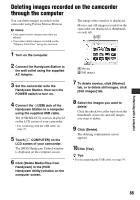
After creating a DVD • After creating a DVD, check that the DVD can be played back properly on a DVD player or other devices. When you cannot play back the DVD properly, import the images to the computer by following the steps on page 81. Then save the data on a DVD, following the instructions in "Creating and copying a DVD" (p. 90). • If you check that the DVD can be played back properly, it is recommended that you delete the images from the camcorder using the functions on the camcorder by following the steps on page 38. In this way, you can increase the free hard disk space of your camcorder. • To copy a created DVD, use the supplied DVD copy software (p. 92). • You cannot save the images on the hard disk of your computer in this operation. • You cannot delete the images on the hard disk of the camcorder in this operation. • You cannot edit the images on the created DVD with a computer. When you want to edit the images with the computer, import the images onto the computer first (p. 81). • If DVD creation ends unexpectedly, the last correctly saved file is completed. When you create a DVD with the One Touch Disc Burn function next time, the image data file that has not yet been saved on the DVD will be the first one to be saved. • The images that have been imported to a computer using Easy PC Back-up, can be saved on a DVD with the One Touch Disc Burn function. To perform [DISC BURN] on the [USB SELECT] screen of your camcorder 1 Turn on the computer. 2 Place the recordable DVD to be saved in the DVD drive of your computer. 3 Connect the Handycam Station to the wall outlet using the supplied AC Adaptor. 4 Set the camcorder onto the Handycam Station, then turn the POWER switch to turn on. 80 5 Connect the (USB) jack of the Handycam Station to a computer using the supplied USB cable. The [USB SELECT] screen is displayed on the LCD screen of your camcorder. • For connecting with the USB cable, see page 78. 6 Touch [DISC BURN] on the LCD screen of your camcorder. The DVD recognition window is displayed on the computer screen. When the DVD type is recognized, DVD creation begins. To perform [One Touch Disc Burn] on the HDD Handycam Utility of a computer 1 Turn on the computer. 2 Place the recordable DVD to be saved in the DVD drive of your computer. 3 Connect the Handycam Station to the wall outlet using the supplied AC Adaptor. 4 Set the camcorder onto the Handycam Station, then turn the POWER switch to turn on. 5 Connect the (USB) jack of the Handycam Station to a computer using the supplied USB cable. The [USB SELECT] screen is displayed on the LCD screen of your camcorder. • For connecting with the USB cable, see page 78. 6 Touch [ COMPUTER] on the LCD screen of your camcorder. The [HDD Handycam Utility] window is displayed on the computer screen.
-
 1
1 -
2
-
3
-
4
-
5
-
6
-
7
-
8
-
9
-
10
-
11
-
12
-
13
-
14
-
15
-
16
-
17
-
18
-
19
-
20
-
21
-
22
-
23
-
24
-
25
-
26
-
27
-
28
-
29
-
30
-
31
-
32
-
33
-
34
-
35
-
36
-
37
-
38
-
39
-
40
-
41
-
42
-
43
-
44
-
45
-
46
-
47
-
48
-
49
-
50
-
51
-
52
-
53
-
54
-
55
-
56
-
57
-
58
-
59
-
60
-
61
-
62
-
63
-
64
-
65
-
66
-
67
-
68
-
69
-
70
-
71
-
72
-
73
-
74
-
 75
75 -
 76
76 -
 77
77 -
 78
78 -
 79
79 -
 80
80 -
 81
81 -
 82
82 -
 83
83 -
 84
84 -
 85
85 -
86
-
87
-
88
-
89
-
90
-
91
-
92
-
93
-
94
-
95
-
96
-
97
-
98
-
99
-
100
-
101
-
102
-
103
-
104
-
105
-
106
-
107
-
108
-
109
-
110
-
111
-
112
-
113
-
114
-
115
-
116
-
117
-
118
-
119
-
120
-
121
-
122
-
123
-
124
-
125
-
126
-
127
-
128
-
129
-
130
-
131
 |
 |