Sony DCR-SR46 Operating Guide - Page 18
Other parts and functions of the camcorder, Recording/Playback - remote
 |
View all Sony DCR-SR46 manuals
Add to My Manuals
Save this manual to your list of manuals |
Page 18 highlights
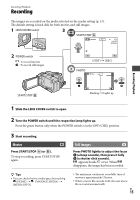
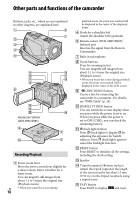
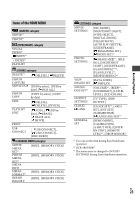
Other parts and functions of the camcorder Buttons, jacks, etc., which are not explained in other chapters, are explained here. Handycam Station (DCR-SR65/SR85) Recording/Playback Power zoom lever Move the power zoom lever slightly for a slower zoom. Move it further for a faster zoom. You can magnify still images from about 1.1 to 5 times the original size (Playback zoom). US When you touch the screen during 18 playback zoom, the point you touched will be displayed in the center of the displayed frame. Hook for a shoulder belt Attach the shoulder belt (optional). Remote sensor (DCR-SR65/SR85)/ Infrared port Receives the signal from the Remote Commander. Built-in microphone Zoom buttons Press for zooming in/out. You can magnify still images from about 1.1 to 5 times the original size (Playback zoom). When you touch the screen during playback zoom, the point you touched will be displayed in the center of the LCD screen. (DISC BURN) button Create a disc by connecting the camcorder to a computer. For details, see "PMB Guide" (p. 26). DISP/BATT INFO button You can switch the screen display when you press while the power is set to on. When you press while the power is set to OFF (CHG), you can check the remaining battery. (back light) button Press (back light) to display for adjusting the exposure for backlit subjects. Press (back light) again to cancel the backlight function. RESET button Press RESET to initialize all the settings, including the clock setting. Speaker Tripod receptacle (Bottom surface) Attach the tripod (optional: the length of the screw must be less than 5.5 mm (7/32 in.)) to the tripod receptacle using a tripod screw. EASY button Press EASY to display and most
-
 1
1 -
2
-
3
-
4
-
5
-
6
-
7
-
8
-
9
-
10
-
11
-
12
-
 13
13 -
 14
14 -
 15
15 -
 16
16 -
 17
17 -
 18
18 -
 19
19 -
 20
20 -
 21
21 -
 22
22 -
 23
23 -
24
-
25
-
26
-
27
-
28
-
29
-
30
-
31
-
32
-
33
-
34
-
35
-
36
-
37
-
38
-
39
-
40
-
41
-
42
-
43
-
44
-
45
-
46
-
47
-
48
-
49
-
50
-
51
-
52
-
53
-
54
-
55
-
56
-
57
-
58
-
59
-
60
-
61
-
62
-
63
-
64
-
65
-
66
-
67
-
68
 |
 |
