Sony DCR-SR87 Operating Guide - Page 29
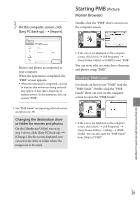
Changing the destination drive or folder for movies and photos, Starting PMB (Picture Motion Browser)
 |
UPC - 027242762855
View all Sony DCR-SR87 manuals
Add to My Manuals
Save this manual to your list of manuals |
Page 29 highlights
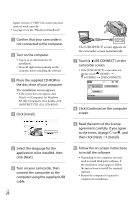
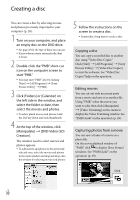
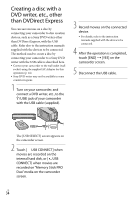
3 On the computer screen, click [Easy PC Back-up] [Import]. Starting PMB (Picture Motion Browser) Double-click the "PMB" short-cut icon on the computer screen. Movies and photos are imported to your computer. When the operation is completed, the "PMB" screen appears. When the operation is completed, a screen to indicate that movies are being analyzed may appear. It may take a long time to analyze movies. In the meantime, you can operate "PMB." If the icon is not displayed on the computer screen, click [Start] [All Programs] [Sony Picture Utility] [PMB] to start "PMB." You can view, edit, or create discs of movies and photos using "PMB." Reading "PMB Guide" For details on how to use "PMB," read the "PMB Guide." Double-click the "PMB Guide" short-cut icon on the computer screen to open the "PMB Guide." See "PMB Guide" on importing selected movies and photos (p. 29). Changing the destination drive or folder for movies and photos On the [Handycam Utility] screen in step 3 above, click [Easy PC Back-up] [Change]. On the screen displayed, you can select the drive or folder where the images are to be saved. If the icon is not displayed on the computer screen, click [Start] [All Programs] [Sony Picture Utility] [Help] [PMB Guide]. You can also open the "PMB Guide" from [Help] of "PMB." Saving movies and photos with a computer US 29
-
 1
1 -
2
-
3
-
4
-
5
-
6
-
7
-
8
-
9
-
10
-
11
-
12
-
13
-
14
-
15
-
16
-
17
-
18
-
19
-
20
-
21
-
22
-
23
-
 24
24 -
 25
25 -
 26
26 -
 27
27 -
 28
28 -
 29
29 -
 30
30 -
 31
31 -
 32
32 -
 33
33 -
 34
34 -
35
-
36
-
37
-
38
-
39
-
40
-
41
-
42
-
43
-
44
-
45
-
46
-
47
-
48
-
49
-
50
-
51
-
52
-
53
-
54
-
55
-
56
-
57
-
58
-
59
-
60
-
61
-
62
-
63
-
64
-
65
-
66
-
67
-
68
-
69
-
70
-
71
-
72
-
73
-
74
-
75
-
76
-
77
-
78
-
79
-
80
-
81
-
82
-
83
-
84
-
85
-
86
-
87
-
88
-
89
-
90
-
91
-
92
-
93
-
94
-
95
-
96
-
97
-
98
-
99
-
100
-
101
-
102
-
103
-
104
-
105
-
106
-
107
-
108
-
109
-
110
-
111
-
112
-
113
-
114
-
115
-
116
 |
 |
