Sony DCR-TRV130 Operating Instructions - Page 86
In the playback mode, Types of trouble and their solutions, Symptom, Cause and/or Corrective Actions
 |
UPC - 027242586154
View all Sony DCR-TRV130 manuals
Add to My Manuals
Save this manual to your list of manuals |
Page 86 highlights
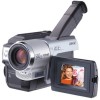
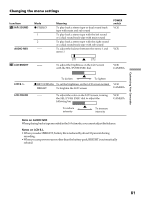
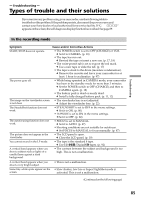
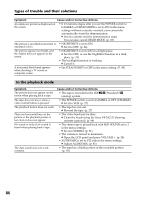
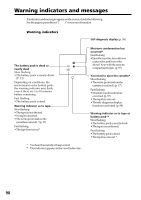
Types of trouble and their solutions Symptom Cause and/or Corrective Actions An unknown picture is displayed on the screen. • If 10 minutes elapse after you set the POWER switch to CAMERA or DEMO MODE is set to ON in the menu settings without a cassette inserted, your camcorder automatically starts the demonstration. c Insert a cassette and the demonstration stops. You can also cancel DEMO MODE. (p. 83) The picture is recorded in incorrect or • NIGHTSHOT is set to ON. unnatural colors. c Set it to OFF. (p. 24) The picture appears too bright, and the subject does not appear on the screen. • NIGHTSHOT is set to ON in a bright place. c Set it to OFF, or use the NightShot function in a dark place. (p. 24) • The backlight function is working. c Cancel it. A horizontal black band appears when shooting a TV screen or computer screen. • Set STEADYSHOT to OFF in the menu setting. (P. 80) In the playback mode Symptom The picture does not appear on the screen when playing back a tape. The tape does not move when a video control button is pressed. The playback button does not work. There are horizontal lines on the picture or the playback picture is not clear or does not appear. No sound or only a low sound is heard when playing back a tape. The date search does not work correctly. Cause and/or Corrective Actions • The tape is recorded in the Hi8 (analog) system. /Standard 8 • The POWER switch is set to CAMERA or OFF (CHARGE). c Set it to VCR. (p. 27) • The tape has run out. c Rewind the tape. (p. 27) • The video head may be dirty. c Clean the heads using the Sony V8-25CLD cleaning cassette (optional). (p. 98) • The stereo tape is played back with HiFi SOUND set to 2 in the menu settings. c Set it to STEREO. (p. 81) • The volume is turned to minimum. c Open the LCD panel and press VOLUME +. (p. 24) • AUDIO MIX is set to ST2 side in the menu settings. c Adjust AUDIO MIX. (p. 81) • The tape has a blank portion in the recorded portion (p. 59) 86
-
 1
1 -
2
-
3
-
4
-
5
-
6
-
7
-
8
-
9
-
10
-
11
-
12
-
13
-
14
-
15
-
16
-
17
-
18
-
19
-
20
-
21
-
22
-
23
-
24
-
25
-
26
-
27
-
28
-
29
-
30
-
31
-
32
-
33
-
34
-
35
-
36
-
37
-
38
-
39
-
40
-
41
-
42
-
43
-
44
-
45
-
46
-
47
-
48
-
49
-
50
-
51
-
52
-
53
-
54
-
55
-
56
-
57
-
58
-
59
-
60
-
61
-
62
-
63
-
64
-
65
-
66
-
67
-
68
-
69
-
70
-
71
-
72
-
73
-
74
-
75
-
76
-
77
-
78
-
79
-
80
-
 81
81 -
 82
82 -
 83
83 -
 84
84 -
 85
85 -
 86
86 -
 87
87 -
 88
88 -
 89
89 -
 90
90 -
 91
91 -
92
-
93
-
94
-
95
-
96
-
97
-
98
-
99
-
100
-
101
-
102
-
103
-
104
-
105
-
106
-
107
-
108
-
109
-
110
-
111
-
112
 |
 |