Sony DCRDVD610 Operating Guide - Page 99
Recommended USB cable connection, To disconnect the USB cable, Performing with Your Computer - to windows media
 |
UPC - 027242727700
View all Sony DCRDVD610 manuals
Add to My Manuals
Save this manual to your list of manuals |
Page 99 highlights
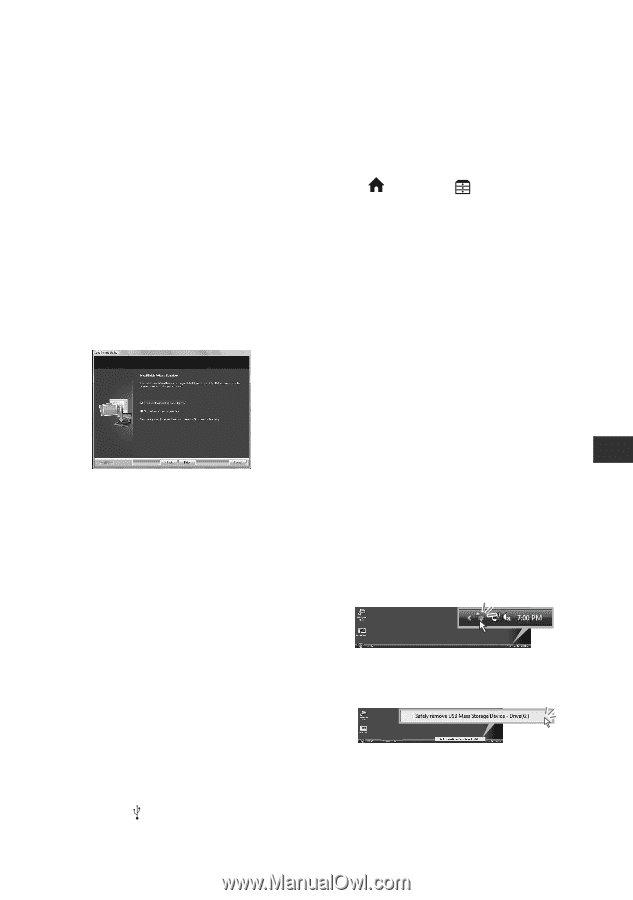
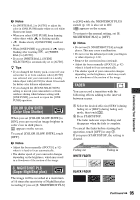
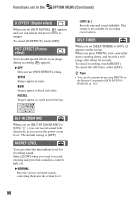
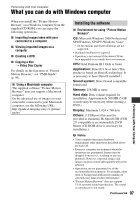
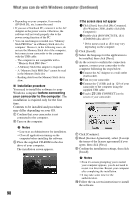
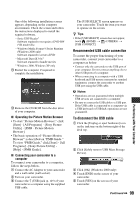
One of the following installation screens appears, depending on the computer environment. Check the screen and follow the instructions displayed to install the required software. - Sonic UDF Reader* Software required to recognize a DVD-RW (VR mode) disc - Windows Media Format 9 Series Runtime (Windows 2000 only) Software required to create a DVD - Microsoft DirectX 9.0c* Software required to handle movies * Windows 2000, Windows XP only qa Restart the computer if required to complete the installation. qs Remove the CD-ROM from the disc drive of your computer. x Operating the Picture Motion Browser • To start "Picture Motion Browser," click [Start] - [All Programs] - [Sony Picture Utility] - [PMB - Picture Motion Browser]. • The basic operation of "Picture Motion Browser" is described on "PMB Guide." To view "PMB Guide," click [Start] - [All Programs] - [Sony Picture Utility] [Help] - [PMB Guide]. x Connecting your camcorder to a computer To connect your camcorder to a computer, follow the steps below. 1 Connect the AC Adaptor to your camcorder and a wall outlet (wall socket). 2 Turn on your camcorder. 3 Connect the (USB) jack (p. 129) of your camcorder to a computer using the supplied USB cable. The [USB SELECT] screen appears on your camcorder. Touch the item you want to operate on the screen. z Tips • If the [USB SELECT] screen does not appear, touch (HOME) t (OTHERS) t [USB CONNECT]. Recommended USB cable connection To assure the proper functioning of your camcorder, connect your camcorder to a computer as below. • Connect only the camcorder to the USB port of your computer. Do not connect anything else to other USB ports of a computer. • When connecting to a computer with a USB keyboard and USB mouse connected as standard equipment, connect the camcorder to another USB port using the USB cable. b Notes • Operations are not guaranteed when multiple USB devices are connected to a computer. • Be sure to connect the USB cable to a USB port. If the USB cable is connected to a computer via a USB keyboard or USB hub, operations are not guaranteed. To disconnect the USB cable 1 Click the [Unplug or eject hardware] icon on the task tray on the bottom right of the desk top. 2 Click [Safely remove USB Mass Storage Device]. 3 Click [OK] (Windows 2000 only). 4 Touch [END] on the screen of your camcorder. 5 Touch [YES] on the screen of your camcorder. Continued , 99 Performing with Your Computer
-
 1
1 -
2
-
3
-
4
-
5
-
6
-
7
-
8
-
9
-
10
-
11
-
12
-
13
-
14
-
15
-
16
-
17
-
18
-
19
-
20
-
21
-
22
-
23
-
24
-
25
-
26
-
27
-
28
-
29
-
30
-
31
-
32
-
33
-
34
-
35
-
36
-
37
-
38
-
39
-
40
-
41
-
42
-
43
-
44
-
45
-
46
-
47
-
48
-
49
-
50
-
51
-
52
-
53
-
54
-
55
-
56
-
57
-
58
-
59
-
60
-
61
-
62
-
63
-
64
-
65
-
66
-
67
-
68
-
69
-
70
-
71
-
72
-
73
-
74
-
75
-
76
-
77
-
78
-
79
-
80
-
81
-
82
-
83
-
84
-
85
-
86
-
87
-
88
-
89
-
90
-
91
-
92
-
93
-
 94
94 -
 95
95 -
 96
96 -
 97
97 -
 98
98 -
 99
99 -
 100
100 -
 101
101 -
 102
102 -
 103
103 -
 104
104 -
105
-
106
-
107
-
108
-
109
-
110
-
111
-
112
-
113
-
114
-
115
-
116
-
117
-
118
-
119
-
120
-
121
-
122
-
123
-
124
-
125
-
126
-
127
-
128
-
129
-
130
-
131
-
132
-
133
-
134
-
135
-
136
-
137
-
138
-
139
-
140
-
141
-
142
-
143
-
144
-
145
-
146
-
147
-
148
-
149
-
150
-
151
-
152
-
153
-
154
-
155
-
156
-
157
-
158
-
159
 |
 |