Sony DPP-FP90 Read This First (Large File - 18.03 MB) - Page 1
Sony DPP-FP90 Manual
 |
View all Sony DPP-FP90 manuals
Add to My Manuals
Save this manual to your list of manuals |
Page 1 highlights
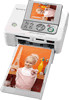
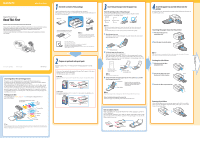
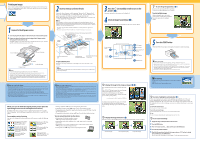
DPP-FP70/FP90 Digital Photo Printer Read This First Welcome to the Sony Digital Photo Printer DPP-FP70/FP90. Please read this side of this leaflet first and follow the procedures to set up your printer: Inserting the paper tray feeding print paper and ink ribbon makes your printer ready for printing. After you finish setup, read the reverse side to print an image from a memory card. You have now done the basic printing! To enjoy a variety of printing or customize your printer, please read the operating instructions also supplied. © 2007 Sony Corporation Printed in China 3-097-070-12(1) Learning about the printing process The printer is a dye sublimation printer using an ink ribbon printing process. As illustrated below, the ink ribbon is made up of three colored panels (yellow, magenta, and cyan), and one clear lamination panel for overcoating. When printing begins, the thermal print head heats up as it passes over the film, causing the dyes to vaporize and permeate the surface of the print paper. After yellow, magenta, and cyan have been laid onto the print paper, the final cycle lays the laminate layer, which protects the printed surface. These four-panel printing cycles are required for each print. An ink ribbon contains 40 sets of four panels. After you print 40 sheets of print paper, the ink ribbon also runs out. Printing process flow Until printing finishes, yellow, magenta, cyan, and transparent laminate layers are processed as follows: The direction ink film moves inside the ink ribbon Laminate film Cyan Magenta Yellow Print Paper Tip During printing, print paper moves back and forth along the thermal head of the printer, which is why the print paper is partially ejected several times from the rear and front paper outlets. After the final cycle of laminate layer finishes, the print paper is ejected onto the paper tray. 1 Check the contents of the package. Open the package and check to see that the following are contained. (Illustrations used in this leaflet are of DPP-FP70. The button locations and names of the DPP-FP90 are identical. ) Paper tray Printer AC adaptor AC power cord Cleaning cartridge/Cleaning sheet (Used for cleaning inside the printer.) Note The AC power cord illustrated is for 120V only. The plug shape and specifications of the AC power cord differ depending on the region you purchased the printer. • Operating Instructions • Read This First (this leaflet) • Warranty (In some regions, the warranty is not supplied.) • Sony End User Software License Agreement • CD-ROM (Sony DPP-FP70/FP90 Printer Driver Software Ver.1.0 and Picture Motion Browser Ver.2.0) 2 Prepare an optional color print pack. To print an image, you need a color print pack containing print paper and ink ribbon. Please use a Sony optional color print pack designed for the printer. Other types of print packs may cause malfunctions. The following print packs are available: SVM-F40P You can make 40 sheets of post card (4 6 inch/10 15 cm) size print. (One ink ribbon, 20-sheetpack 2) Ink ribbon for 40 prints 20 sheets of print paper 20 sheets of print paper SVM-F120P You can make 120 sheets of post card (4 6 inch/10 15 cm) size print. (Three ink ribbons each for 40 prints, 20-sheet-pack 6) Ink ribbon for 40 prints 20 sheets of print paper 20 sheets of print paper 3 3 Insert the print paper into the paper tray. Check the printing surface of the print paper Set the print paper with the printing surface facing up. The glossy surface without imprints is the printing surface. Reverse side Printing surface Notes • The reverse side imprints design may be changed. The side with "Sony" logos is the reverse side. • Do not touch the printing surface. Fingerprints on the printing surface may result in imperfect printing. • Do not bend the print paper, or cut the print paper from perforations before printing. 1 Open the paper tray cover. Hold the parts on both sides of the paper tray cover (shown with arrows) and open the paper tray cover. Feeding direction 2 Set the print paper into the paper tray. You can set up to 20 sheets of print paper. Riffle the print paper thoroughly. Then insert the print paper into the arrow direction with the protective sheet facing up. Then remove the protective sheet. If there is no protective sheet, insert the print paper with its printing surface (the side with no imprint) facing up. Protective sheet (You cannot print on a protective sheet.) Note Do not touch the printing surface. Protective sheet Feeding direction 3 Stretch out the slide cover of the paper tray cover if it is opened (), and then close the paper tray cover (). Slide cover Paper holder Keep the slide cover stretched out. When you insert the paper tray into the printer, the slide cover opens automatically. Note Do not touch the paper holder of the paper tray. Otherwise the paper will not be fed correctly. When storing the print paper in the paper tray Remove the paper tray from the printer and shut the slide cover. Note on number of sheets With an ink ribbon, you can print the total of 40 sheets of the print paper, 2 packs of 20-sheet print paper. When you feed the print paper, please make sure that the total number of sheets in the paper tray does not exceed 20. When 2 packs of 20-sheet print paper runs out, the ink ribbon should also run out. ink ribbon for 40 print 20 sheets of print paper 20 sheets of print paper 4 Insert the paper tray and ink ribbon into the printer. Insert the paper tray containing the print paper and ink ribbon into the printer in the following directions. Inserting the paper tray into the printer 1 Pull and open the paper tray compartment door. 2 Insert the paper tray into the printer. Note Please insert the paper tray straightly and fully into the printer until it fits into place. If the paper tray is inserted at any angle, the printer may not print properly. Setting the ink ribbon 1 Pull and open the ink ribbon compartment door. 2 Insert the ink ribbon in the arrow Arrow direction until it clicks into place. 3 Close the ink ribbon compartment door. Removing the ink ribbon When the ink ribbon runs out, an message appears on the LCD screen of the printer. Open the ink ribbon compartment door, push up the eject lever, and remove the used ink ribbon. Please read the reverse side to make a print.
-
 1
1 -
 2
2
 |
 |