Sony DPP-FPHD1 Instruction Manual - Page 16
To install the printer vertically, When using the paper protector, supplied - tv
 |
UPC - 718122197620
View all Sony DPP-FPHD1 manuals
Add to My Manuals
Save this manual to your list of manuals |
Page 16 highlights
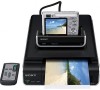
3 Connect the printer to a TV. Connect the printer to the high definition TV with the component video cable and the A/V connecting cable. To install the printer vertically You can attach the stand attachments to the printer and install the printer vertically. Component Component video cable Red White Audio (monaural) A/V connecting cable • When both the Component video cable and the A/V connecting cable are connected, images will be output not via the A/V OUT jack, but via the COMPONENT OUT jack. • Set the "COMPONENT" setting of the camera to "HD(1080i)" beforehand. Connect the printer to the high definition TV with the A/V connecting cable. To the A/V OUT jack Red White Yellow Audio (monaural) A/V connecting cable For details on how to play back on a TV, see page 17. Align v markers on the stand attachment slit and stand attachment. When using the paper protector (supplied) The print paper comes out of the rear side a few times during printing. You can protect the paper ejected from the printer when using the paper protector. The protector also prevents blocking the ventilation holes. PPrecautions • The printer is not disconnected from the AC power source (mains) as long as it is connected to the wall outlet , even if the printer itself has been turned off. • Connect the AC adaptor to an easily accessible wall outlet close by. If some trouble occurs while using the adaptor, immediately shut off the power by disconnecting the plug from the wall outlet. • When you have finished using the AC adaptor, disconnect it from the DC IN 24V jack of the printer. • Do not short the DC plug of the AC adaptor with a metallic object, as this may cause malfunction. • Do not use the AC adaptor in a narrow space, such as the one between the printer and the wall. 16
-
 1
1 -
2
-
3
-
4
-
5
-
6
-
7
-
8
-
9
-
10
-
 11
11 -
 12
12 -
 13
13 -
 14
14 -
 15
15 -
 16
16 -
 17
17 -
 18
18 -
 19
19 -
 20
20 -
 21
21 -
22
-
23
-
24
-
25
-
26
-
27
-
28
-
29
-
30
-
31
-
32
 |
 |
