Sony DPP-FPHD1 Instruction Manual - Page 18
Printing images - review
 |
UPC - 718122197620
View all Sony DPP-FPHD1 manuals
Add to My Manuals
Save this manual to your list of manuals |
Page 18 highlights
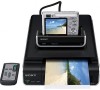
Printing images • You can print images by pressing either the control buttons on the remote control or on the camera. 1 Place the camera on the camera adaptor and turn on the power of the camera. The print menu appears on the screen. 4 Select desired images with the control buttons. 1 Select the images with b/B, and press at the center. 2 Press the MENU button. 3 Select "OK", and press at the center. 5 Set the print mode. You can select from the following print modes: • Printing of the image currently displayed on the screen t To the Step 2 • Printing of multiple selected images t To the Step 3 2 Select "This Image" with the PRINT button or the control buttons on the remote control, and press at the center. Proceed to the Step 5. 3 Select "Multiple Images" with the control buttons on the remote control, and press at the center when selecting images. 18 You can select from the following print modes: • Index print • Border/Borderless print* • Date print * When you specify border print for 16:9 size images, you can print the full images without margins being cut off. (page 30) 6 Select "OK" with the control buttons, and press at the center. The image will be printed. The "Printing..." screen disappears when printing is complete. • For details on printing, refer to the Cyber-shot Handbook. • You can play back and review images on a TV when printing the images. (t page 17) PNotes on printing • Never move or turn off the printer while it is printing; the ink ribbon or paper may become stuck. In case you turn off the power, keep the paper tray inserted and then turn on the printer. If paper being printed remains in the printer, remove the paper that emerged automatically and resume printing from the step 1.
-
 1
1 -
2
-
3
-
4
-
5
-
6
-
7
-
8
-
9
-
10
-
11
-
12
-
 13
13 -
 14
14 -
 15
15 -
 16
16 -
 17
17 -
 18
18 -
 19
19 -
 20
20 -
 21
21 -
 22
22 -
 23
23 -
24
-
25
-
26
-
27
-
28
-
29
-
30
-
31
-
32
 |
 |
