Sony DPP-SV55 Operating Instructions: Basic Operations - Page 1
Sony DPP-SV55 - Ms Printer Manual
 |
View all Sony DPP-SV55 manuals
Add to My Manuals
Save this manual to your list of manuals |
Page 1 highlights
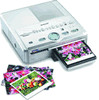
Printing Printing "Memory Stick" or PC card images Printing the selected image You can select an image recorded on the "Memory Stick" or PC card and print it in full-size (standard print). 4 3 2 PICTURE 1 5 Borderless standard print 6 1 Insert a "Memory Stick" or PC card on which you recorded images into the "Memory Stick" or PC card insertion slot. 2 Turn on the printer and television and set the input selector of the television to "VIDEO." The POWER indicator lights in green. 3 Press INPUT SELECT to light "MEMORY STICK" or PC CARD indicator. The printer accesses the "Memory Stick" or PC card, and the recorded images are displayed as thumbnails on the screen. Yellow frame (cursor) MEMORY PC INPUT STICK CARD PC SELECT Note Make sure that ALL and DPOF indicators of the AUTO PRINT are off. If it is lit, press CANCEL to turn it off. 4 Press the arrow (B/b/V/v) button to move the yellow frame (cursor) to the image you want to print, then press ENTER. The image is selected and the area beneath the image turns orange. ENTER PRINT QTY To display another page When multiple pages exist, you can switch pages. To display the next page, move the yellow frame to the bottom line of the image list and press v. To display to the previous page, move the yellow frame to the top line and press V. To cancel the selection Move the yellow frame to the image you want to cancel and press CANCEL. The orange area turns gray and the selection is canceled. Selected image (orange) To display a preview image Move the yellow frame to the desired image, then press PICTURE. The preview of the selected image is displayed. To display the preview of the next image, press b. To display the preview of the previous image, press B. To display the image list again, press PICTURE. The selection is canceled. 5 Press ENTER to set the print quantity. Each time you press ENTER, the print quantity increases. To reset to the previous quantity, press CANCEL. To print multiple images at a time Repeat steps 4 and 5 to select other images and set print quantity for each of them. The number increases. 6 Press PRINT. Printing starts. During printing, the PRINT indicator lights and the printing process bar is displayed on the screen. PRINT To stop printing Press CANCEL. Printing from the next print will be canceled. When you press PRINT while the preview image is displayed An dialog box to ask whether you want to print the image being displayed or all the selected images. Select either of the two options to start printing. 7 When printing ends and the print paper automatically emerges from the paper outlet, remove the paper from the printer. Notes •Avoid getting liquids on the "Memory Stick" or PC card or using them in areas subject to high humidity. Otherwise, data may be rendered unreadable. •When the "MEMORY STICK"/PC CARD indicator is lit, do not eject the "Memory Stick" or PC card. Otherwise, they may crash. •While printing, never move or turn off the printer; the print cartridge or paper may become stuck. If this happens, turn the printer off and on, and resume printing from the beginning. •While printing, the print paper is partially ejected from the paper outlet several times. Never pull out the paper forcibly until the PRINT indicator turns off and the print paper emerges automatically. •Avoid storing the paper with the printed faces touching each other or in contact with rubber or plastic products including vinyl chloride or plasticizer for an extended period of time; the color change or deterioration may occur. •An image which is damaged or has some kind of trouble does not appear in the image list. The file error message appears on the display. If there are no images stored in the "Memory Stick" or PC card, the no file message appears on the display. •Depending on the file type and size of an image, it may take 5 to 60 seconds to display a full-size image on the monitor. •Depending on the type of digital still camera, it may take some time for the thumbnail list to be displayed. •The printer can handle and display up to 999 image files. If there are more than 999 images stored in the "Memory Stick" or PC card, use the computer to display and handle the remaining images. •Depending on the type of digital still camera, the aspect ratio of a recorded image differs, so the image may not be printed in the entire printable area. •Depending on the type of digital still camera, preview images may be displayed along with the primary images in the thumbnail list. The printed quality of the preview images will not be as good as the primary images. Note that if you delete the preview images, the data for the primary images may be damaged. •Depending on the type of digital still camera, an image may be stretched vertically if it has been rotated or processed with your digital still camera. This is not because of trouble with the printer, but because the image was rewritten with your digital still camera. Printing all the images or preset images at one time You can print all the images stored in a "Memory Stick" or PC card at one time. You can also print images preset by your digital still camera (DPOF) at one time. What is "DPOF"? The "DPOF" is a format to record the information necessary for automatically printing images shot with a digital still camera at a printing shop or with a home-use printer. The printer can automatically print the preset number of copies of the images preset for printing with DPOF (Digital Print Order Format). Notes •For details on the preset print settings, refer to the operating instructions of the digital still camera you are using. •Depending on the type of digital still camera and others, the preset printing function supported by the printer, or sometimes the function itself, is not available. 1 Insert a "Memory Stick" or PC card on which you recorded images into the "Memory Stick" or PC card insertion slot. 2 Turn on the printer. The POWER indicator lights in green. To display the images on the screen You can display and check the images to be printed on the screen. Connect the printer and the television and turn on the television. Then set the input selector of the television to "VIDEO." 3 Press INPUT SELECT to light "MEMORY STICK" or PC CARD indicator. The printer accesses the "Memory Stick" or PC card. When you connect your printer to the television, the images are displayed as thumbnails on the screen. 4 Press AUTO PRINT to light ALL indicator for all the images or DPOF indicator for the preset images. AUTO ALL DPOF PRINT When you connect your printer to the television When you select All, all the images in the thumbnail list are displayed with the orange area beneath the image. When you select DPOF, the preset images are displayed with the orange area beneath the image. 5 Press PRINT. Printing starts. When you select All, all the images on a "Memory Stick" or PC card are printed in the order of their image numbers. When you select DPOF, the preset images are printed in the order they have been preset. To stop printing Press CANCEL. Printing from the next print will be canceled. To return to the usual printing mode Press CANCEL to turn off the ALL and DPOF indicators. Printing from your computer When you connect a computer that is powered on to the USB connector of the printer, the PC indicator lights and the printer enters the PC mode. Otherwise, you cannot switch to the PC mode manually by pressing the INPUT SELECT button. For how to install and operate the software, refer to the supplied "Operating Instructions - Software Guide/Additional Information." MEMORY PC INPUT STICK CARD PC SELECT For the customers in the U.S.A. WARNING This equipment has been tested and found to comply with the limits for a Class B digital device, pursuant to Part 15 of the FCC Rules. These limits are designed to provide reasonable protection against harmful interference in a residential installation. This equipment generates, uses, and can radiate radio frequency energy and, if not installed and used in accordance with the instructions, may cause harmful interference to radio communications. However, there is no guarantee that interference will not occur in a particular installation. If this equipment does cause harmful interference to radio or television reception, which can be determined by turning the equipment off and on, the user is encouraged to try to correct the interference by one or more of the following measures: - Reorient or relocate the receiving antenna. - Increase the separation between the equipment and receiver. - Connect the equipment into an outlet on a circuit different from that to which the receiver is connected. - Consult the dealer or an experienced radio/TV technician for help. If you have any questions about this product, you may call: Sony's Business Information Center (BIC) at 1-800-686SONY (7669) or Write to: Sony Customer Information Services Center 6900-29 Daniels Parkway, PMB 330 Fort Myerts, Florida 33912 Declaration of Conformity Trade Name: SONY Model No.: DPP-SV55 Responsible Party: Sony Electronics Inc. Address: 1 Sony Drive, Park Ridge, NJ 07656 U.S.A. Telephone No.: 201-930-6972 This device complies with part 15 of the FCC Rules. Operation is subject to the following two conditions: (1) this device may not cause harmful interference, and (2) this device must accept any interference received, including interference that may cause undesired operation. You are cautioned that any changes or modifications not expressly approved in this manual could void your authority to operate this equipment. The shielded interface cable recommended in this manual must be used with this equipment in order to comply with the limits for a digital device pursuant to Subpart B of Part 15 of FCC Rules. Owner's Record The model and serial numbers are located on the bottom. Record the serial number in the space provided below. Refer to this number whenever you call upon your Sony dealer regarding this product. Model No. DPP-SV55 Serial No. CAUTION To prevent electric shock, match wide blade of plug to wide slot, fully insert. CAUTION The nameplate is located on the bottom enclosure. 3-205-183-11(1) Digital Photo Printer Operating Instructions - Basic Operations Before operating this printer, please read this manual thoroughly and retain it for future reference. This manual explains necessary preparations and basic operations for the printer. For advanced operations, refer to "Operating Instructions - Advanced Operations." For using the supplied software and for additional infromation, refer to "Operating Instructions - Software Guide/Additional Information." DPP-SV55 2000 Sony Corporation WARNING To prevent fire or shock hazard, do not expose the unit to rain or moisture. To avoid electrical shock, do not open the cabinet. Refer servicing to qualified personnel only. ATTENTION: Pictures and/or Sound distortion may occur if this product is positioned in close proximity to equipment emitting electromagnetic radiation. Attention Sony shall assume no responsibility for any accidental or consequential damages or loss of the recording contents which may be caused by use or malfunction of the printer, "Memory Stick" or PC card. Printed in Japan • Microsoft, MS, MS-DOS and Windows® are registered trademarks of Microsoft Corporation in the United States and other countries. • Apple, Macintosh, Power Macintosh, and Mac OS are registered trademarks of Apple Computer, Inc. • Pentium is a registered trademark of Intel Corporation. • "Memory Stick," "MagicGate Memory Stick" and their logo marks are the trademarks of Sony Corporation. • All other companies and product names mentioned herein may be the trademarks or registered trademarks of their respective companies. Furthermore, "™" and "®" are not mentioned in each case in this manual.
-
 1
1 -
 2
2
 |
 |
